Using Reliability Prediction Knowledge Banks
Reliability Prediction Knowledge Banks allow you to create data banks of your Reliability Prediction subsystem information. You can then retrieve that data and automatically insert it into your Reliability Prediction Analyses. Your Reliability Prediction Knowledge Banks grow over time and become an efficient and powerful way to reuse subsystem data from one Reliability Prediction to the next. Subsystem data stored in the Knowledge Bank can be used to update existing Analyses so as to maintain consistency of data across Reliability Predictions.
You can have a single Knowledge Bank, or multiple Knowledge Banks. If you have only one Knowledge Bank, Relyence automatically saves and retrieves data from that Knowledge Bank. If you have more than one Knowledge Bank, you will be asked to select which Knowledge Bank to use when storing Reliability Prediction subsystem information.
Relyence will automatically create the first Knowledge Bank for you with the name Knowledge Bank 1. To rename this Knowledge Bank, while it is open, click Bank Properties from the Sidebar menu. You can rename and create additional Knowledge Banks using the Manage Analyses function.
Opening a Knowledge Bank
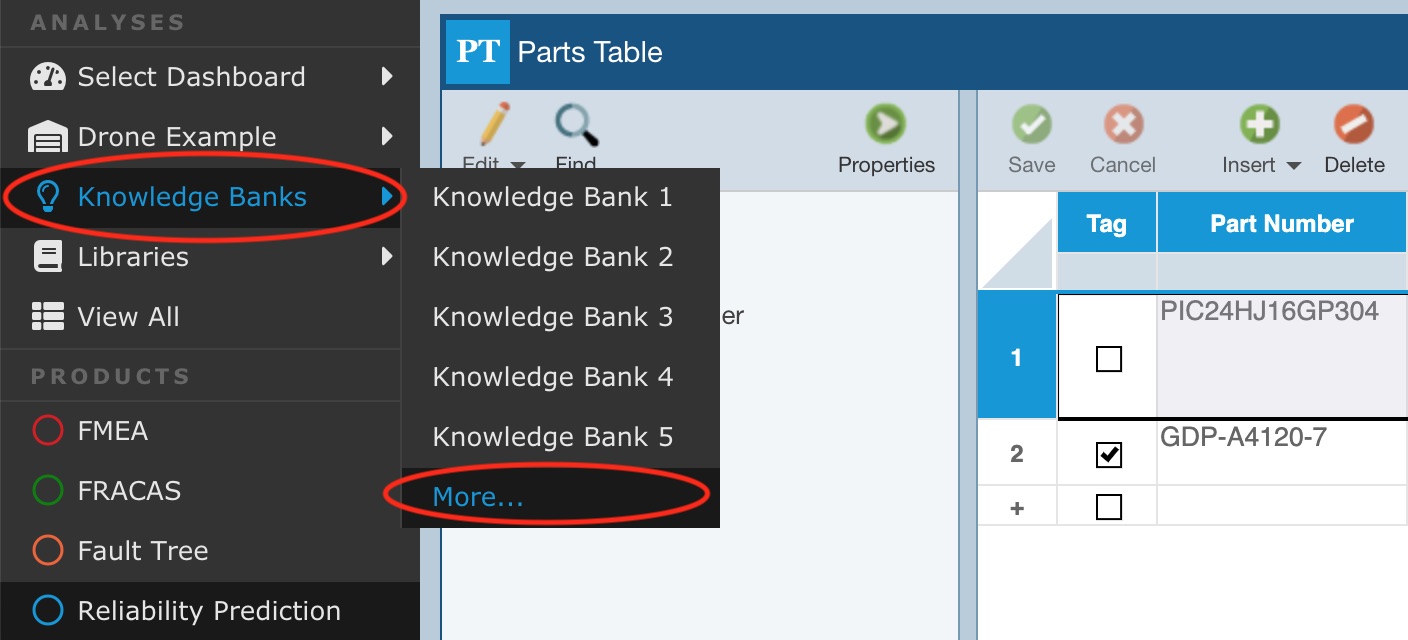
To open a Knowledge Bank, click Knowledge Bank(s) in the Sidebar menu. If only one Knowledge Bank is in use, the Knowledge Bank will be opened.
If multiple Knowledge Banks are in use, the first five, alphabetically by name, will appear in the Knowledge Banks submenu. If the name of the Knowledge Bank appears in the list, click the name to open it. If the name of the Knowledge Bank does not appear, click More... from the submenu.
The Knowledge Bank dialog appears.
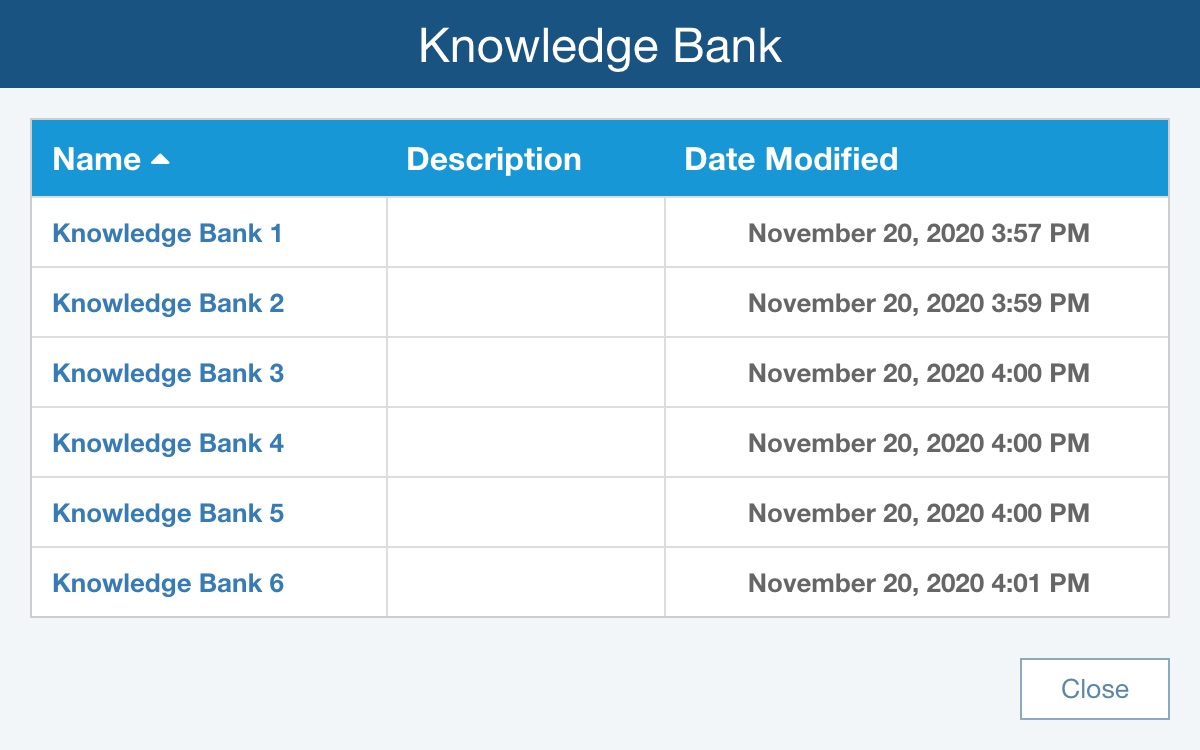
Click the name of the Knowledge Bank to open it.
Knowledge Bank Properties
You can rename a Knowledge Bank, add or modify a Knowledge Bank description, or set the Audit Log option by accessing the Properties of a Knowledge Bank.
Open the Knowledge Bank you wish to update, and click Bank Properties from the Sidebar menu.
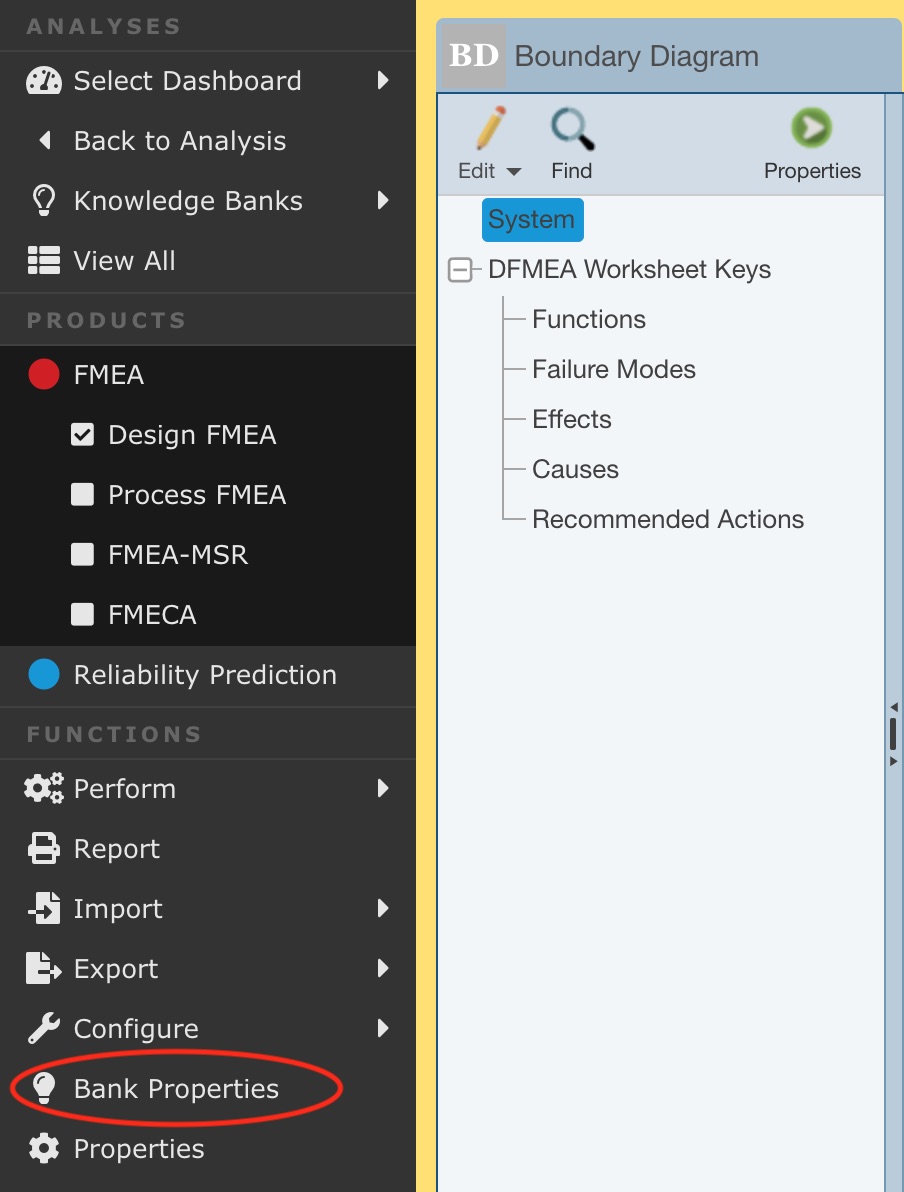
The Knowledge Bank Properties dialog appears.
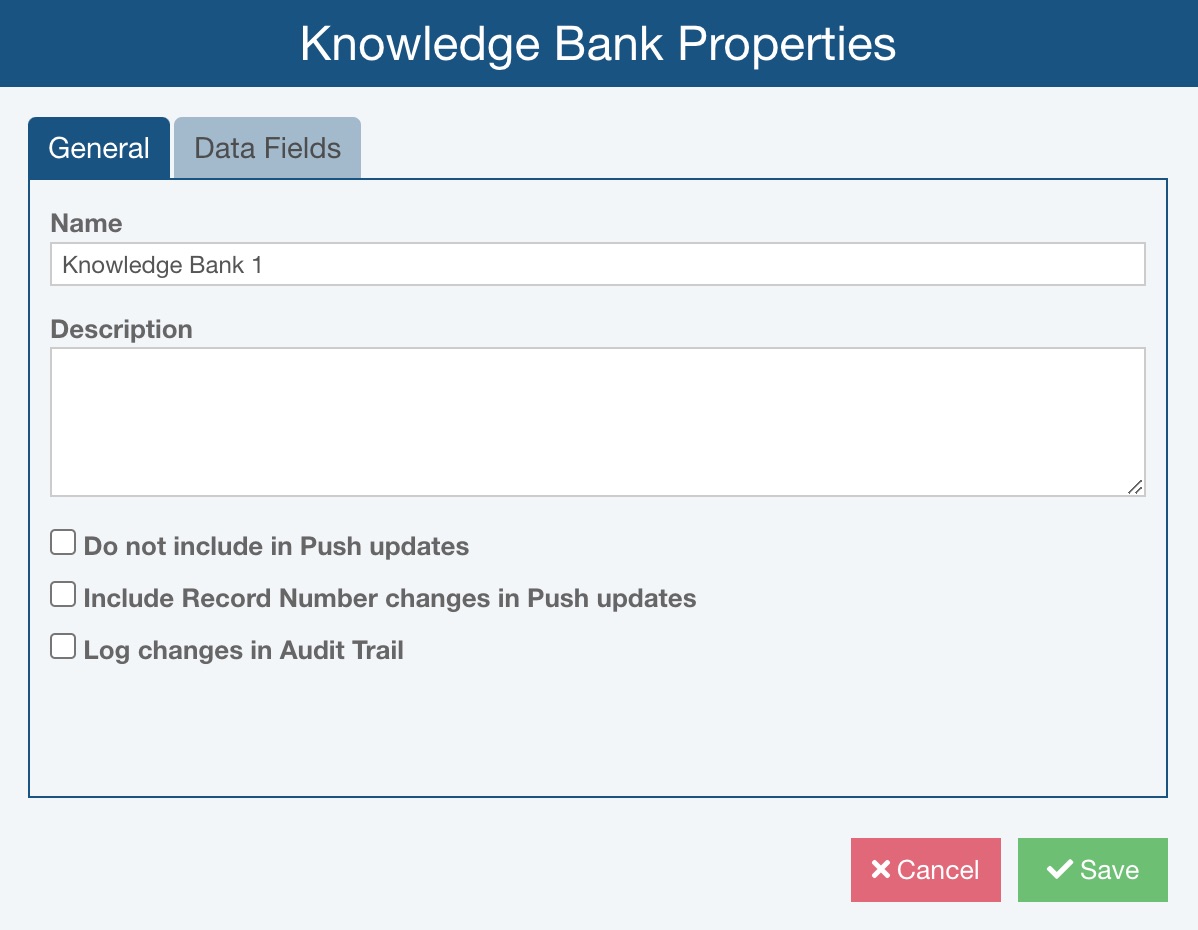
On the General tab, you can enter basic Knowledge Bank properties.
Enter the Name for your Knowledge Bank. Knowledge Bank names must be unique.
Enter a Description, if desired.
Check Do not include in Push updates if you do not want any changes from the Knowledge Bank(s) to propagate to this Knowledge Bank.
Check Include Record Number changes in Push updates if Record Number changes should be included in Push updates. Note that if Record Number changes are pushed, then records in the Knowledge Bank are moved to new locations based on Record Number. This option is cleared by default.
If you are licensed for the Audit Trail capability, use the Log changes in Audit Trail checkbox to enable or disable audit tracking for the Knowledge Bank.
On the Data Fields tab, you can specify Analysis Tree Identifiers and Failure Rate Field details.
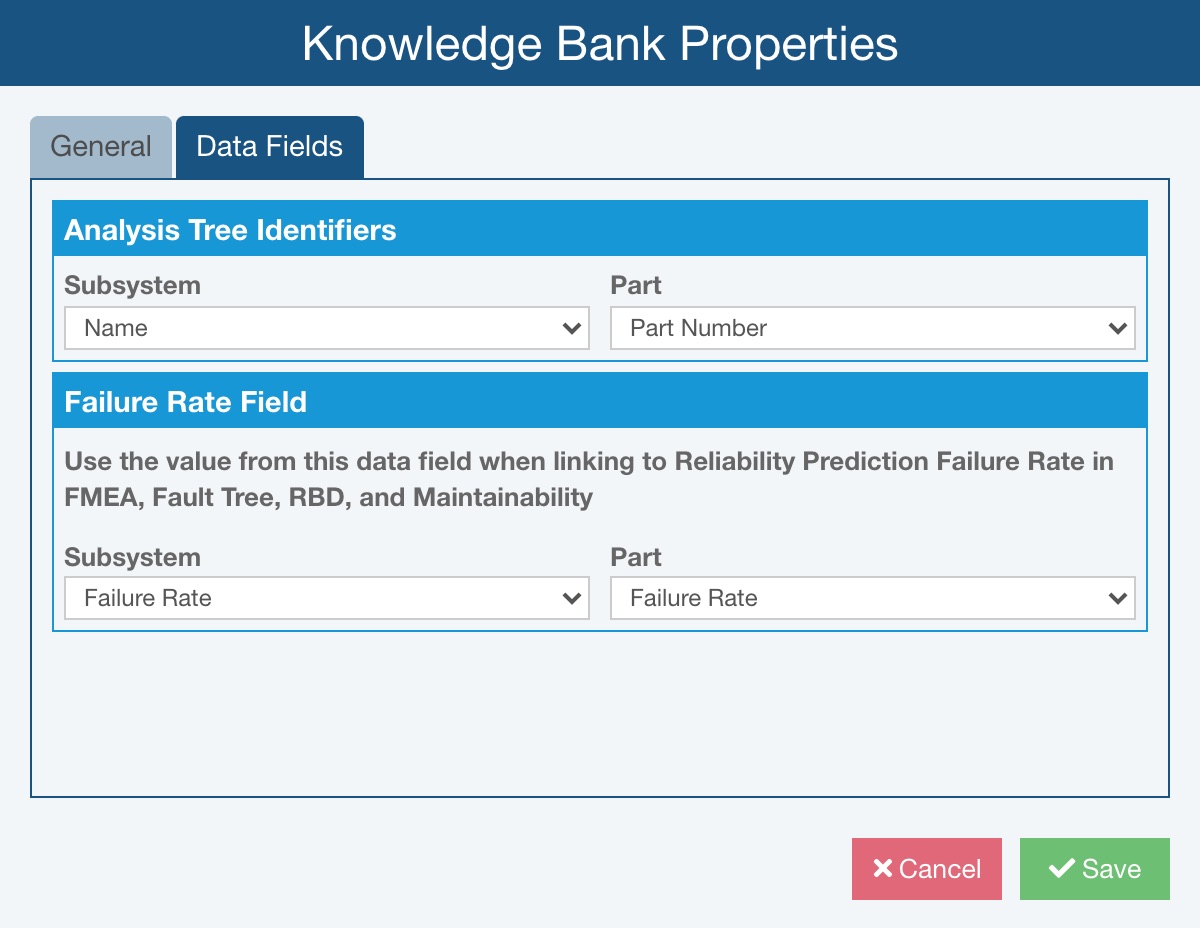
Set Subsystem and Part details in the Analysis Tree Identifiers section. By default, in the Analysis Tree, Relyence shows the Name field for Subsystems and the Part Number field for Parts. If desired, you can select an alternate display field for Subsystems and Parts. If you do choose another display field, the selected field will appear in any place where the Name or Part Number was shown for Subsystems and Parts, respectively.
Set Subsystem and Part details in the Failure Rate Field section.
Note: These property settings only appear if the Knowledge Bank includes Reliability Prediction.
By default, the Failure Rate field is used for items in FMEA, Fault Tree, RBD and Maintainability that are linked to Reliability Prediction Subsystems or Parts. If you would prefer to link to a data field other than the Failure Rate, you can select it here for both Subsystems and Parts using the Subsystem and Part dropdown lists.
Regardless of which field you choose to link to, note that Relyence assumes its units to be the same as the Failure Rate field, which is set via the Failure Rate Units on the Settings from the Account menu. For example, for Parts, if you choose to link to the User Value 1 field, and your Failure Rate Units value is Failures/Million Hours, be certain that your entered or calculated value is in units of Failures/Million Hours.
A special Relyence field, My Reliability Prediction Failure Rate, can be added to applicable Analysis Tree Properties panes, the Parts Table, and the FMECA Worksheet to verify the Failure Rate value that will be used when linking a subsystem or part to FMEA, Fault Tree, RBD or Maintainability data.
Click Save when you are complete.
Adding Reliability Prediction subsystem data directly to a Knowledge Bank
You can directly access a Reliability Prediction Knowledge Bank by clicking Knowledge Bank(s) from the Sidebar menu.
If you are accessing the Knowledge Bank feature for the first time, a Knowledge Bank named Knowledge Bank 1 will be automatically created for you.
If only one Knowledge Bank is in use, it will be opened. If more than one Knowledge Bank is in use, select the Knowledge Bank to open from the submenu.
The Reliability Prediction Knowledge Bank interface operates in the same manner as the Reliability Prediction interface, so the features and functions are the same. Notice that the background when you are in a Knowledge Bank is yellow to make it easy to distinguish from your Reliability Prediction, which has a blue background.
The Tree pane in a Knowledge Bank is very similar to the Analysis Tree pane in an Analysis.
You can directly add Reliability Prediction subsystem data to a Knowledge Bank by using the Knowledge Bank interface if you desire.
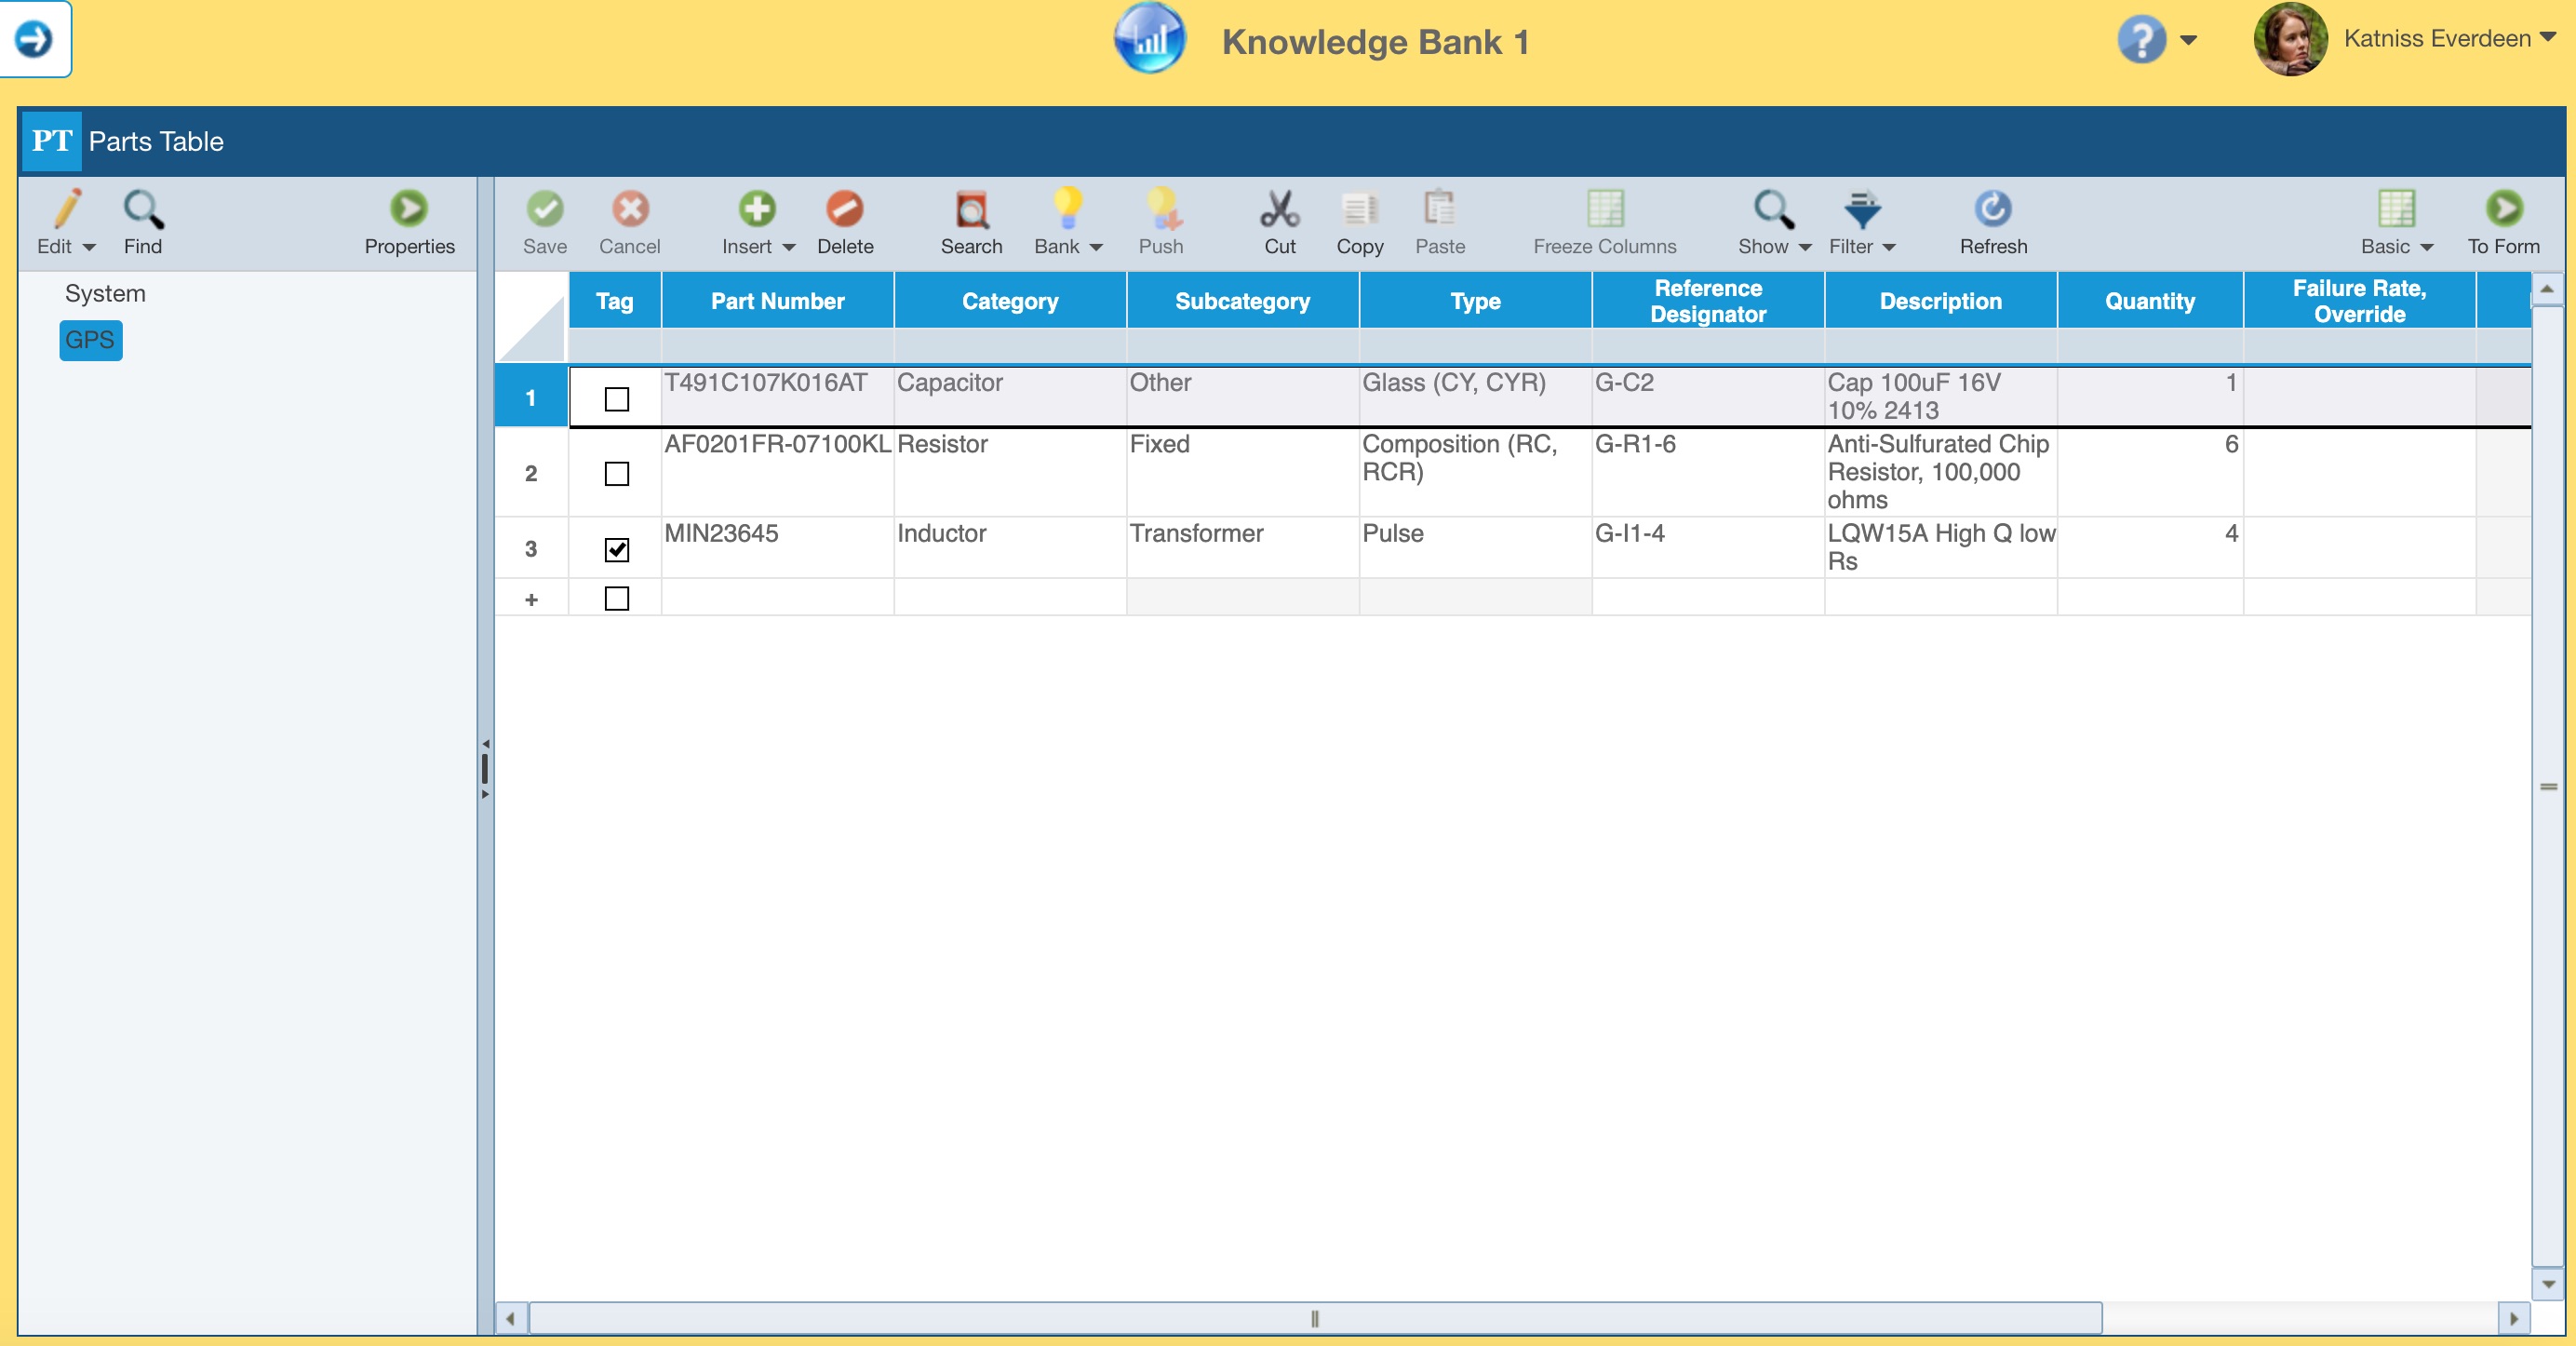
This includes adding data in the Analysis Tree or on the Parts Table.
You can also add data to a Knowledge Bank from another Knowledge Bank using the Search button.
You can tie data from a Knowledge Bank to data in Analyses or data in other Knowledge Banks.
In the case of using data from one Knowledge Bank within another Knowledge Bank, you can ultimately create a hierarchy of Knowledge Banks, if needed.
Click Back to Analysis in the Sidebar menu to return to your Analysis.
Building up Knowledge Banks from your Reliability Predictions
The most common method of building up your Reliability Prediction Knowledge Banks is adding information from a completed Reliability Prediction to it.
When you add a Reliability Prediction subsystem to a Knowledge Bank, all child subsystems and child parts and their data are added to the Knowledge Bank as well.
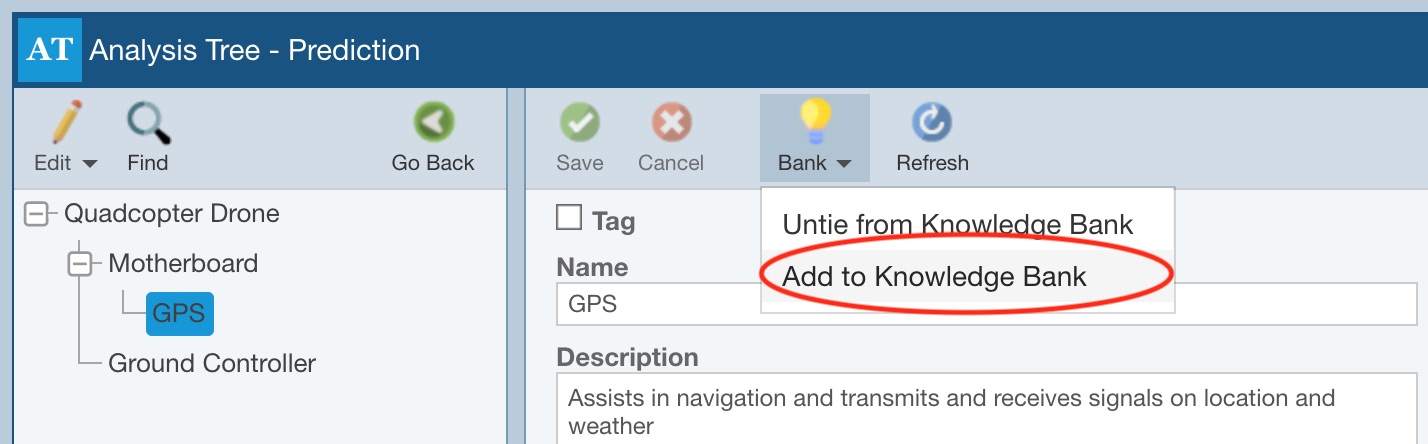
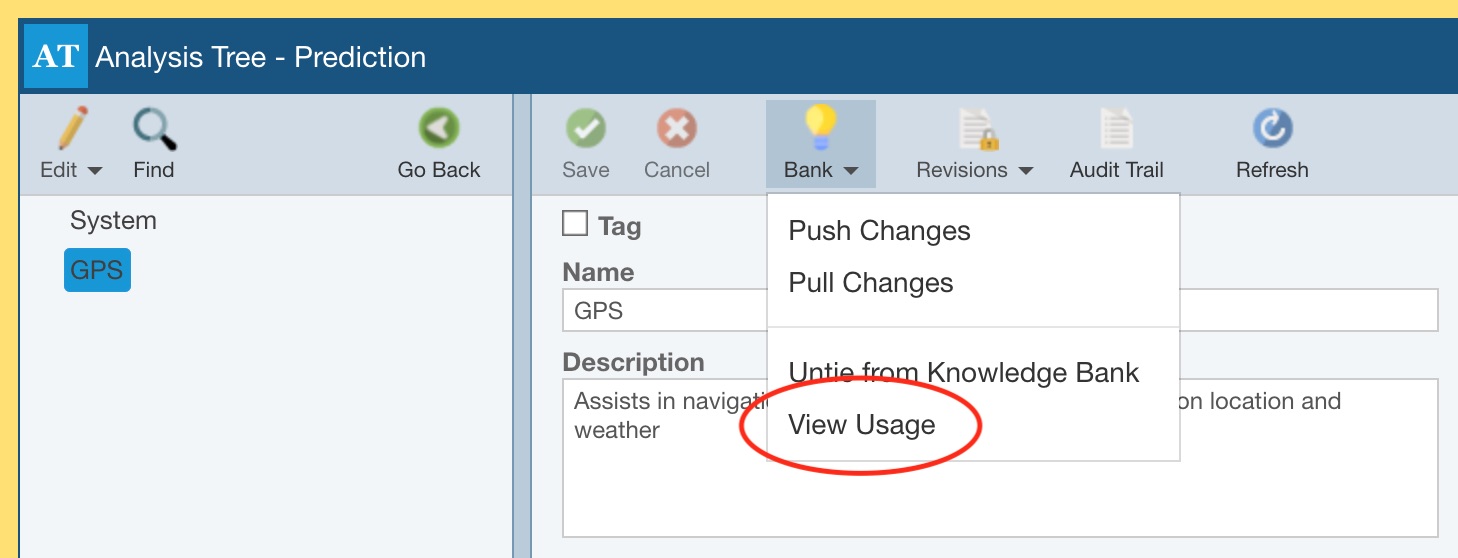
To add Reliability Prediction subsystem data to a Knowledge Bank, select the subsystem you wish to add, click Properties to access the Analysis Tree - Prediction pane and from the Bank toolbar button drop down, click Add to Knowledge Bank.
If one Knowledge Bank is in use, you will be asked to verify that you wish to add the data to the Knowledge Bank, click Yes. If no Knowledge Banks have yet been created, an initial Knowledge Bank named Knowledge Bank 1 will automatically be created and the selected data added to it. (Note that you can rename Knowledge Banks using Bank Properties and manage your Knowledge Banks using the Manage Analyses function.) The Add to Knowledge Bank dialog appears once the data has been added to the Knowledge Bank. Click Close to dismiss the confirmation dialog.
If you are using more than one Knowledge Bank, the Knowledge Bank dialog appears.
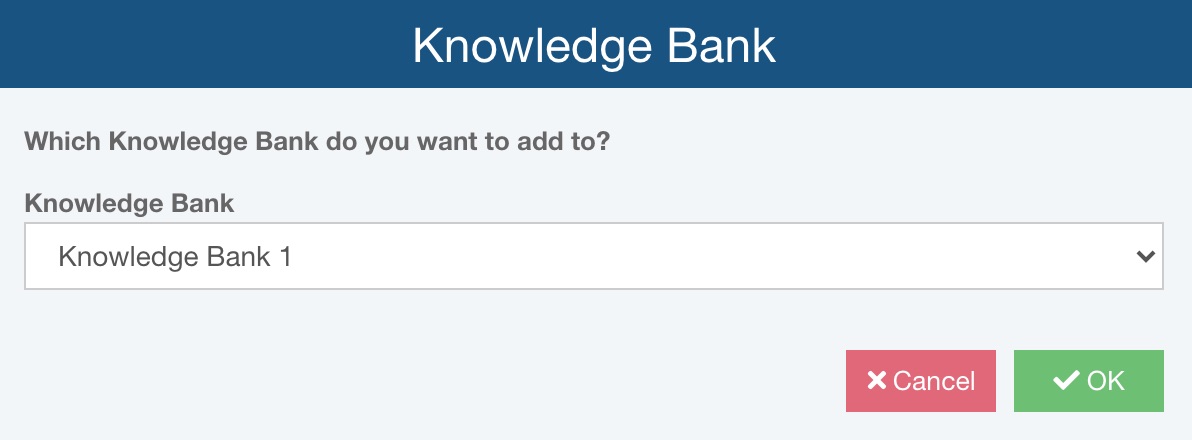
Select the Knowledge Bank you want to add to and click OK. The Add to Knowledge Bank dialog appears to ask you to confirm; click Yes. The Add to Knowledge Bank dialog appears once the data has been added to the Knowledge Bank. Click Close to dismiss the confirmation dialog.
Using Knowledge Banks when performing Reliability Prediction Analyses
The power of Knowledge Banks becomes apparent when you utilize them when performing your Reliability Prediction analyses. As you are working on your Reliability Prediction, you can search the Knowledge Banks using the built-in search capabilities to locate information stored in them and pull it into your current Reliability Prediction. As your Knowledge Banks grow, the effort required to complete your Reliability Prediction analyses is significantly reduced.
To search Knowledge Banks while in your Reliability Prediction, select the Analysis Tree item to which you want to add a Sibling Subsystem or Child Subsystem and from the Edit dropdown menu, choose Edit Tree. In the toolbar, from the Search dropdown menu, select Sibling Subsystem or Child Subsystem.
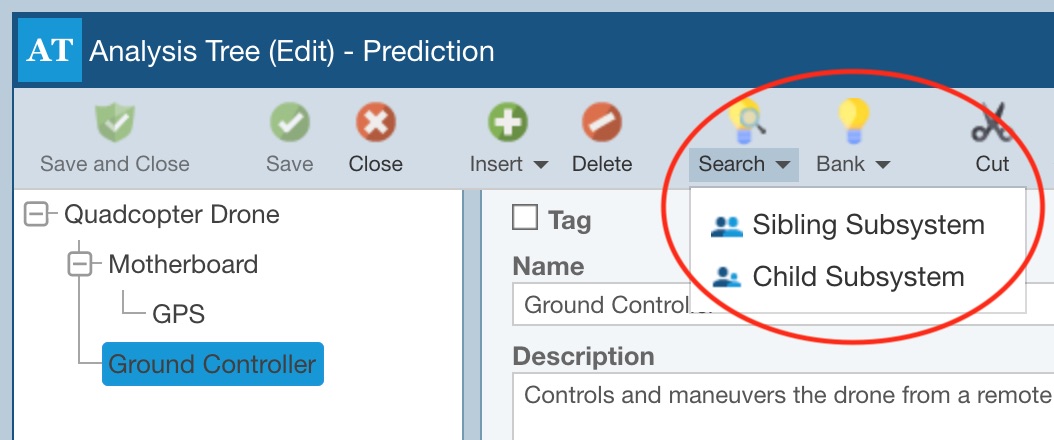
The Search Subsystems dialog appears.
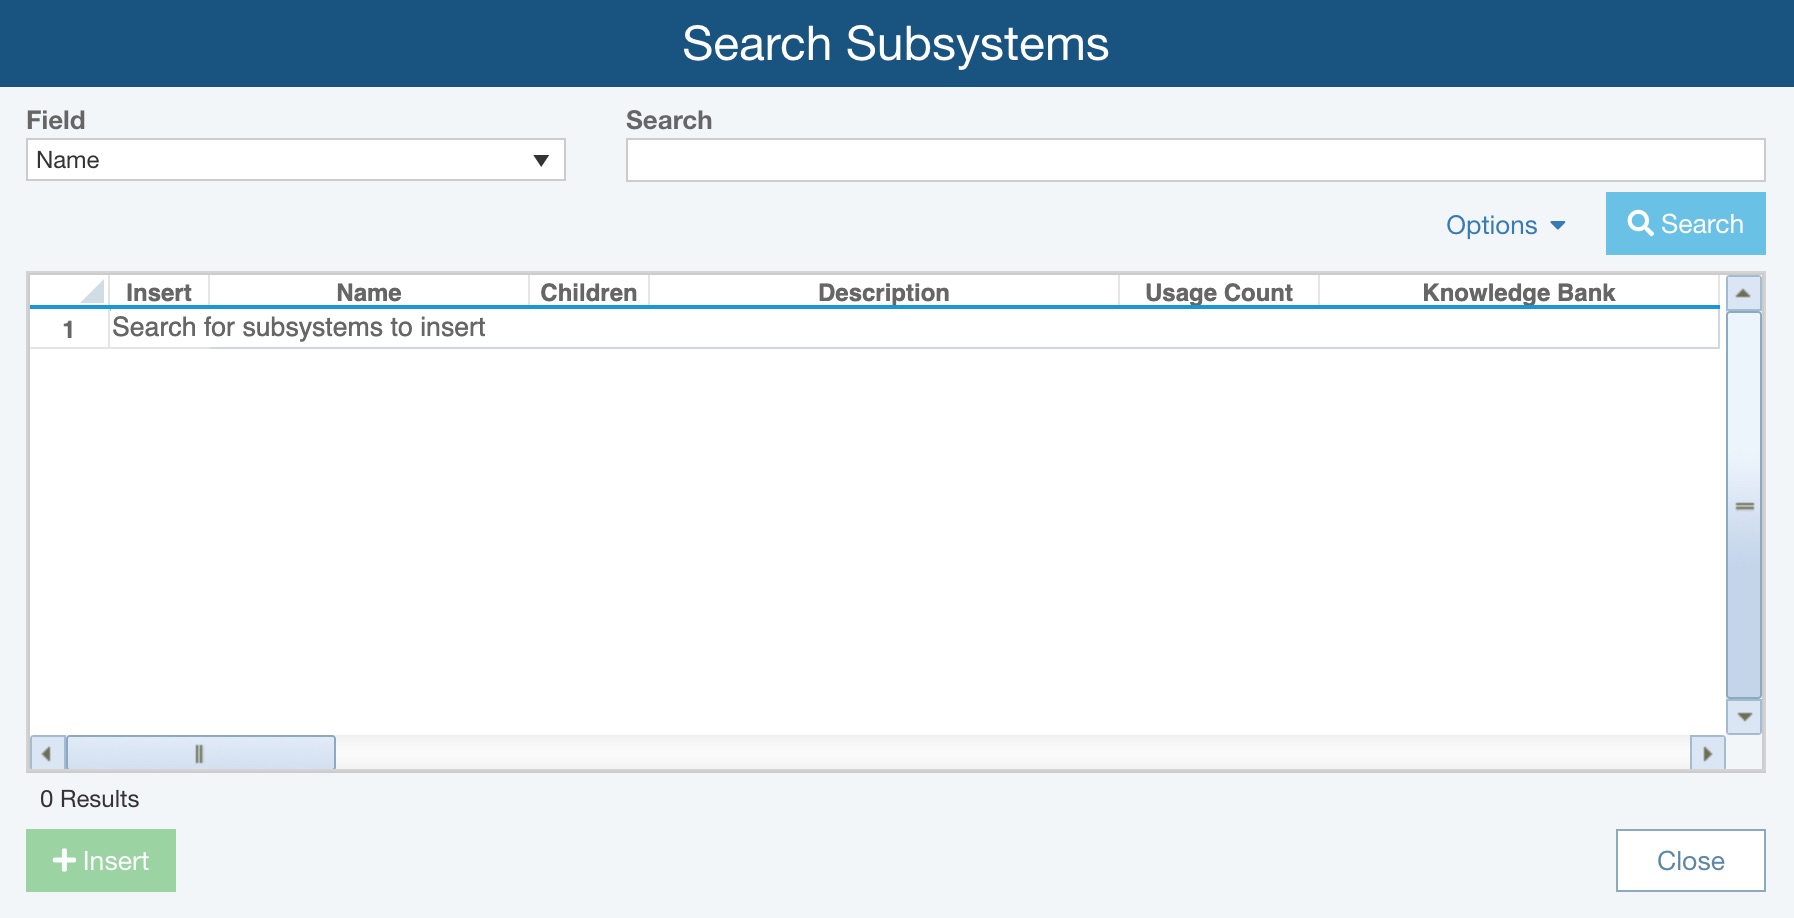
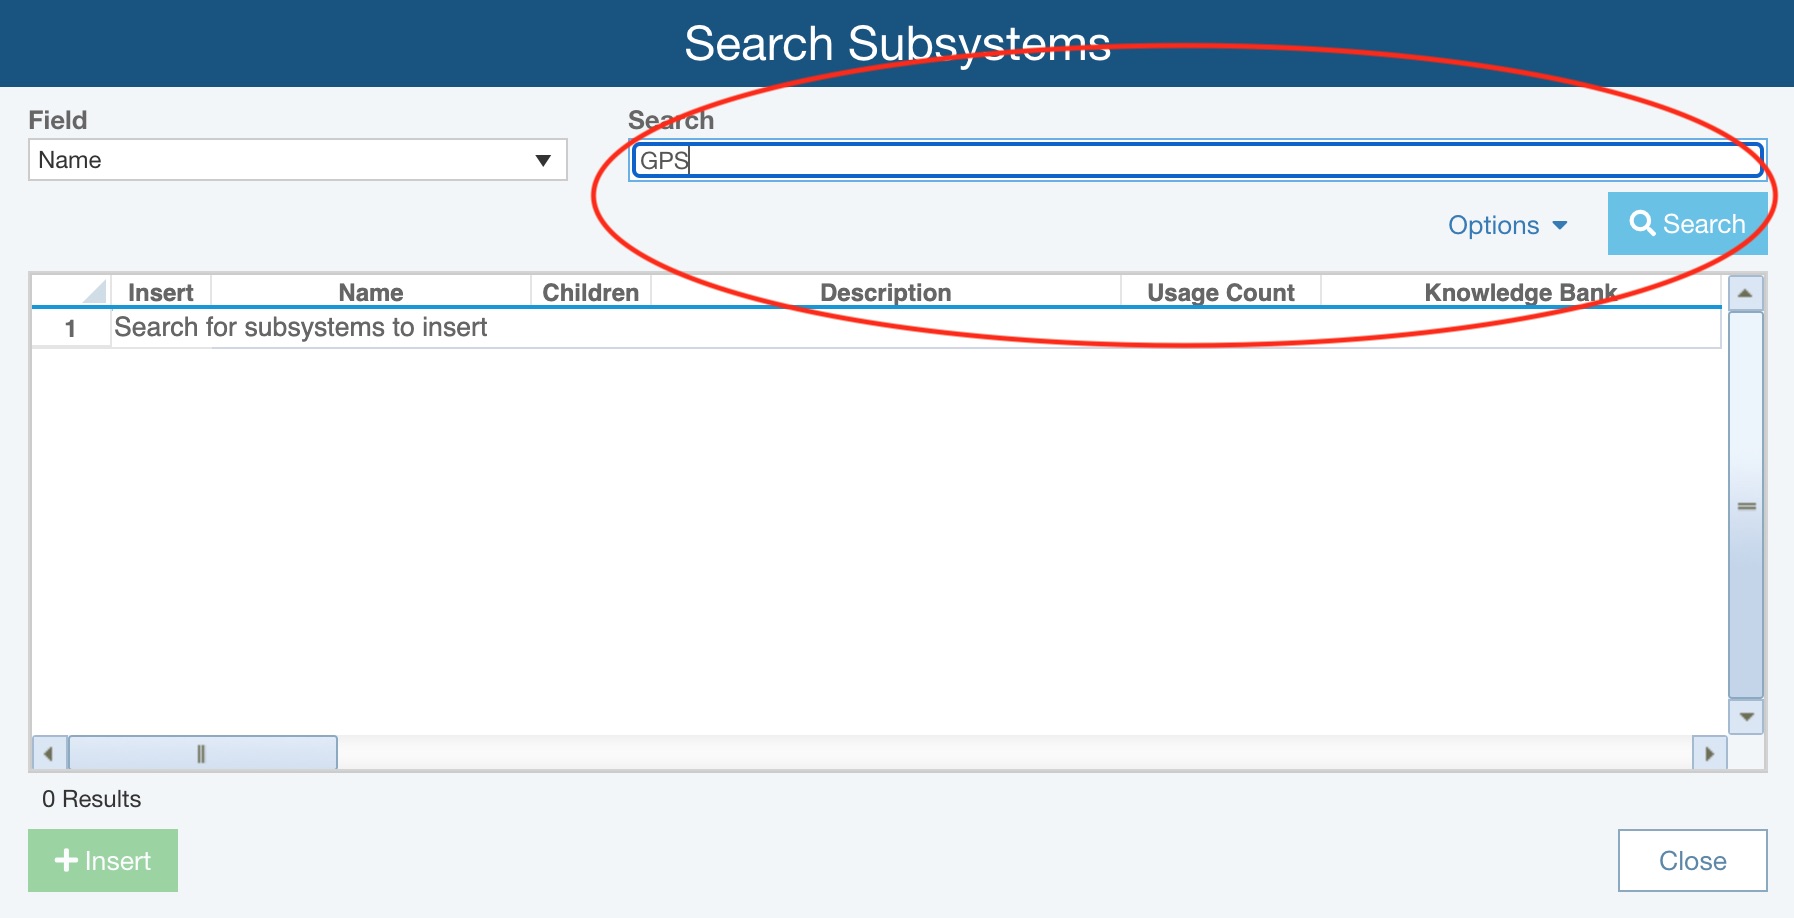
In the Search Subsystems dialog, select the Field to search and enter in a portion of the text, or the full text, in the Search field.
As needed, use the Options link to establish your preferred search and sorting options.
For Show, choose between:
- All Results - returns all results that match search criteria
- Results not used in this Analysis - returns all results that match search criteria and are not yet used in the current Analysis/Knowledge Bank
Use the Sort By options to select your preferred sort order:
- -- No Sort --
- Usage Count
- Alphabetically (choose the available field, such as Name)
Click the Search button to start the Knowledge Bank search.
The list of matches appears in the table. The search results table includes other information: other related Reliability Prediction data, the usage count (the number of times the particular item is used in your Reliability Predictions), and which Knowledge Bank the match is from. Note: The Knowledge Bank column does not appear if only one Knowledge Bank is being used. The table is sorted by Usage Count in descending order.
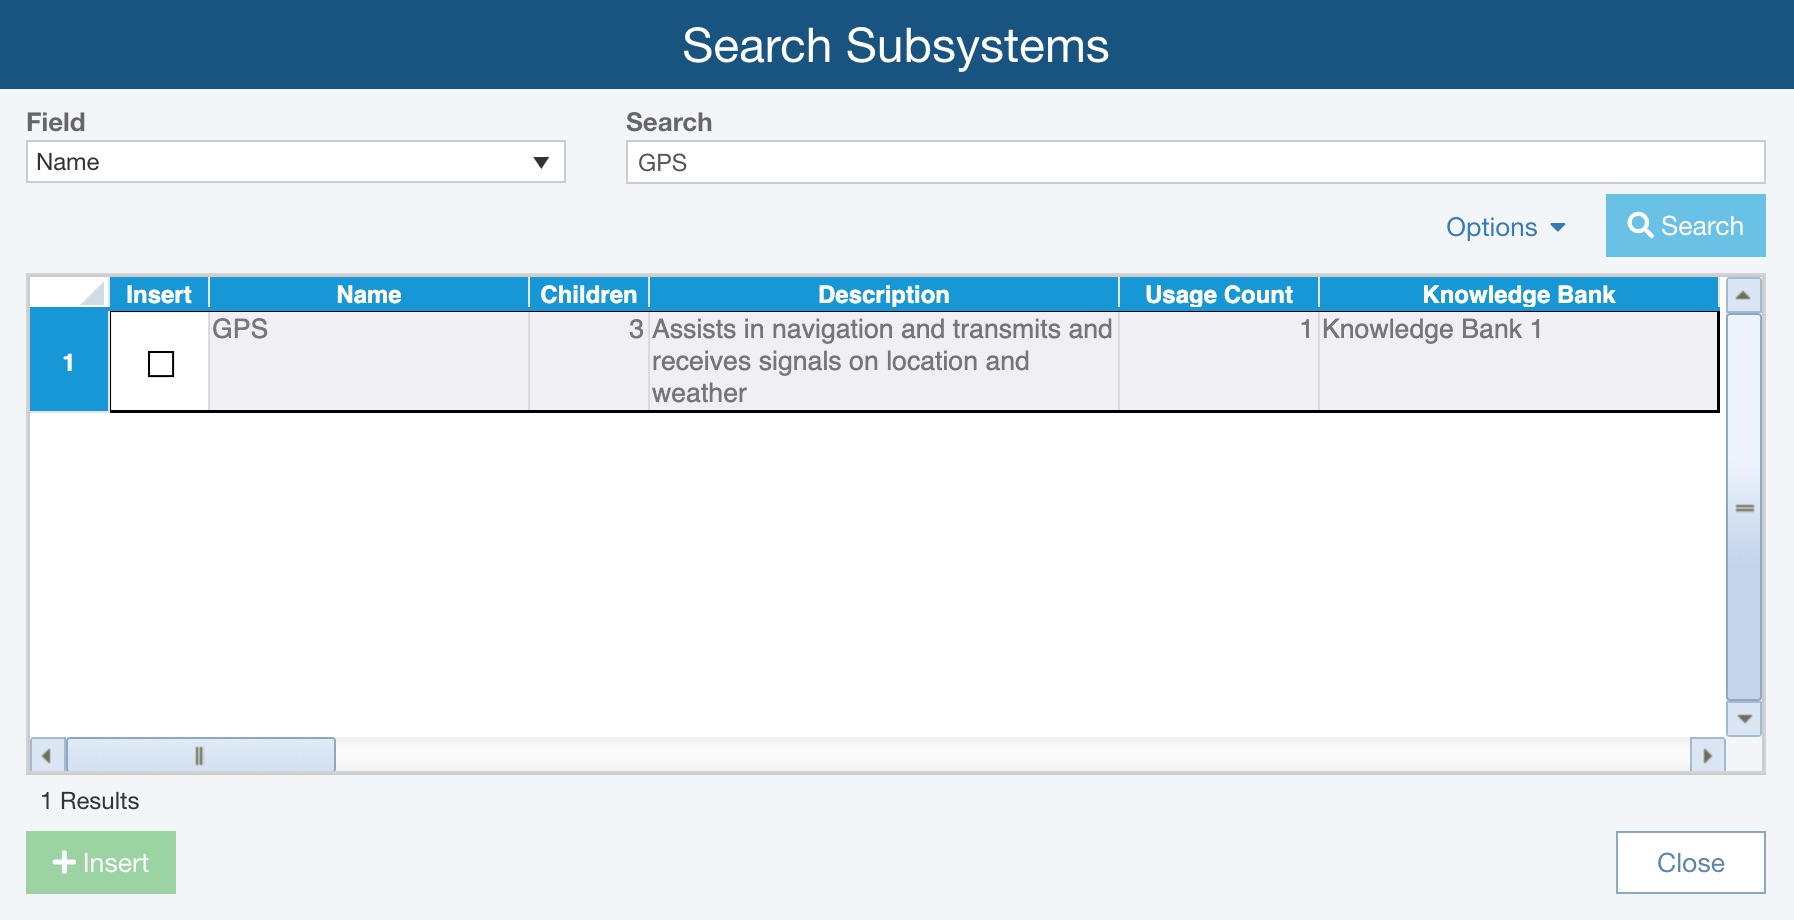
Select the item or items you wish to insert into your Analysis Tree by selecting the Insert checkbox.
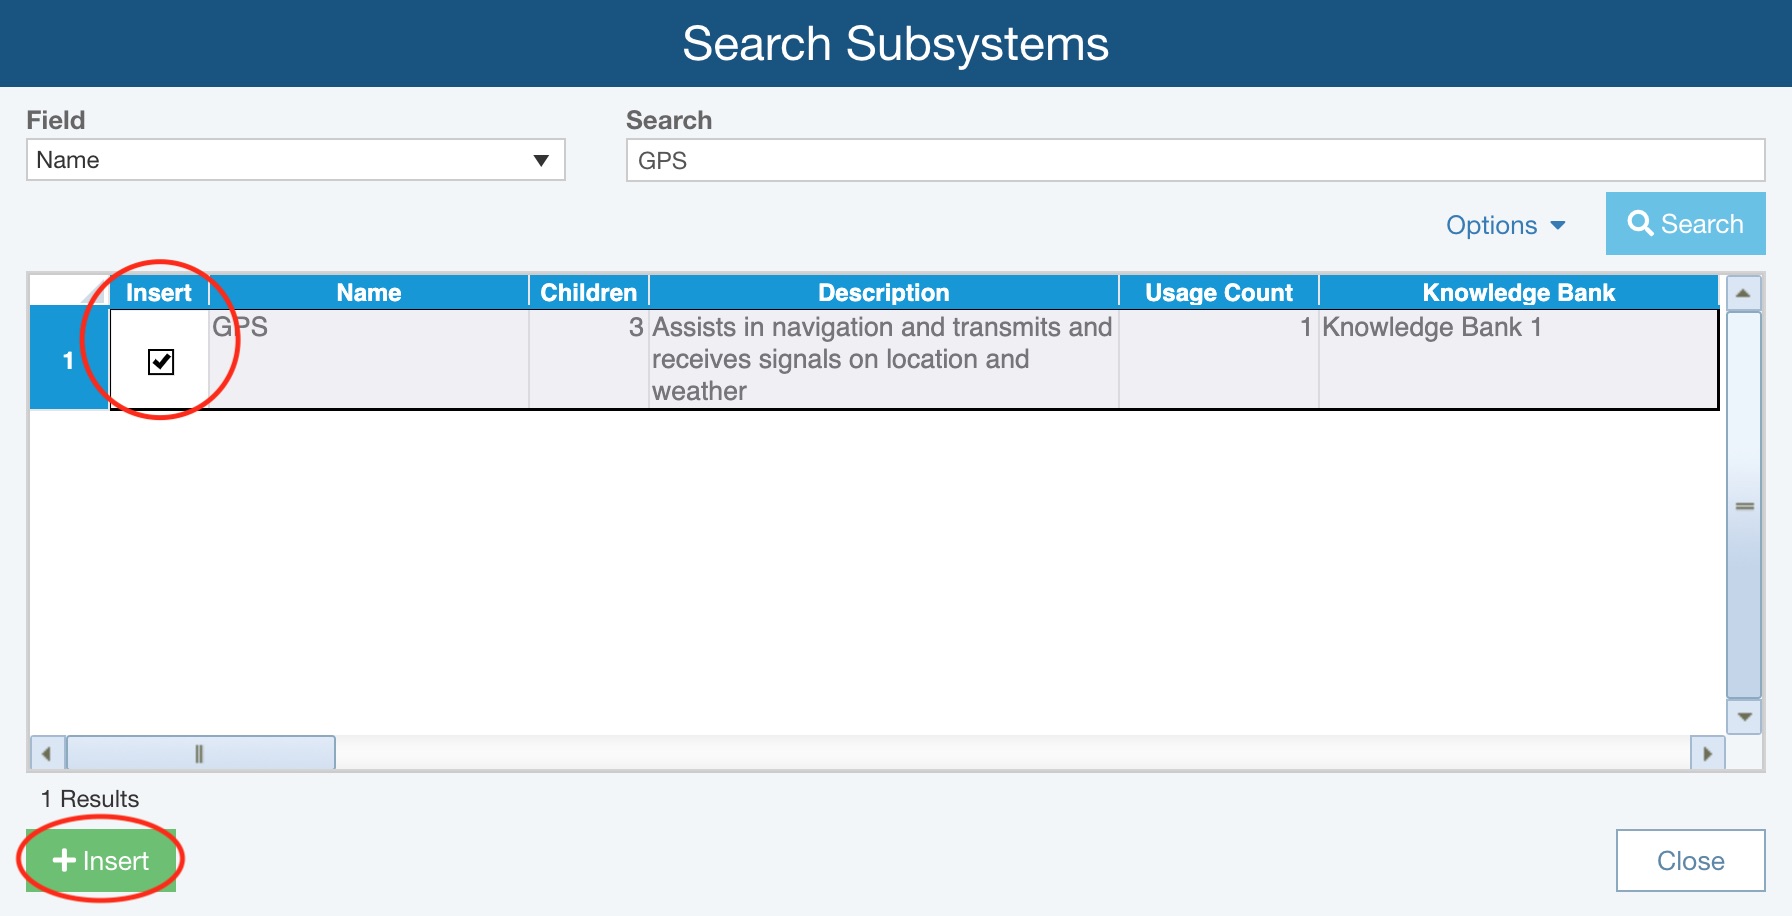
Click the Insert button to insert the data into your Analysis Tree. The new subsystem(s) are added and are automatically tied to the Knowledge Bank. Click Close to close the Search Subsystems dialog.
Configure Search Rules for Knowledge Banks
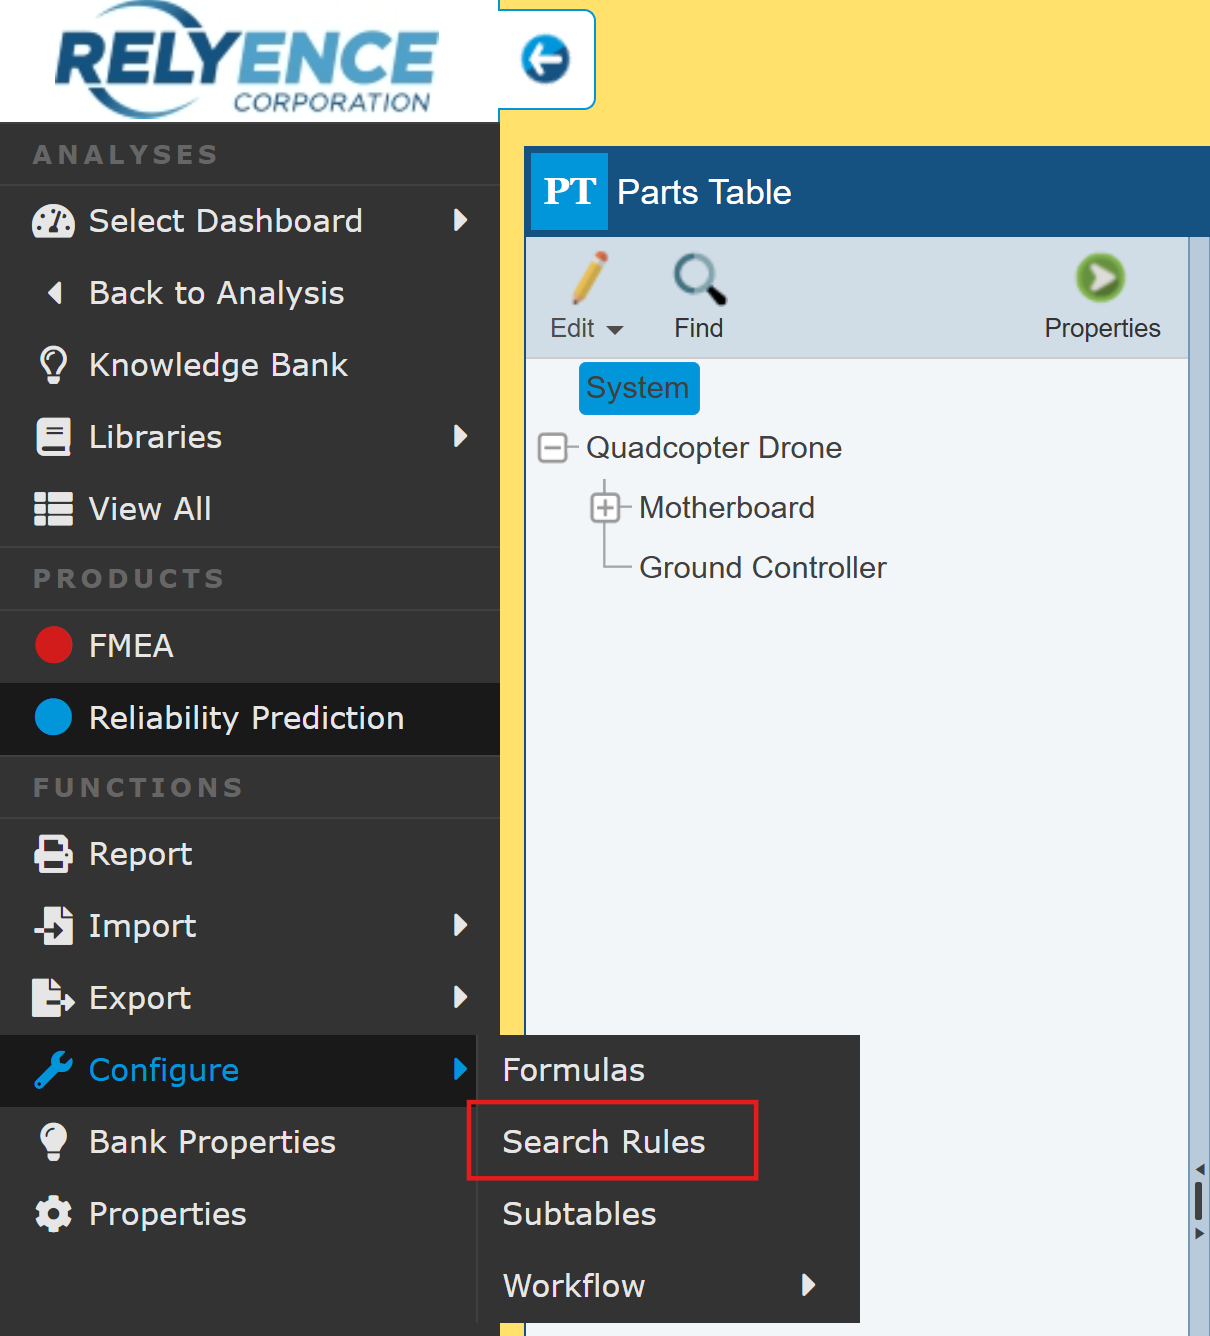
You can configure specific search rules for your Knowledge Bank data. To access the Configure Search Rules dialog, within your Knowledge Bank, from the Sidebar, select Configure>Search Rules.
The Configure Search Rules dialog appears.
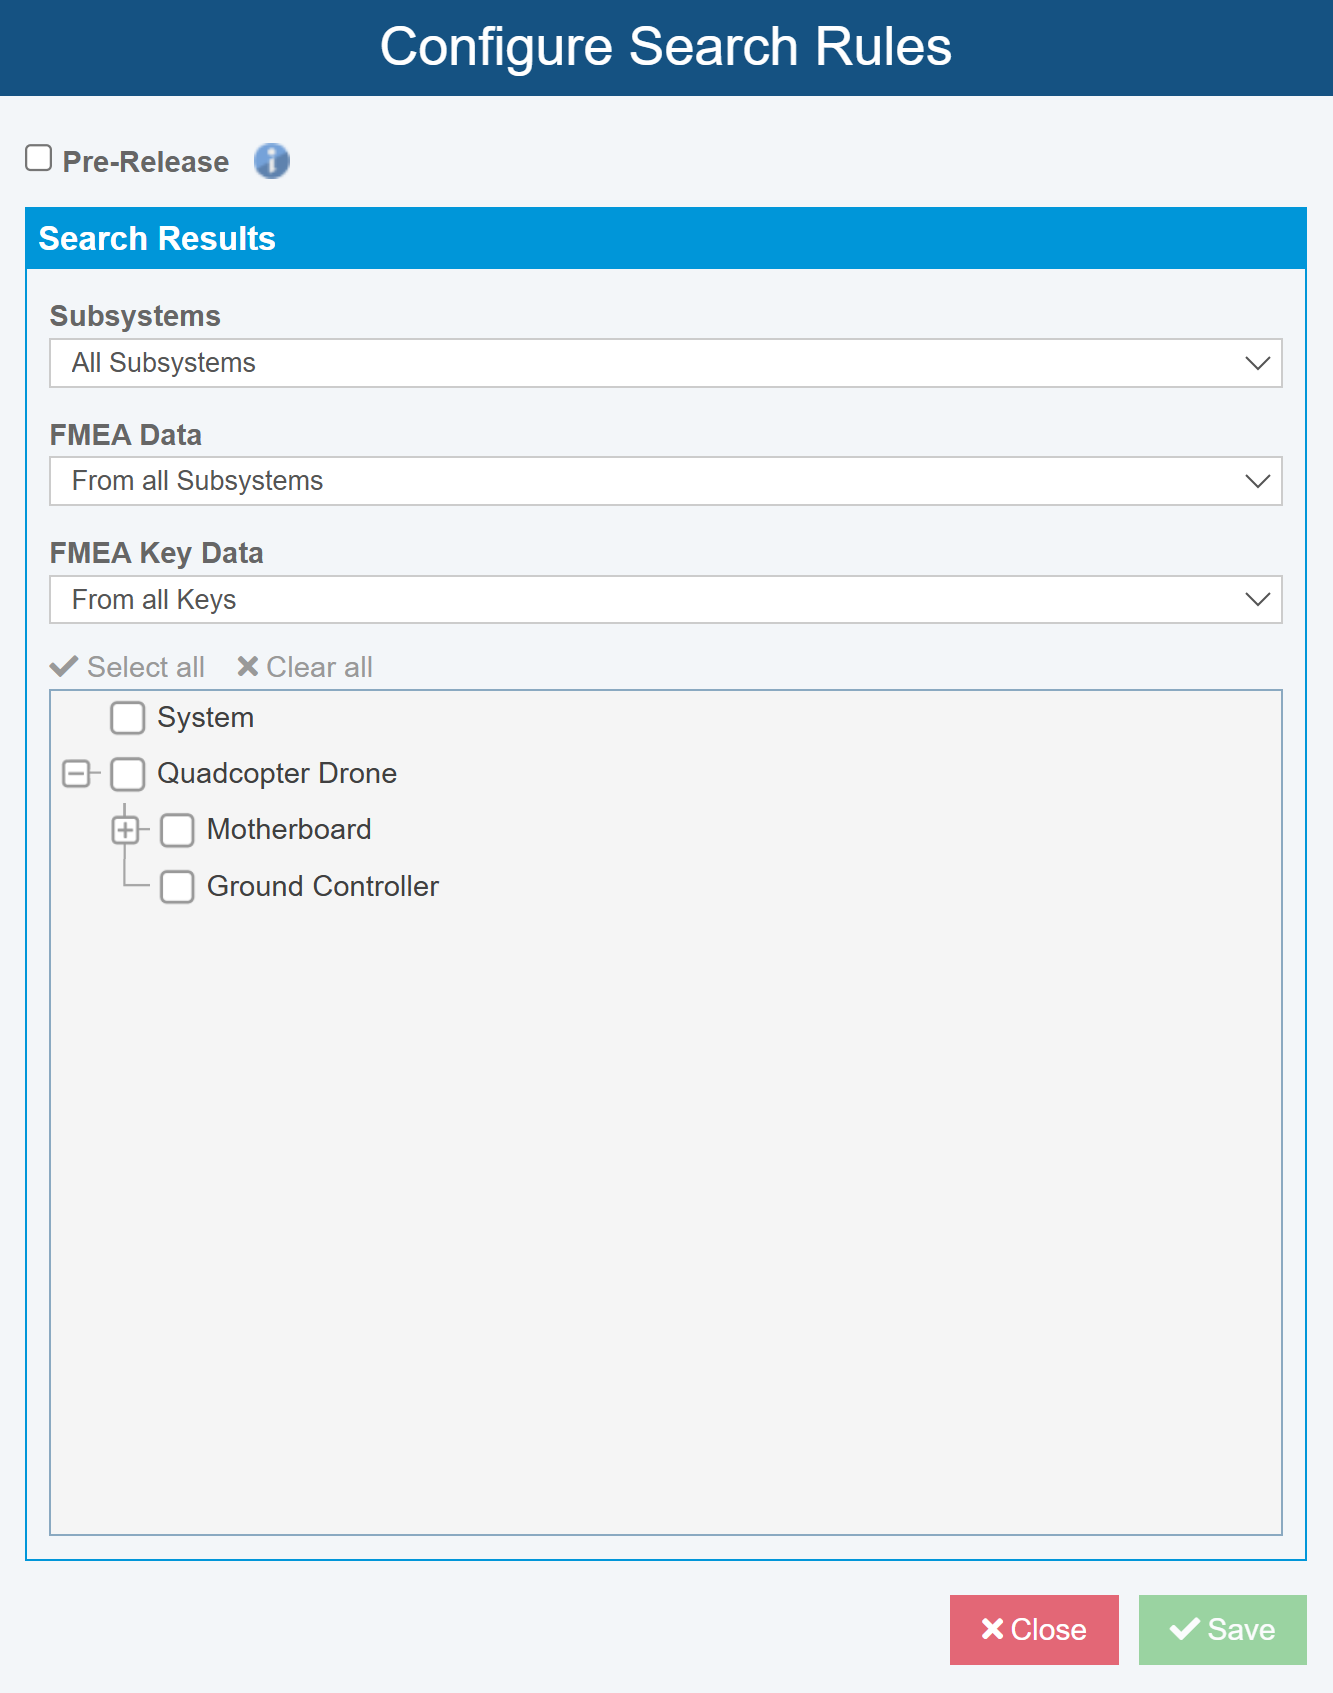
Define the Knowledge Bank as Pre-Release if you don't want data in this Knowledge Bank accessible by search, Pushed out from or Pulled in to. When you are ready for this Knowledge Bank to be actively used, clear the Pre-Release checkbox.
In the Search Results section, define your search rules:
- Subsystems - define which Subsystems can be searched. Choose from All Subsystems, Only selected Subsystems, Subsystems in the selected branch, or None. If you select Only selected Subsystems or Subsystems in the selected branch, choose the relevant Subsystems below.
- [Applies when working with Knowledge Banks in Relyence FMEA only. Can be ignored when using Knowledge Banks for Relyence Reliability Prediction.] FMEA Data - define what FMEA data can be searched, including data From all Subsystems, Only from selected Subsystems, From Subsystems in the selected branch, or None. If you select Only from selected Subsystems or From Subsystems in the selected branch, choose the relevant Subsystems below.
- [Applies when working with Knowledge Banks in Relyence FMEA only. Can be ignored when using Knowledge Banks for Relyence Reliability Prediction.] FMEA Key Data - define what FMEA Key data can be searched, including data From all Keys, Only from Keys matching the search type, or None.
Click Save and/or Close as needed.
Pushing out Knowledge Bank updates
Another powerful feature of Knowledge Banks is in keeping all your Reliability Prediction data tied to Knowledge Banks in sync. For example, you may have a Subsystem in a Knowledge Bank that is used in multiple Reliability Prediction analyses, and you add a new part to that subsystem by either updating or adding to the Knowledge Bank. That change will automatically propagate to all your Reliability Predictions tied to that subsystem through the Knowledge Bank Push feature.
You manage the Push function, so you are in control of how and when the updates are made to your Reliability Predictions. For example, you may want to let your teammates know about a data push prior to initiating. Or, you may want to only push the changes at certain times, perhaps weekly or monthly.
To perform a push, click Knowledge Bank(s) from the Sidebar menu. If only one Knowledge Bank is in use, it will be opened. If more than one Knowledge Bank is in use, select the Knowledge Bank to open from the submenu.
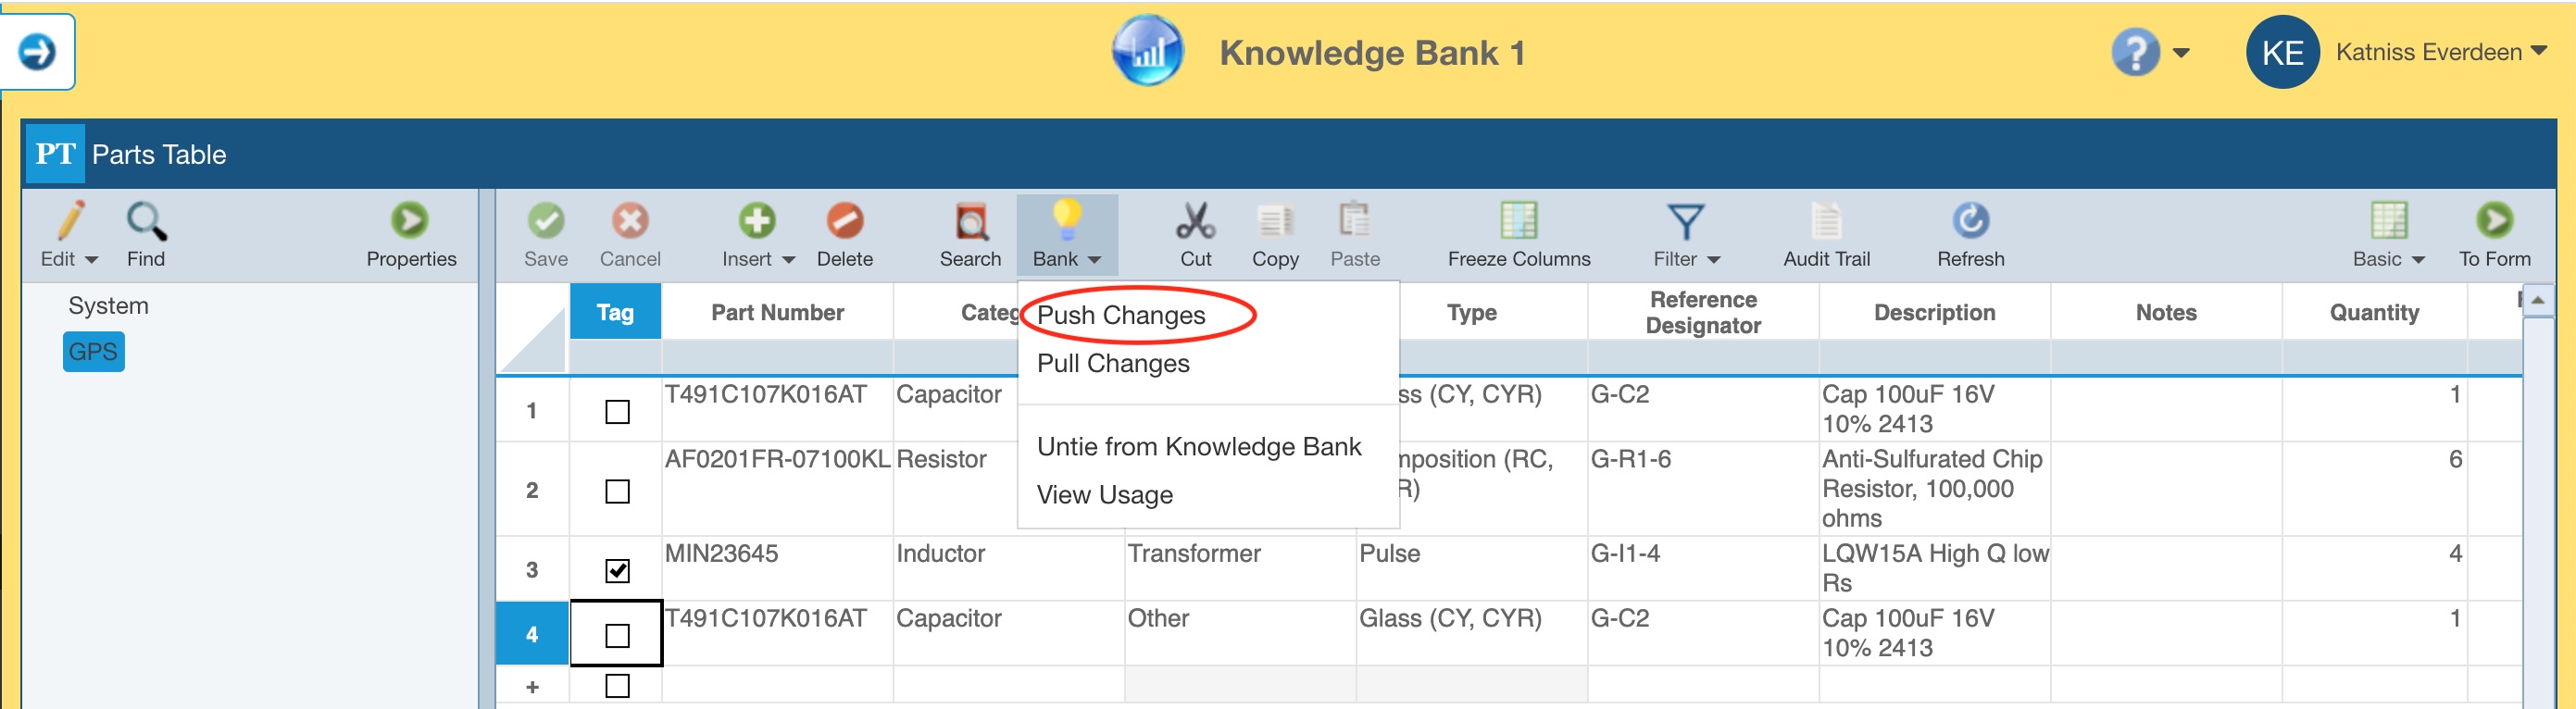
If there are changes in the Knowledge Bank, the Push Changes option from the Bank toolbar button will be enabled. To update the Reliability Predictions tied to this Knowledge Bank, click the Bank>Push Changes.
Note that while Relyence is gathering the list of changes to push, you can click Stop to stop gathering changes to push and return to the Knowledge Bank.
Otherwise, the Push Knowledge Bank Changes dialog appears.
If there are no changes to be pushed, the dialog will indicate this. In this case, click the Close button to close the dialog.
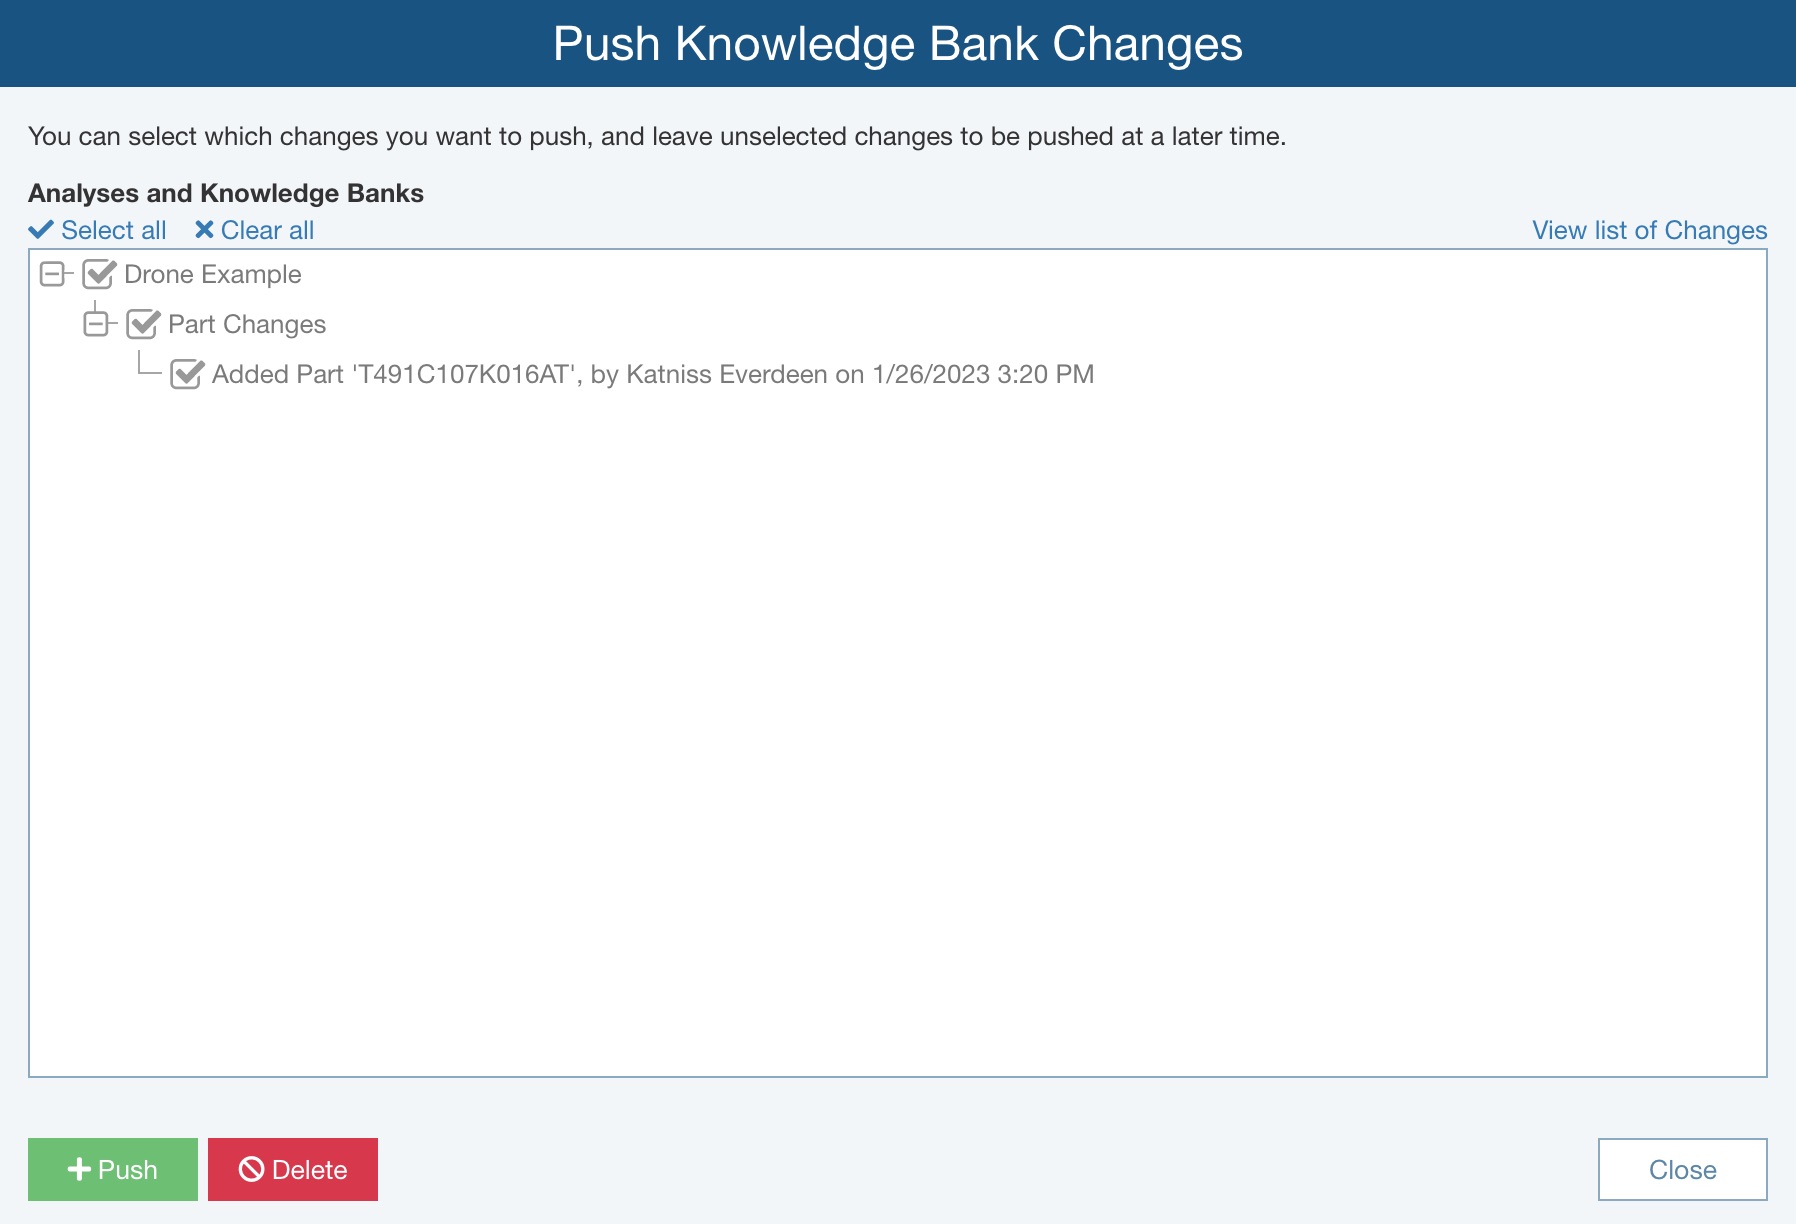
Otherwise, the dialog will display a list of all the changes that will occur with this Push. The Push Knowledge Bank Changes dialog allows you to choose which changes you want to make with this Push. For example, perhaps you know that a team member is awaiting approval on a subsystem in a certain reliability prediction Analysis, so you want to hold off changes until that review is complete. You can disable that Analysis for this Push. However, note that those changes will still be pending, and will appear the next time you select the Push function.
You can view the list of changes in two ways: by Analysis or by Change. To change the way the Push changes are listed, click the View list of Changes or View list of Analyses link. Click the Expand (+) and Collapse (-) icons in the tree to drill down to see the specific details on the changes to be made.
By default, all changes are selected. Clear the checkboxes next to any changes you want to bypass with this Push. Use the Select all or Clear all options, where applicable, to enable all checkboxes or clear all check boxes.
To push changes now, select all changes to be pushed and click Push.
- The Push Changes dialog appears and reminds you that the operation is permanent and cannot be undone.
- Click Yes to proceed or No to return to the Push Knowledge Bank Changes dialog.
- When you click Yes, the progress dialog appears and when the push is complete the Push Knowledge Bank Changes dialog appears and confirms the changes have been pushed out. Click Close.
For any changes you'd like to leave in the list for future consideration, leave their checkmark cleared. Those changes will still be pending and will appear in the list the next time you select the Push function.
To remove changes from the list permanently, select all changes to be removed and click Delete.
- The Delete Changes dialog appears and confirms that deleting the selected changes will remove them permanently from the list of changes to be pushed.
- Click Yes to proceed or No to return to the Push Knowledge Bank Changes dialog.
- When you click Yes, the selected changes are removed from the list and you are returned to the Push Knowledge Bank Changes dialog.
If Knowledge Bank Push Notifications are enabled, a message box appears to allow you to enter in a custom message for this Knowledge Bank Push. For example, you may want to include a message indicating what changes were made to the Knowledge Bank and why. You must enter a message in order for the Push to proceed.
All updates to your Reliability Predictions tied to Knowledge Bank information will automatically be made.
Once the Push is complete, Push Knowledge Bank Changes dialog appears with the list of all Analyses and Revisions that were updated. When you have completed reviewing, click Close to close the dialog.
Click Back to Analysis in the Sidebar menu to return to your Analysis.
Knowledge Bank Push Notifications
If you want to notify team members when a Knowledge Bank Push occurs, you can enable Knowledge Bank Push Notifications. By default, Push Notifications are disabled.
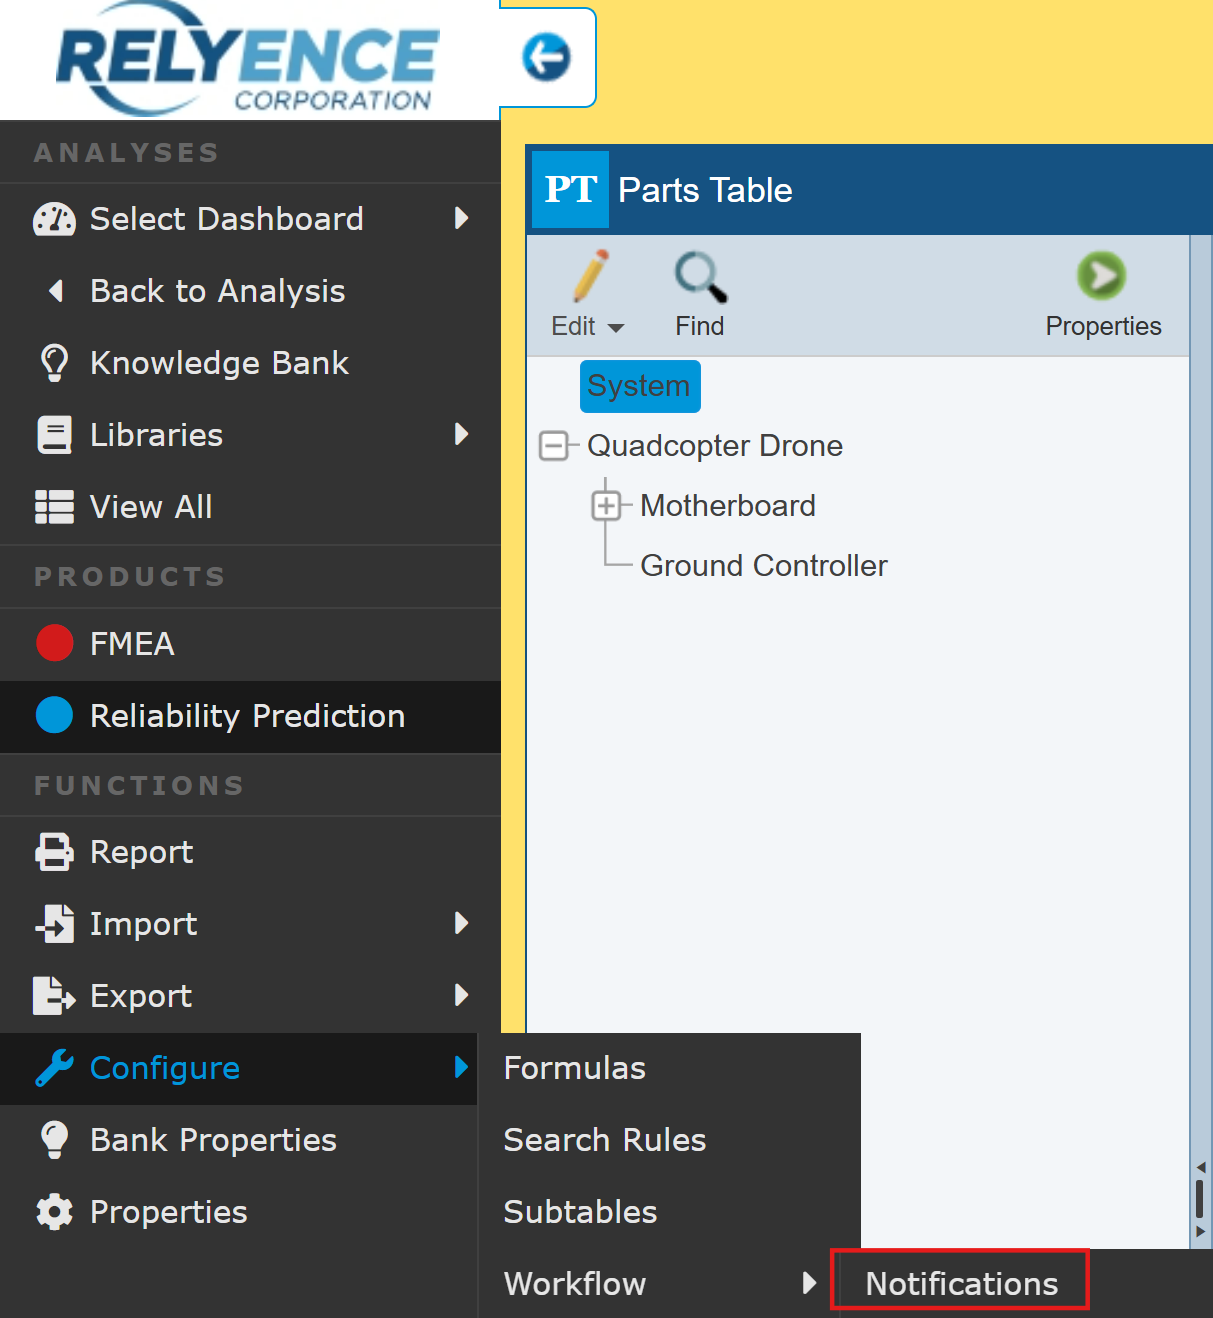
To enable Push Notifications, make sure the Knowledge Bank is active and select Configure>Workflow>Notifications from the Sidebar menu.
The Edit Knowledge Bank Notification dialog appears.
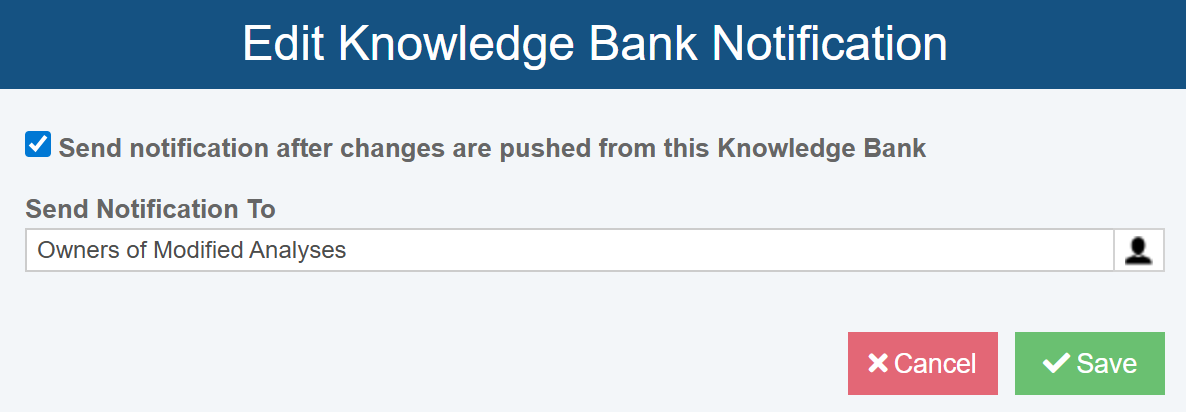
To enable Knowledge Bank Notifications, select the Send notification after changes are pushed from this Knowledge Bank.
You can select from the list of team members to Send Notification To. You can select Owners of Modified Analyses to automatically send notifications to any team members you have designated as Owners on the Analysis Properties settings. You can also add any Users, Groups, or Contacts to include in the notification list.
Click Save to save your changes.
When a Knowledge Bank Push occurs, the team member performing the Push will be required to enter a message to be added to the notification email along with default information included by Relyence.
Once the Push is complete, notifications will be sent to all specified team members. The notification will include the following information:
- The name of the Knowledge Bank
- The name of the team member who performed the Push
- The custom notification message entered by the team member who performed the Push
- The list of Analyses and Revisions that were updated
Viewing data ties to Knowledge Bank
You can view usage of Knowledge Bank data at any time by opening the Knowledge Bank, selecting a data item, and clicking View Usage from the Knowledge Bank toolbar button drop down list.
The Knowledge Bank Usage dialog appears with the list of Analyses and associated Subsystems where the Reliability Prediction data from this Knowledge Bank is used.
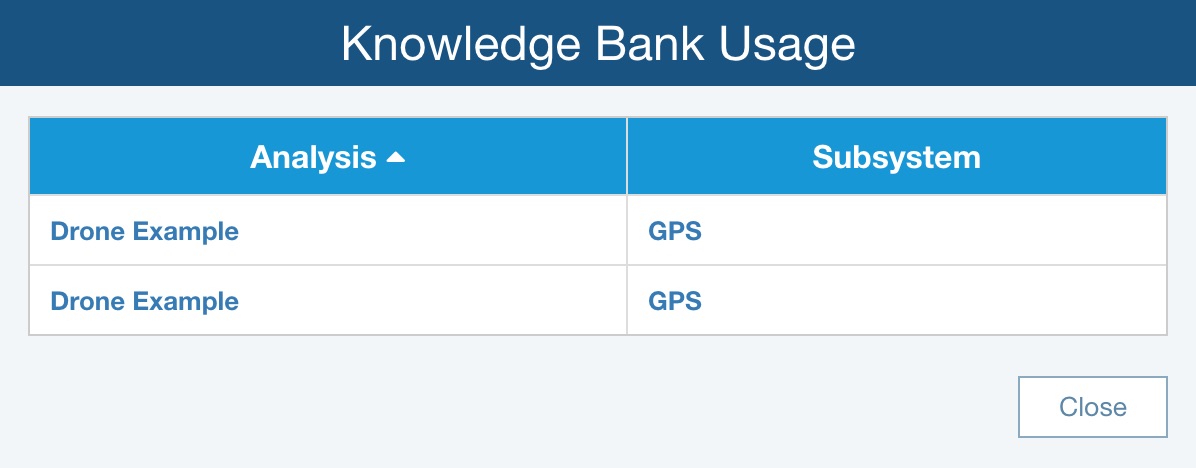
Click Close when finished viewing.
Creating Multiple Knowledge Banks
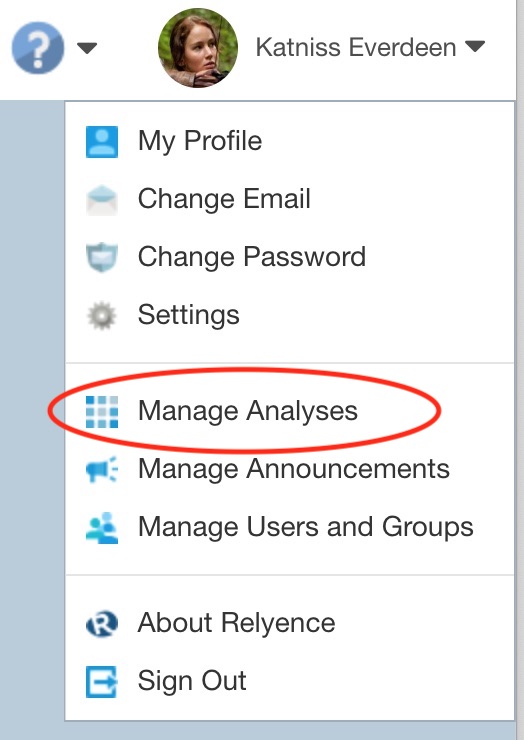
Relyence will create and maintain a single Knowledge Bank for you. You can rename this Knowledge Bank, or create additional Knowledge Banks using the Manage Analyses function which appears in the Account Management dropdown menu in the upper right of the Header Bar.
If you are using multiple Knowledge Banks, you can also control which Analyses can access which Knowledge Banks.
For more details, see the Using the Manage Analyses Function topic of this guide.
Enabling Knowledge Bank Audit Trails
You can enable audit trail logging for your Knowledge Banks if you want to track all data changes. See the Reliability Prediction Audit Trail topic for more information on this feature.
Pulling Changes into Knowledge Banks
Another powerful feature of Knowledge Banks is in keeping your Knowledge Banks up-to-date with additions or changes made in Analyses as Reliability Prediction work is completed.
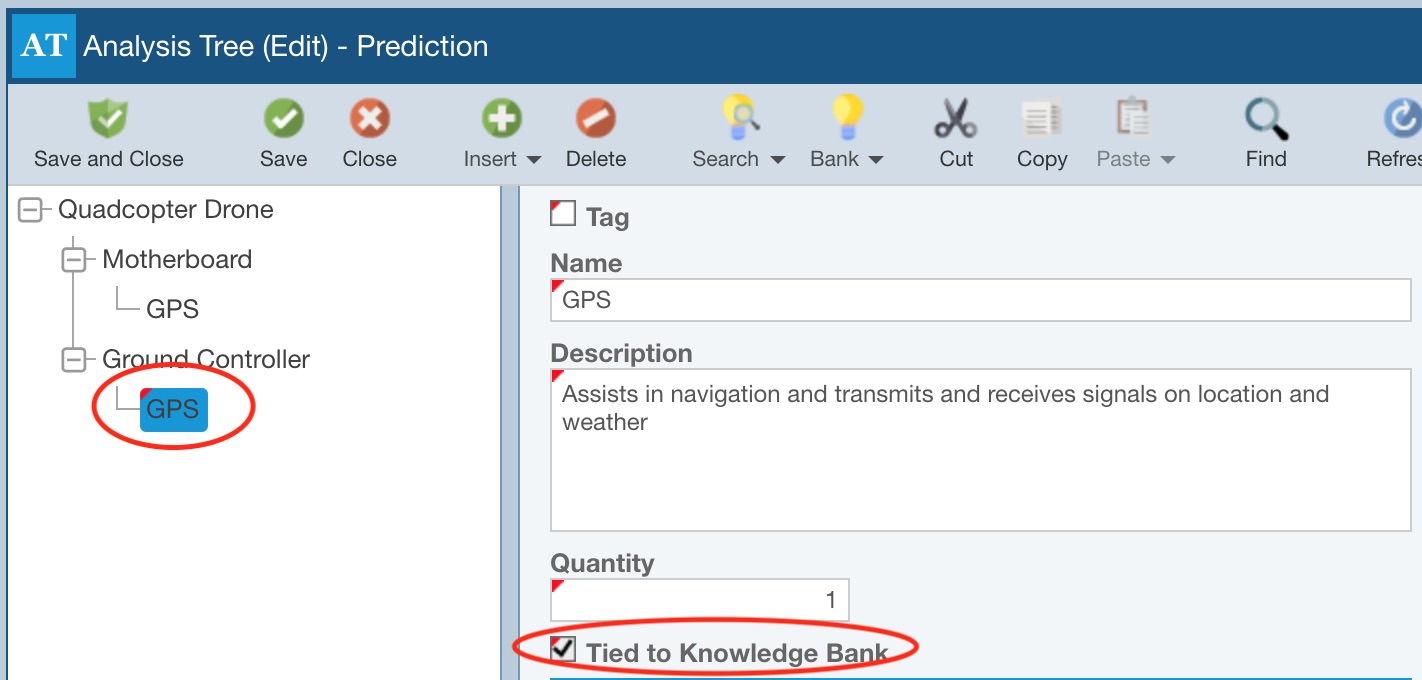
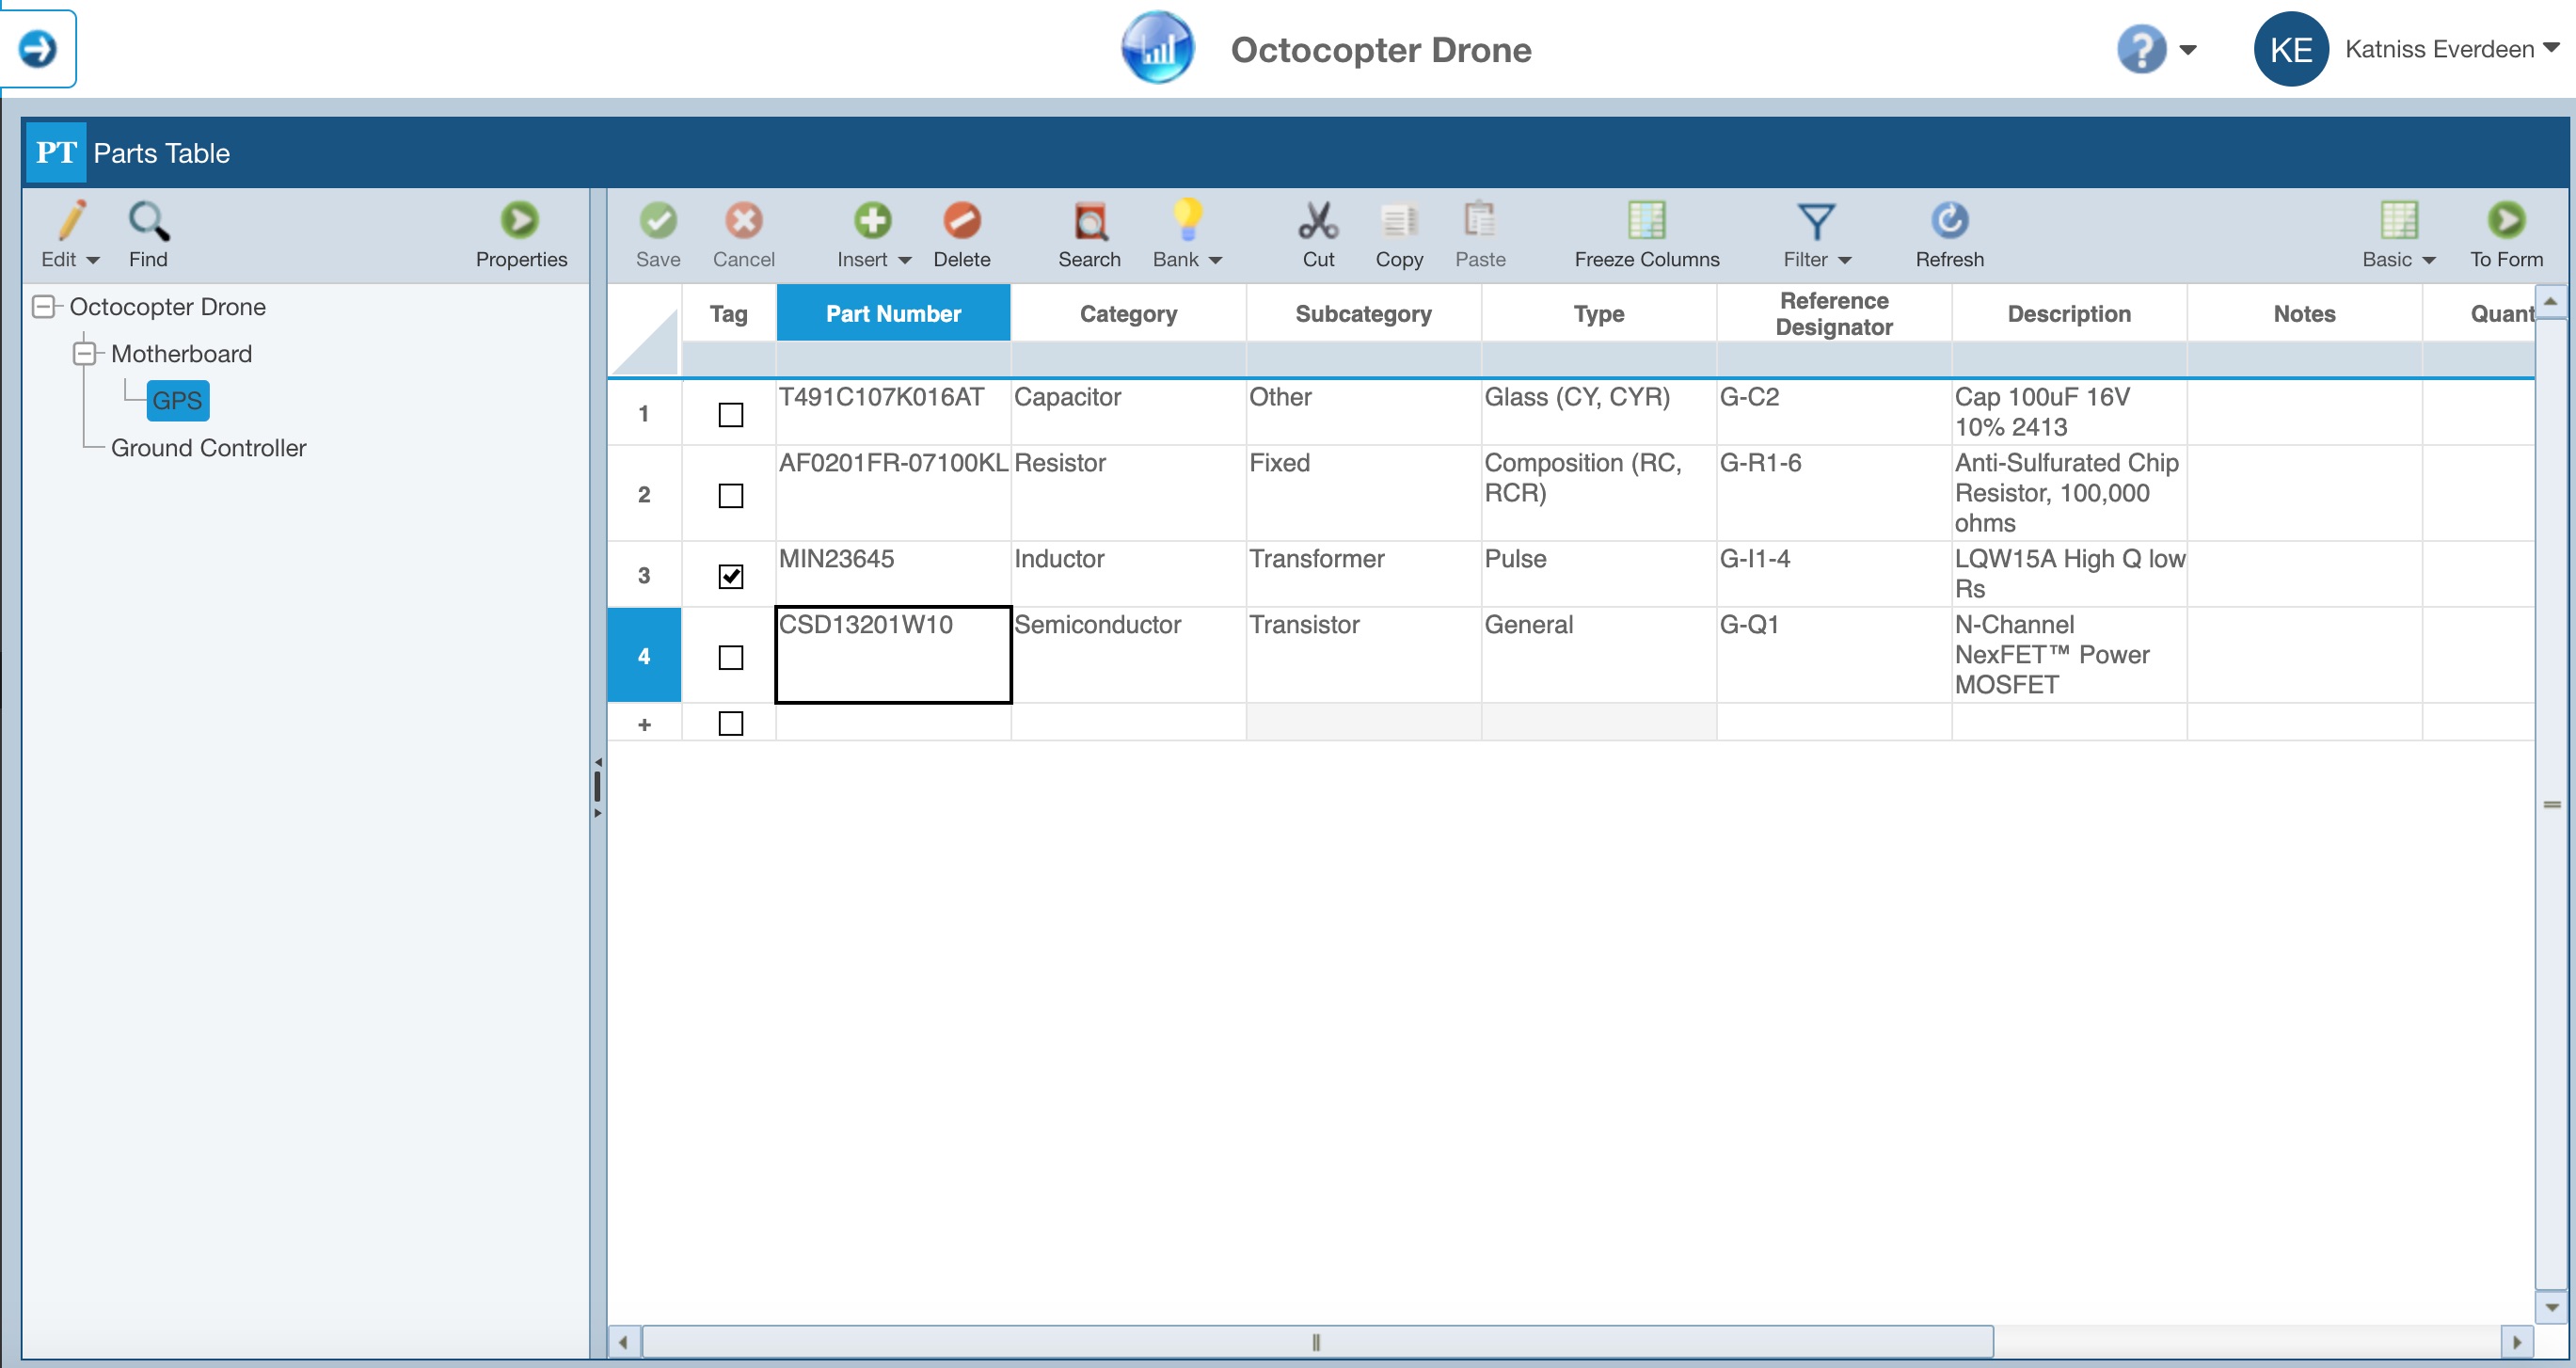
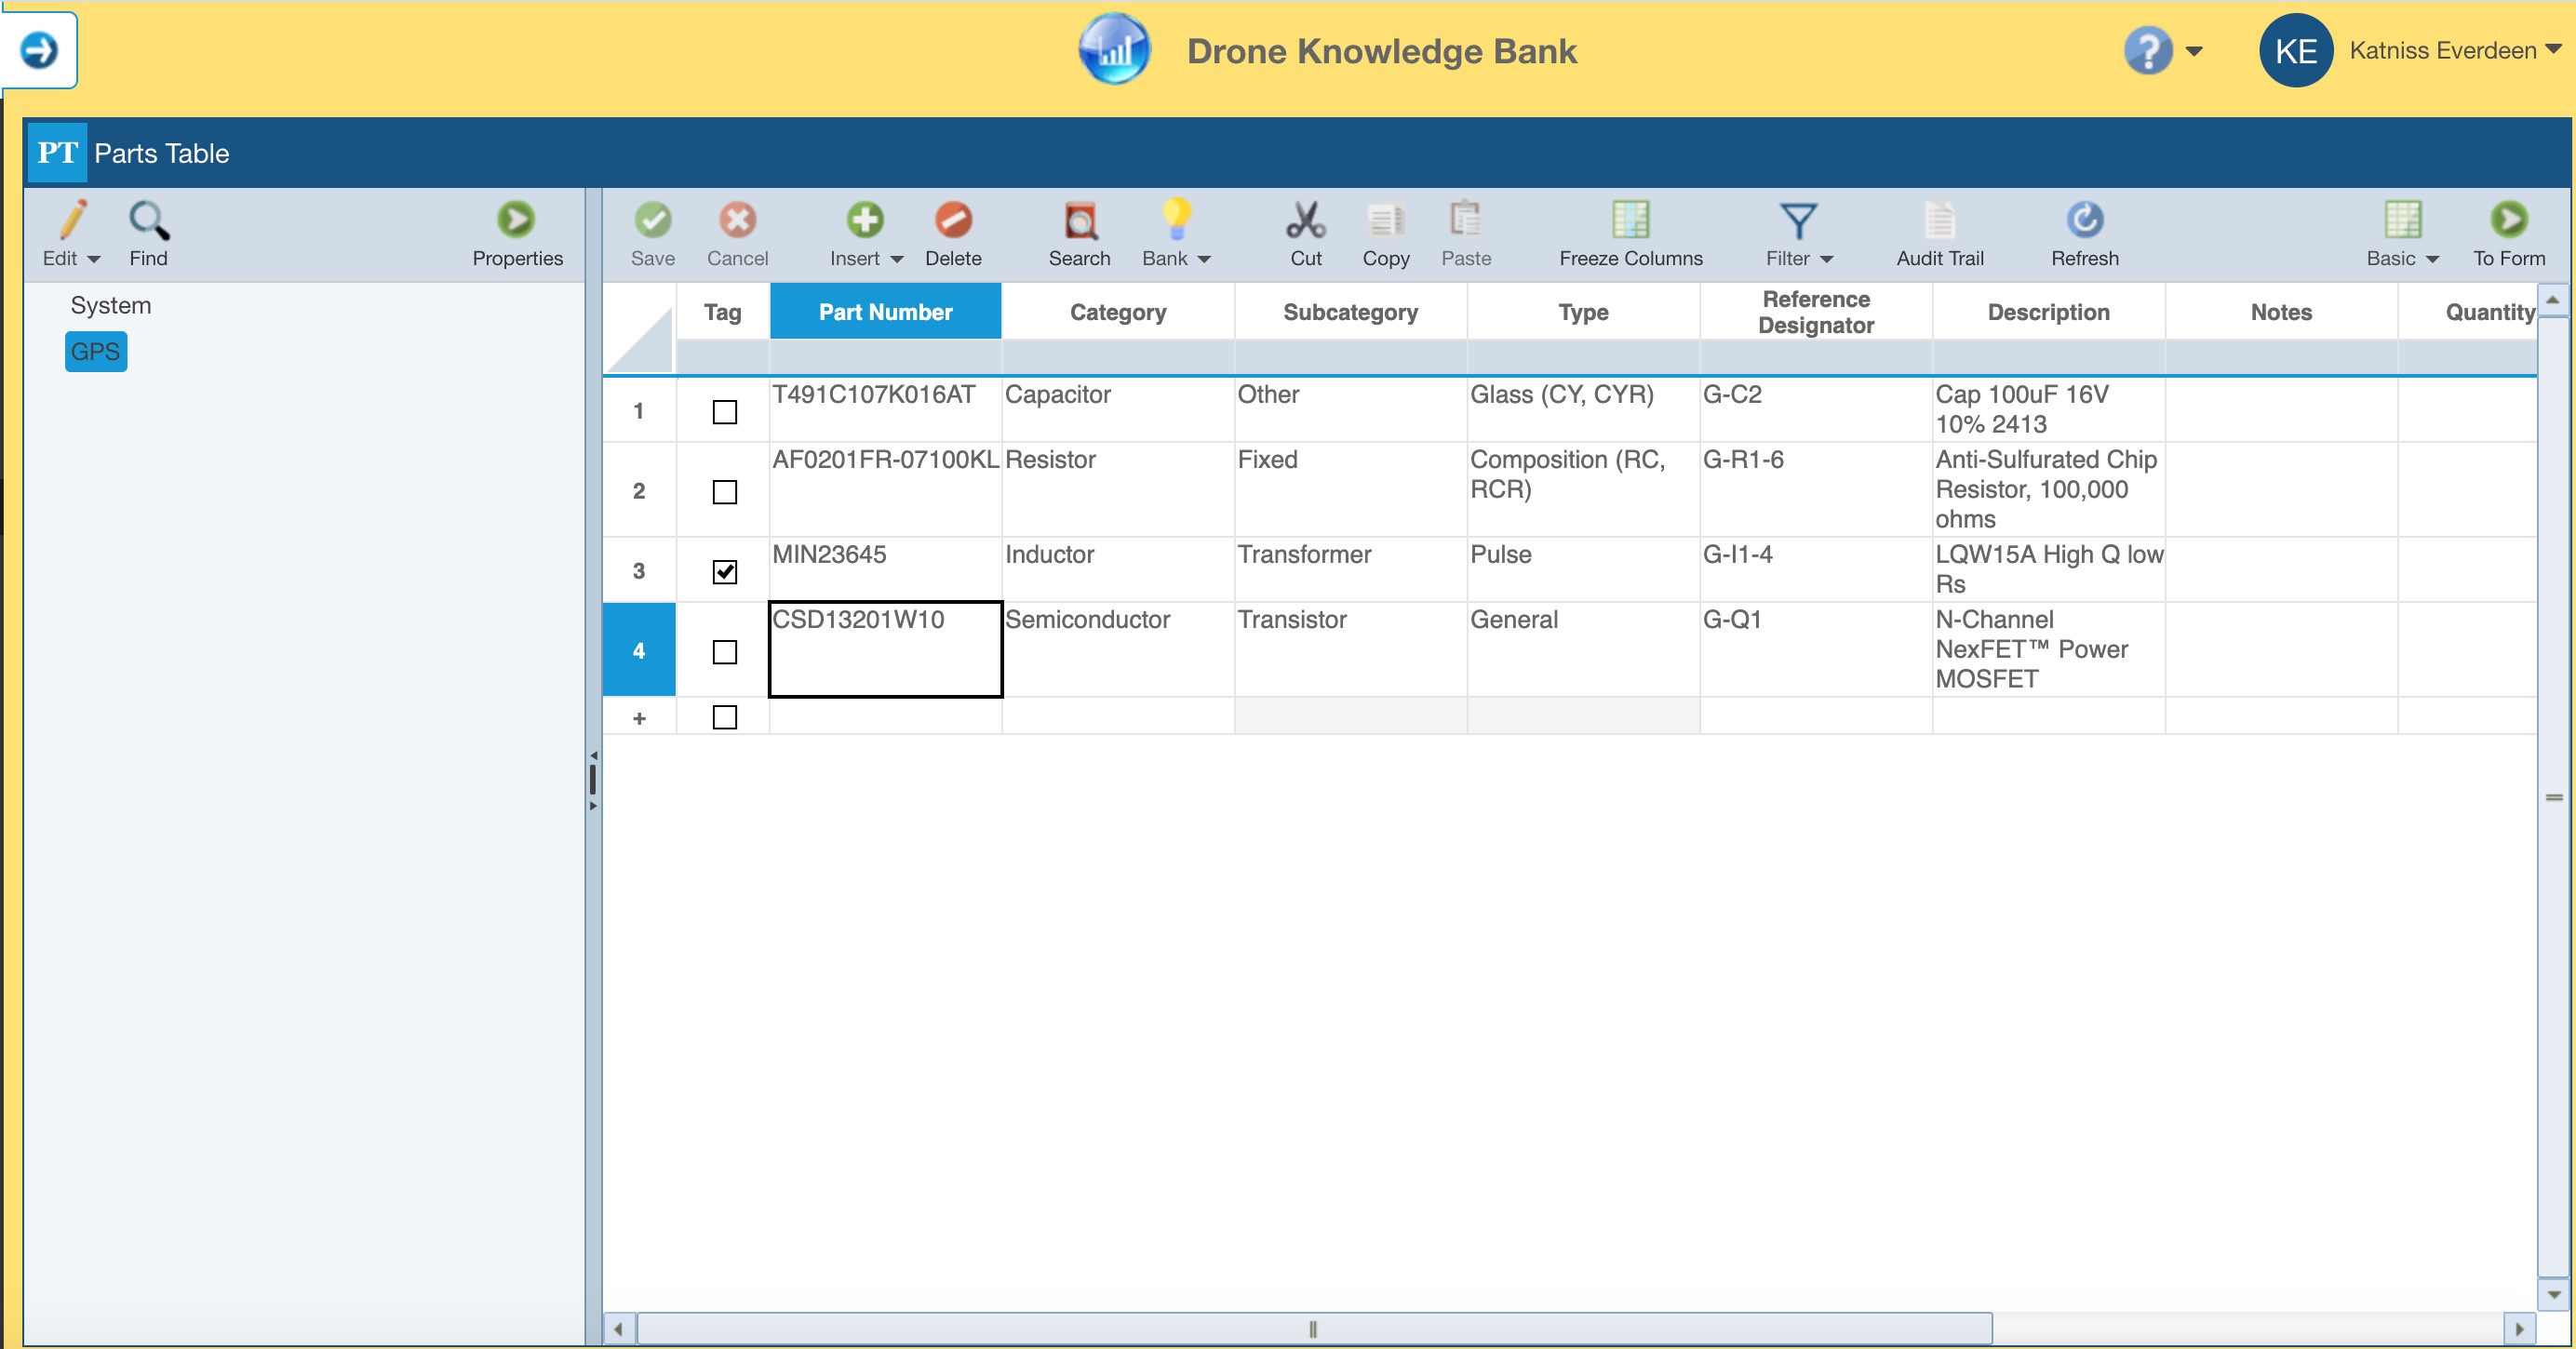
For example, you may have a GPS Subsystem and all its Reliability Prediction data stored in a Knowledge Bank and then you create an instance of the GPS that is tied to the Knowledge Bank. Consider if at some point it is determined that an additional Part must be included. That additional Part is added to the GPS Subsystem in the Analysis, which is tied to the Knowledge Bank. In some cases, it might be useful to add that Part to the Knowledge Bank and then Push those changes. In order to add that additional Reliability Prediction data to the Knowledge Bank, you can use Pull Changes feature.
In our example, the GPS in the Knowledge Bank looks like this:
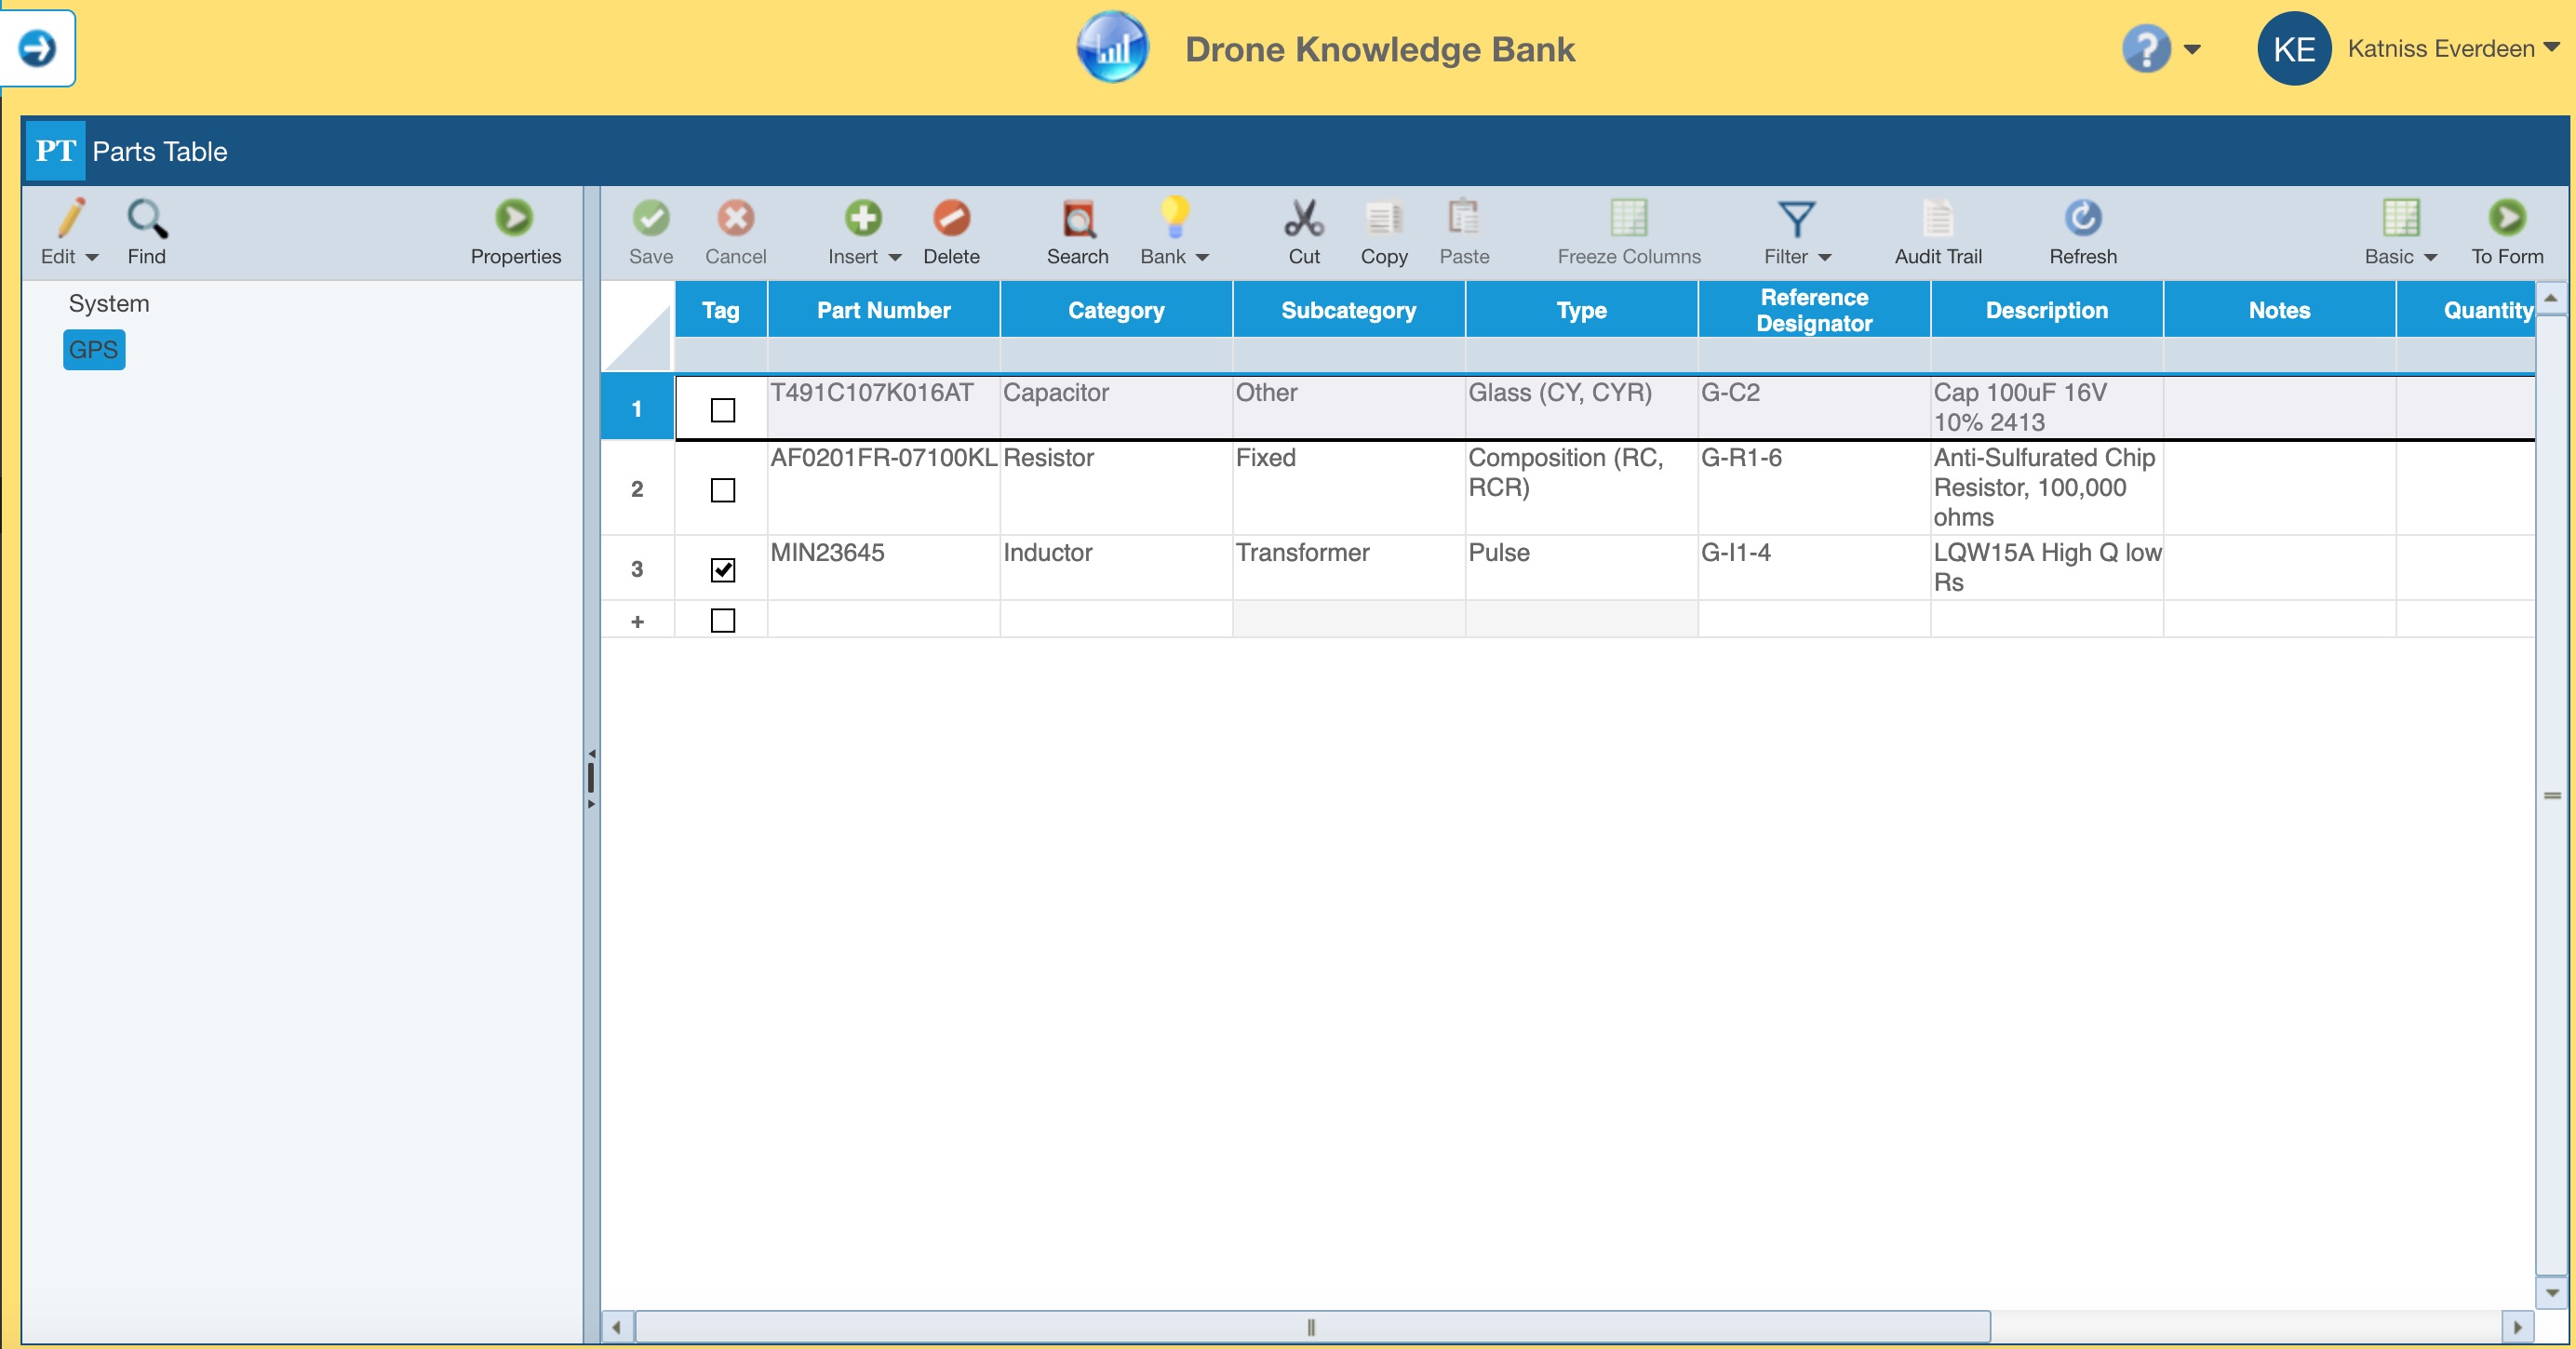
And, in our in-progress Analysis, we determine we must add another Part. So, the GPS gets updated to include the additional Part data and looks like this:
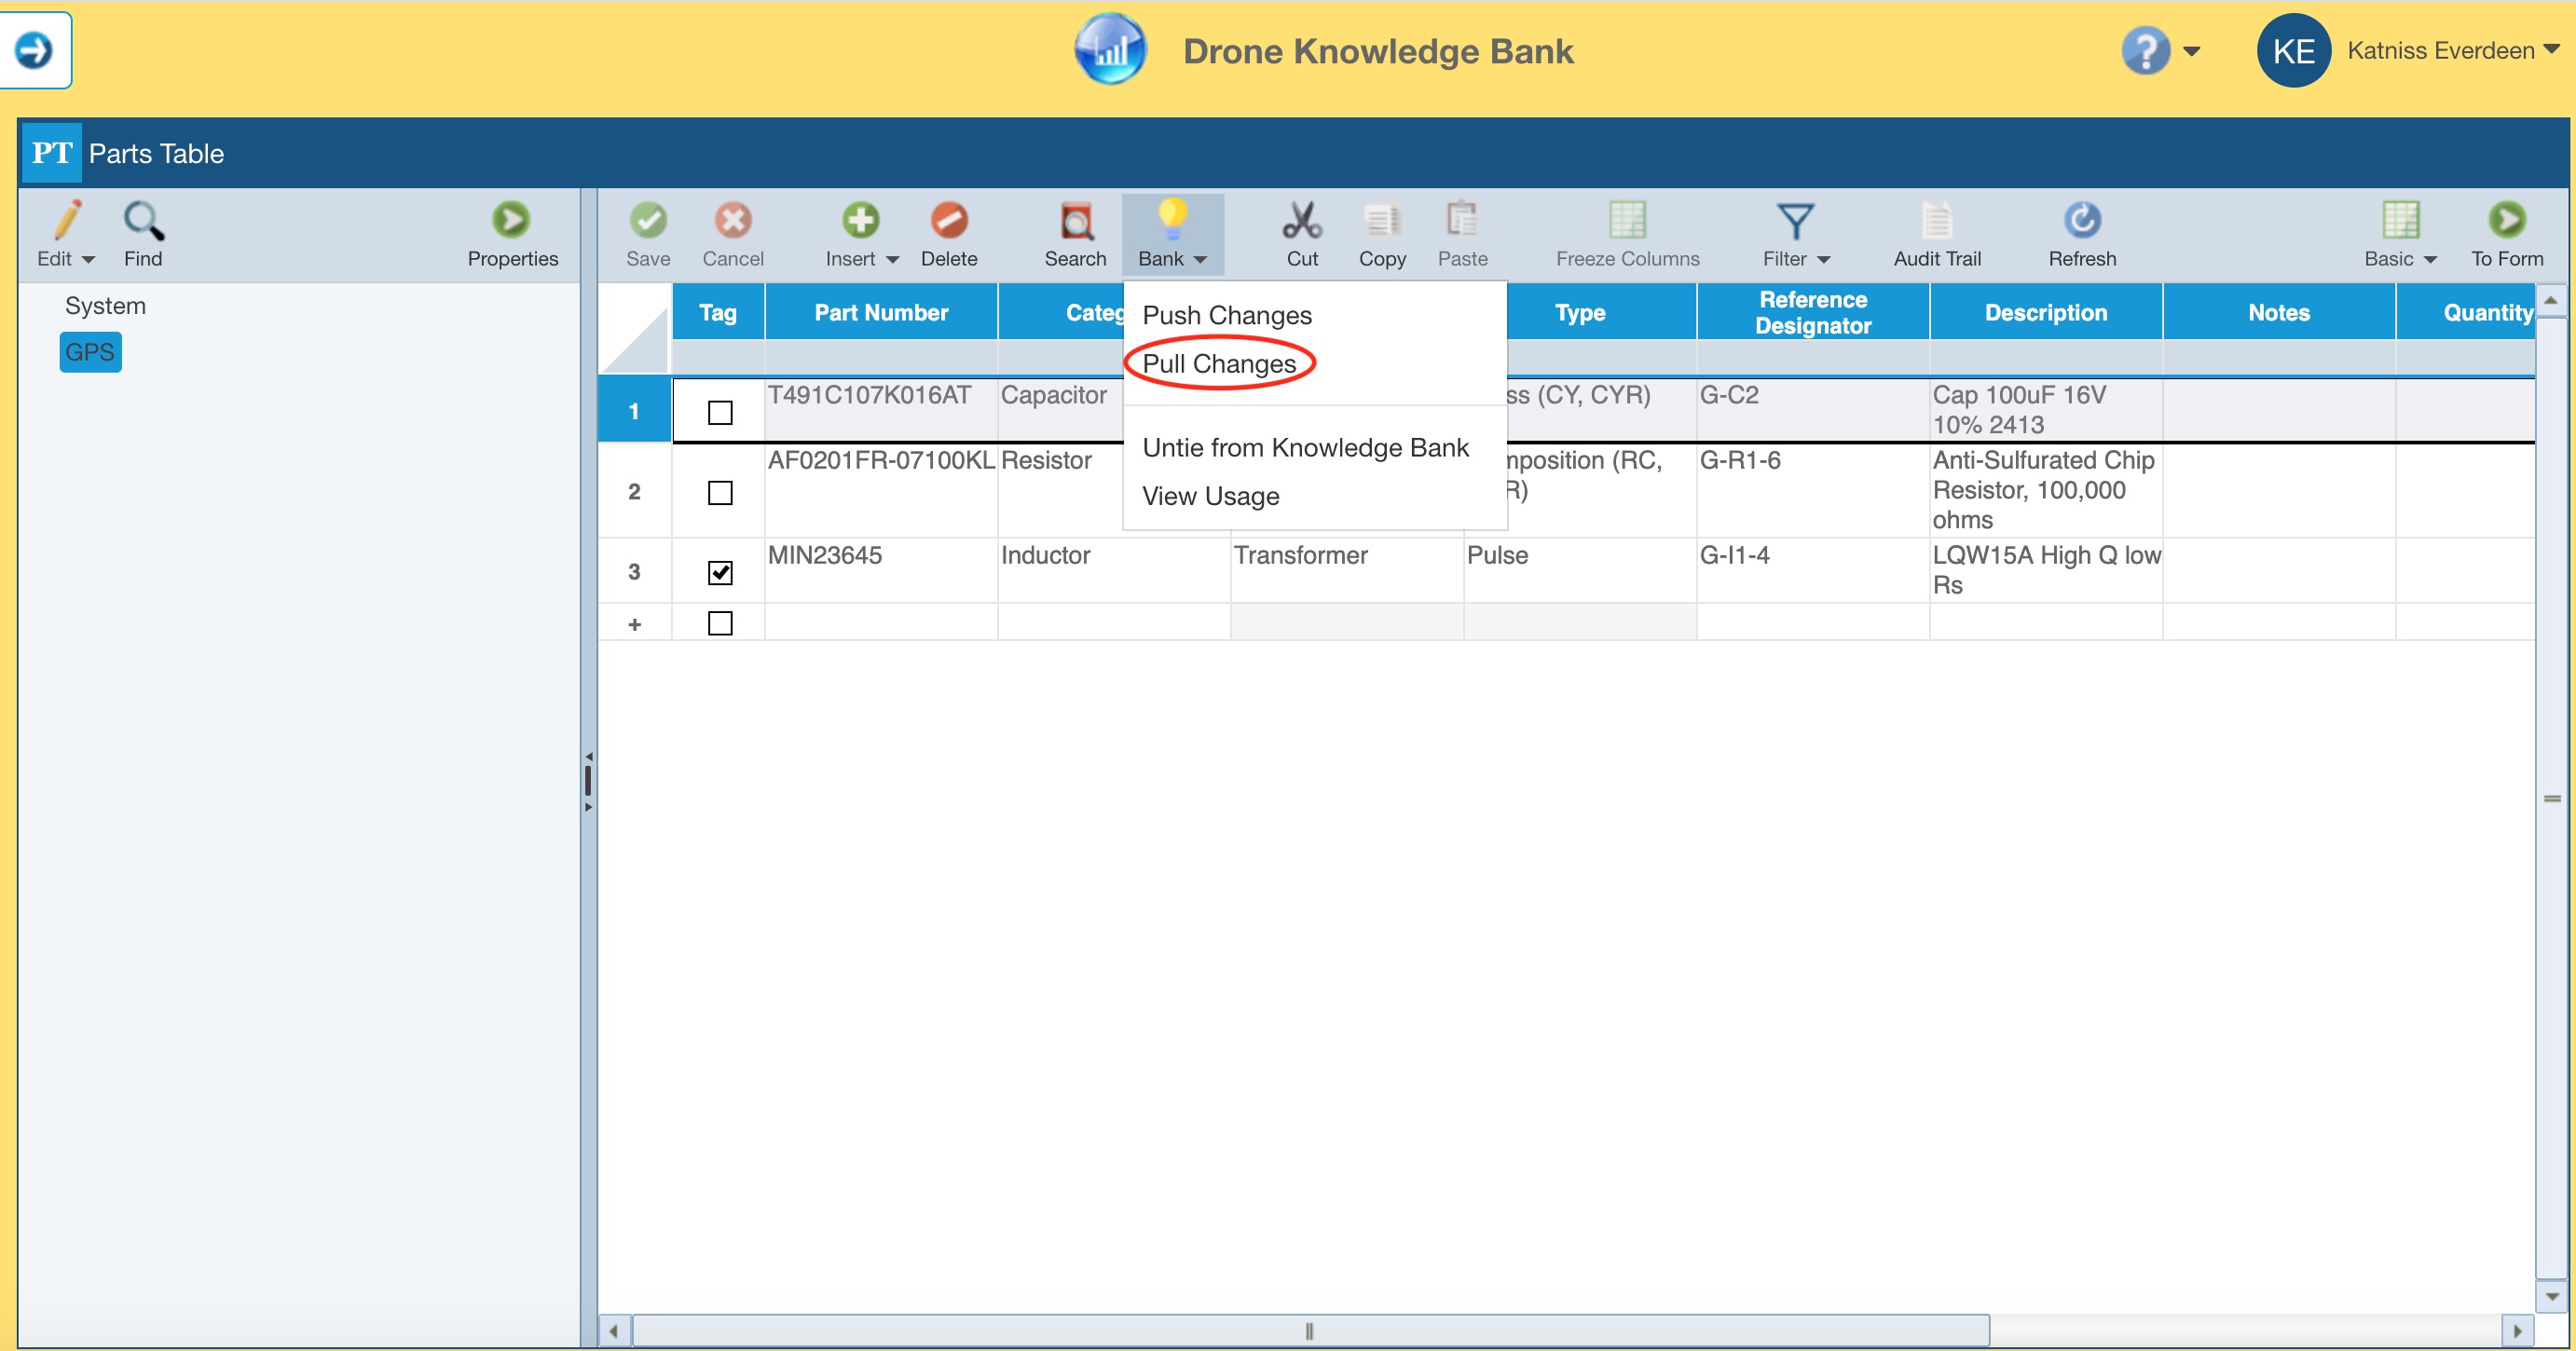
To pull those changes into the Knowledge Bank for future use, you can open the Knowledge Bank and from the toolbar, select Bank and then Pull Changes.
Note that while Relyence is gathering the list of changes to pull, you can click Stop to stop gathering changes to pull and return to the Knowledge Bank.
Otherwise, the Pull Knowledge Bank Changes dialog appears with a list of possible changes to be pulled. Or if there are no changes to be pulled, the dialog will indicate this. In this case, click the Close button to close the dialog.

This dialog displays changes made in Analyses and associated Knowledge Banks that have data tied to this Knowledge Bank.
You can view the list of changes in two ways: by Analysis or by Change. To change the way the Push changes are listed, click the View list of Changes or View list of Analyses and Knowledge Banks link. Click the Expand (+) and Collapse (-) icons in the tree to drill down to see the specific details on the changes to be made.
You can click to select any changes that you do not want to Pull into the Knowledge Bank and then click Delete to remove them from the list.
Click to select any changes that you want to Pull into this Knowledge Bank by selecting the checkmark and then click Pull to add them.
To select all changes to delete or pull, click Select all. To deselect all changes to ignore or pull, click Clear all.
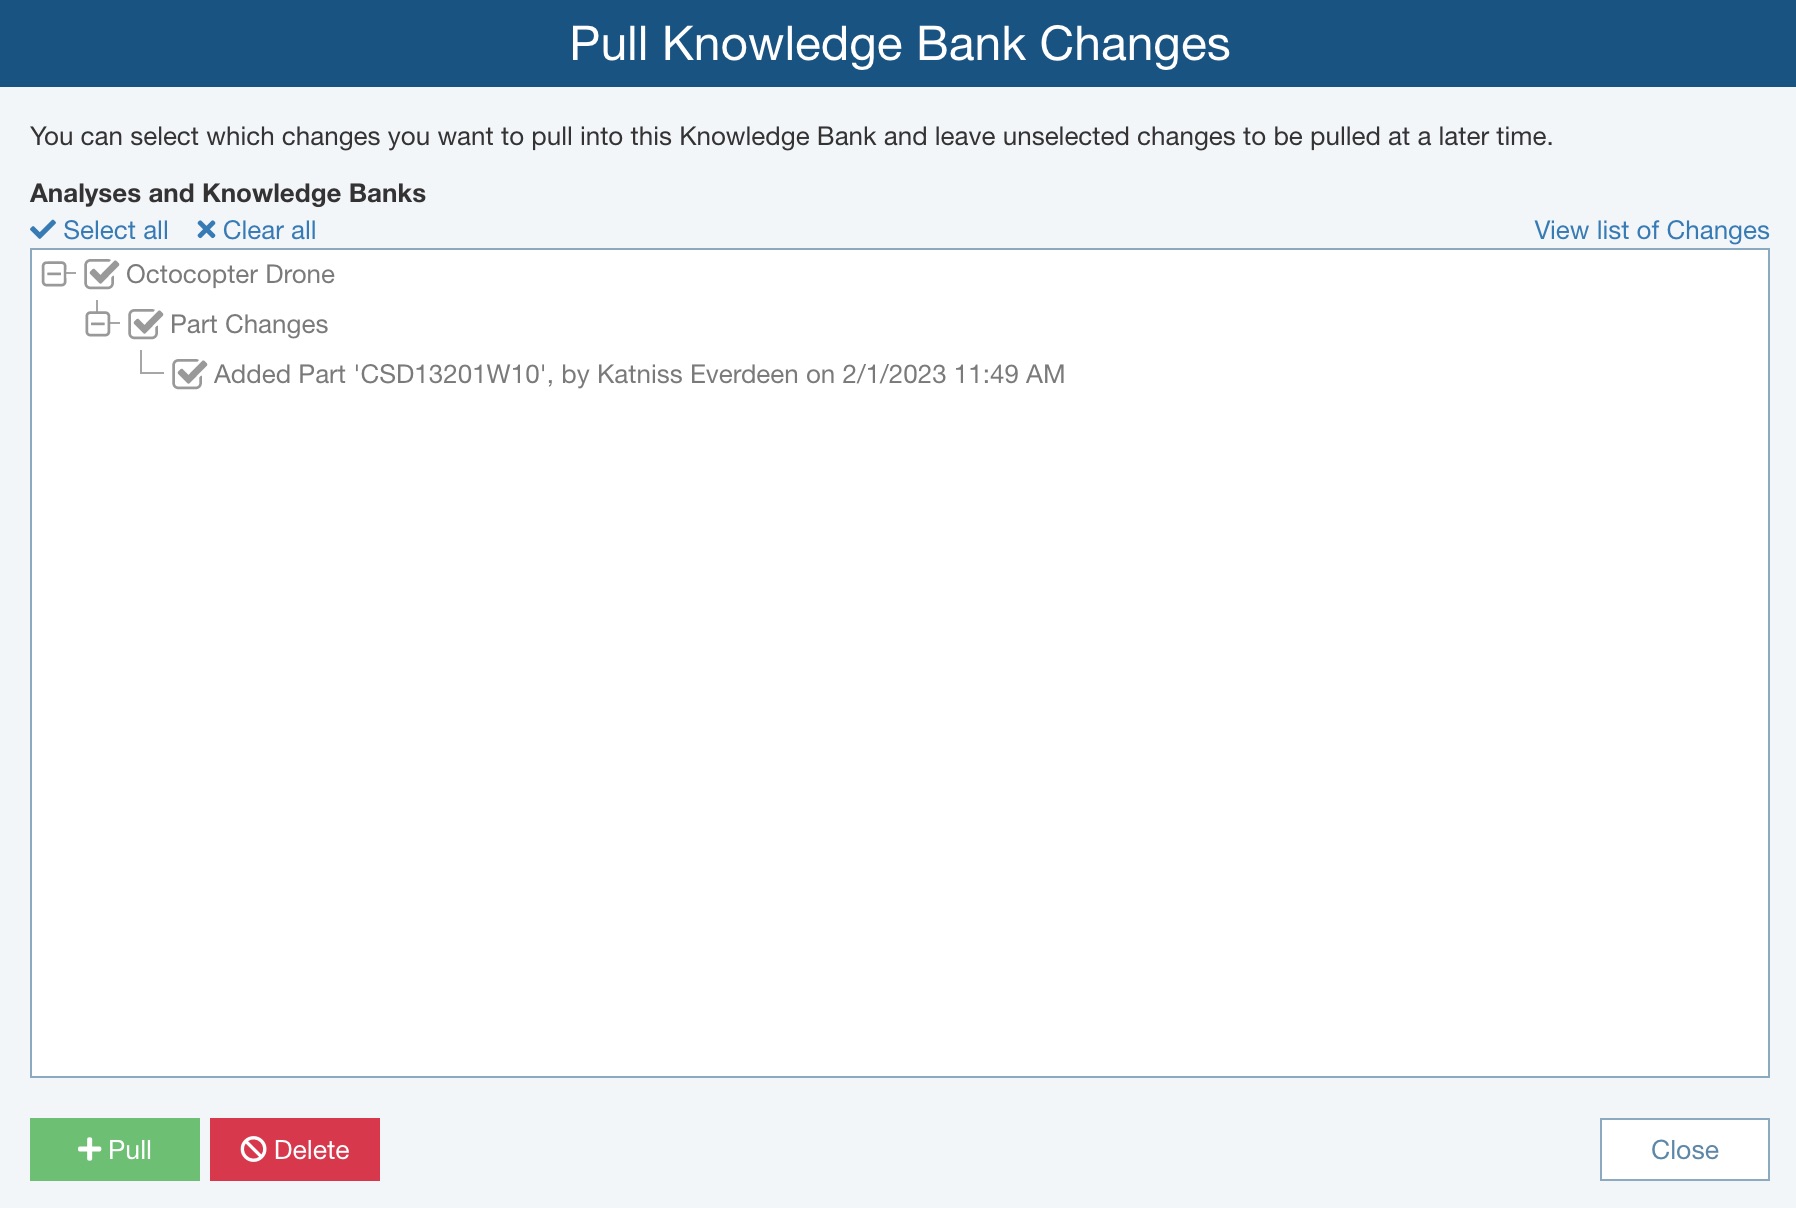
If there are any changes you want to leave in the list for consideration in a future Pull, leave their checkmark cleared: those changes will still be pending, and will appear the next time you select the Pull function.
The Pull Changes dialog appears with a warning that the operation is permanent and cannot be undone.
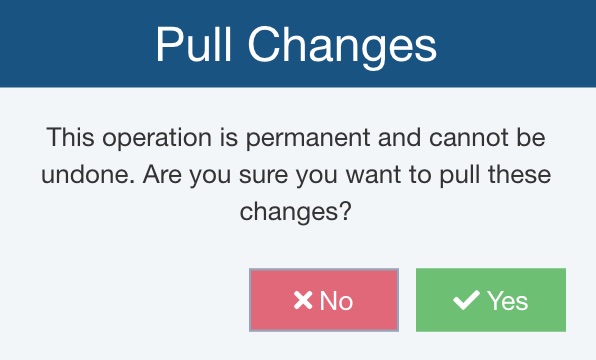
If you are confident to make these changes at this time, click Yes; otherwise click No.
All updates to your Knowledge Bank data will automatically be made based on your selections on the Pull Knowledge Bank Changes dialog. A green message appears in the bottom right of the screen to confirm the Pull changes is completed. The Pull Knowledge Bank Changes dialog appears with any outstanding changes to consider for pulling or a message confirming that there are no changes to be pulled into the Knowledge Bank at this time.
Click Close.
In the example Knowledge Bank, the GPS Subsystem was updated to include the additional Part and related data.
If that GPS is used in other places, you can optionally use the Knowledge Bank Push function to update other instances of the GPS. See the earlier section, Pushing out Knowledge Bank updates, for more details about how to Push updates from the Knowledge Bank.
You manage the Pull function, so you are in control of how and when the updates are made to your Knowledge Banks. For example, you may want to let your teammates know about a data Pulls prior to initiating or after completion so they may consider an update via the Push function. Or, you may want to only pull the changes at certain times, perhaps weekly or monthly.
When you have completed reviewing, click Close to close the dialog.
Click Back to Analysis in the Sidebar menu to return to your Analysis.
Creating and Using Custom Reliability Prediction Formulas in Knowledge Banks
You can create and use custom Reliability Prediction Formulas in Knowledge Banks. You can find more details in Creating Your Own Reliability Prediction Formulas.
To create custom Reliability Prediction Formulas in a Knowledge Bank, from the Sidebar, select Configure>Formulas.
To perform the calculations defined in your custom Reliability Prediction Formulas in a Knowledge Bank, from the Sidebar, select Perform>Formula Calculations.