Using the Manage Analyses Function
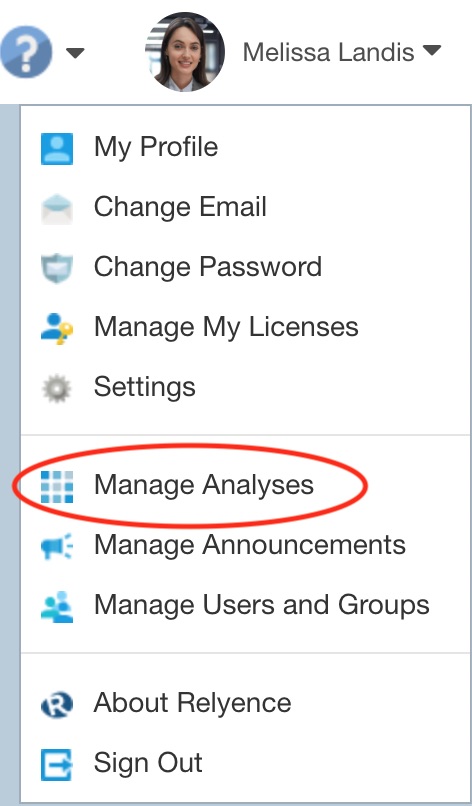
Note: The Manage Analyses is available by permission, so you may or may not have access to it depending upon the permissions set by your Relyence Administrator. If you have permission, the Manage Analyses function will appear in the Account menu.
Manage Analyses encompasses all the functions needed for fully manage and organize and track all your Relyence Analyses and their related data. It is the one location that can be used for all Analysis related activities including duplicating, deleting, creating Revisions, defining access control, and various other functions. It also provides access to organize and track Dashboards, Knowledge Banks, Libraries, Imports, Examples, and their related data.
To access the Manage Analyses function, click Manage Analyses from the Account menu.
The Manage Analyses page appears.
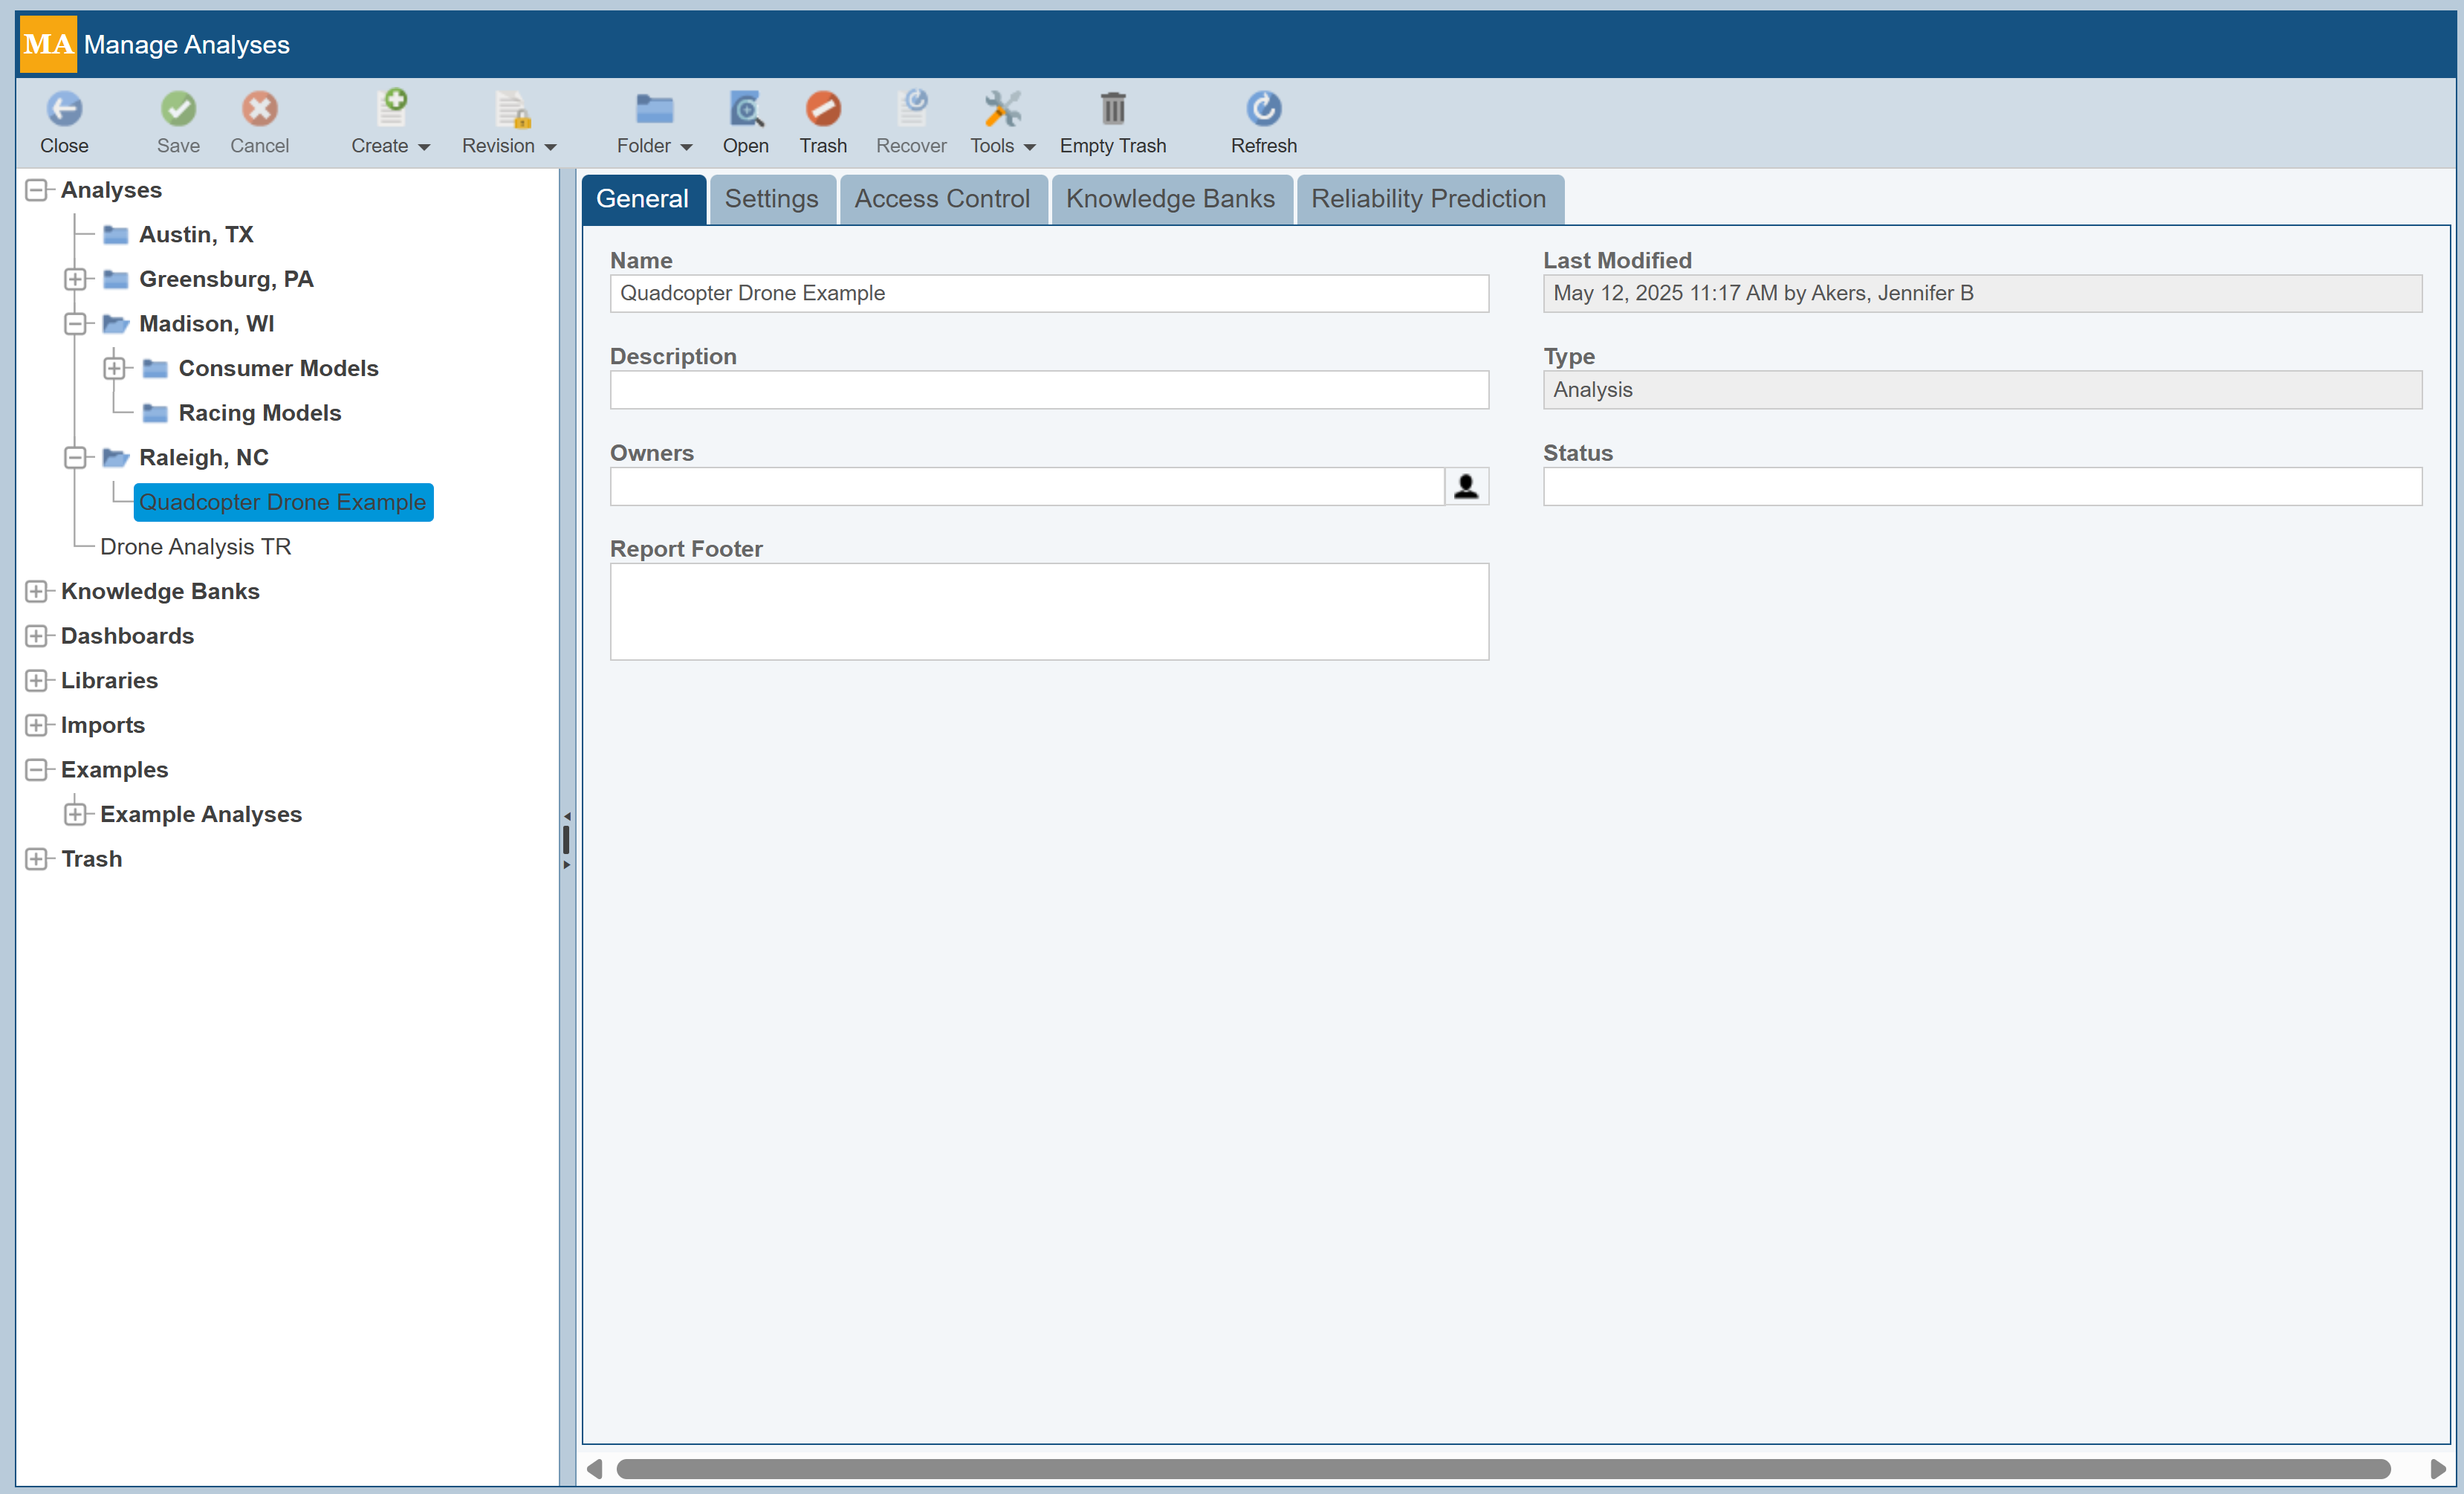
Manage Analyses Page
The Manage Analyses page consists of three parts:
- The left Navigator pane enables you to view all your Analyses, Revisions, Knowledge Banks, Dashboards, Libraries, Imports, Examples, and Trash.
- The right tabbed Settings pane is the working pane that allows you to set the preferred settings for the item selected in the Navigator pane.
- The top Toolbar.
Manage Analyses Navigator Pane
The Navigator pane is used to select the item. The hierarchical tree can be expanded or collapsed using the [+] and [-] icons to view all available items.
The top levels in the Navigator pane include Analyses, Revisions, Knowledge Banks, Dashboards, Libraries, Imports, Examples, and Trash.
Revisions are always shown below their associated original Analysis. Revisions can be full Analysis Revisions or Analysis Tree Revisions. For more detail about Analysis Revisions, see Managing Revisions. For more details about Analysis Tree Revisions, see FMEA Analysis Tree Revisions, Reliability Prediction Analysis Tree Revisions, or Maintainability Prediction Analysis Tree Revisions.
Manage Analyses Settings Pane
The Settings pane consists of various tabbed views, depending on what is selected in the Manage Analyses Navigator pane.
The Settings pane consists of several tabbed views when an Analysis or Revision is selected.
- General tab
- Enables you to set the Name and Description
- Displays the Last Modified date, time and User and the Type of selected item
- Enables you to set Owners and Status as well as Report Footer.
- Categories tab (only if Analysis Categories are defined)
- Enables you to define important characteristics about the selected Analysis, such as Customer, Country Sold, Product Line details. No Analysis Categories are defined by default in Relyence, so until you define custom Analysis Categories, this section will not be displayed. For more details, see Customizing Analysis Categories.
- Settings tab
- Enables you to specify the settings for the selected item, including:
- Read-only (available for Analyses only) - Sets the Analysis to read-only, which mean that no edits can be made.
- Do not include this Analysis in Push updates (available for Analyses and Revisions)
- If you are using the Knowledge Bank(s), changes made to your Knowledge Bank(s) can be optionally pushed out to your Analyses which link to it. If you want this Analysis or Revision to be updated with Knowledge Bank changes, clear Do not include this Analysis in Push updates. If you do not want any changes from the Knowledge Bank(s) to propagate to this Analysis or Revision, select Do not include this Analysis in Push updates.
- For example, you may have a FMEA Analysis that you have completed and want to keep as is. By turning off Knowledge Bank changes to this Analysis, your FMEA will be preserved as is.
- For more information on Knowledge Banks, see the Using FMEA Knowledge Banks topic or Using Reliability Prediction Knowledge Banks topic.
- Log changes in Audit Trail (available for Analyses and Knowledge Banks)
- Note: You may not see this option if you are not licensed for Relyence Audit Trail functionality.
- If you would like to track all changes made to your FMEA, FRACAS, and Reliability Prediction data in this Analysis, select Log changes in Audit Trail. All modifications made to your FMEA, FRACAS, and Reliability Prediction information will be logged along with who made the change and when that change was made. You can then review Audit Log information on specific records in your Analysis and export full Audit Trail reports.
- For more information on Audit Trails for FMEA, see the FMEA Audit Trail topic. For more information on Audit Trails for FRACAS, see the FRACAS Audit Trail topic. For more information on Audit Trails for Reliability Prediction, see the Reliability Prediction Audit Trail topic.
- Log notifications (available for Analyses only)
- Relyence FMEA and FRACAS have the capability to send notification emails according to your preferences through the FMEA and FRACAS Notifications and Approvals features. If you wish to log all the emails sent to team members through Relyence, select Log notifications setting. When enabled, Relyence will log all emails sent. For more information, see the FRACAS Notifications and Using FMEA Notifications topics.
- Force save on Workflow change (available for Analyses only)
- Note: This setting is only available for Analyses that include either FMEA or FRACAS.
- Relyence has the capability to track records through a custom workflow in Relyence FMEA and Relyence FRACAS. If you wish to force the user to Save outstanding changes before moving to the next workflow step, select the Force save on Workflow change setting.
- Enables you to specify the settings for the selected item, including:
- Access Control tab
- Enables you to limit access to your Analysis. See the Manage Analyses Access Control section below for details.
- Knowledge Banks tab
- Enables you to limit access to selected Knowledge Banks. See the Managing Access to Knowledge Banks section below for more details.
- Fault Tree tab
- Enables you to limit access to selected Event Libraries, Fault Tree Libraries, Event Libraries (SAE ARP4754A / ARP4761), and Fault Tree Libraries (SAE ARP4754A / ARP4761).
- Reliability Prediction tab
- Enables you to limit access to selected Parts Libraries and Derating Libraries.
- RBD tab
- Enables you to limit access to selected Block Libraries and RBD Libraries.
- Maintainability tab
- Enables yo to limit access to selected Maintainability Libraries.
The Settings pane consists of several tabbed views when a Knowledge Bank is selected.
- General tab
- Enables you to set the Name and Description
- Displays the Last Modified date, time and User and the Type of selected item
- Enables you to set Owners as well as Report Footer.
- Categories tab
- Enables you to define important characteristics about the selected Analysis, such as Customer, Country Sold, Product Line details. No Analysis Categories are defined by default in Relyence, so until you define custom Analysis Categories, this section will not be displayed. For more details, see Customizing Analysis Categories.
- Settings tab
- Enables you to specify the settings for the selected item, including:
- Do not include in Push updates
- Include Record Number changes in Push updates
- Log changes in Audit Trail
- Enables you to specify the settings for the selected item, including:
- Access Control tab
- Enables you to limit access to your Knowledge Bank. See the Manage Analyses Access Control section below for details.
- Knowledge Banks tab
- Enables you to limit access to selected Knowledge Banks. See the Managing Access to Knowledge Banks section below for more details.
- Reliability Prediction tab
- Enables you to limit access to selected Parts Libraries and Derating Libraries.
The Settings pane consists of several tabbed views when a Dashboard is selected.
- General tab
- Enables you to set the Name and Description
- Displays the Last Modified date, time and User and the Type of selected item
- Access Control tab
- Enables you to limit access to your Dashboard. See the Manage Analyses Access Control section below for details.
The Settings pane consists of several tabbed views when a Library is selected.
- General tab
- Enables you to set the Name and Description
- Displays the Last Modified date, time and User and the Type of selected item
- Access Control tab
- Enables you to limit access to your Library. See the Manage Analyses Access Control section below for details.
- Not applicable for Defaults Library files, Failure Mode Library files, Fault Tree Monitor Library files.
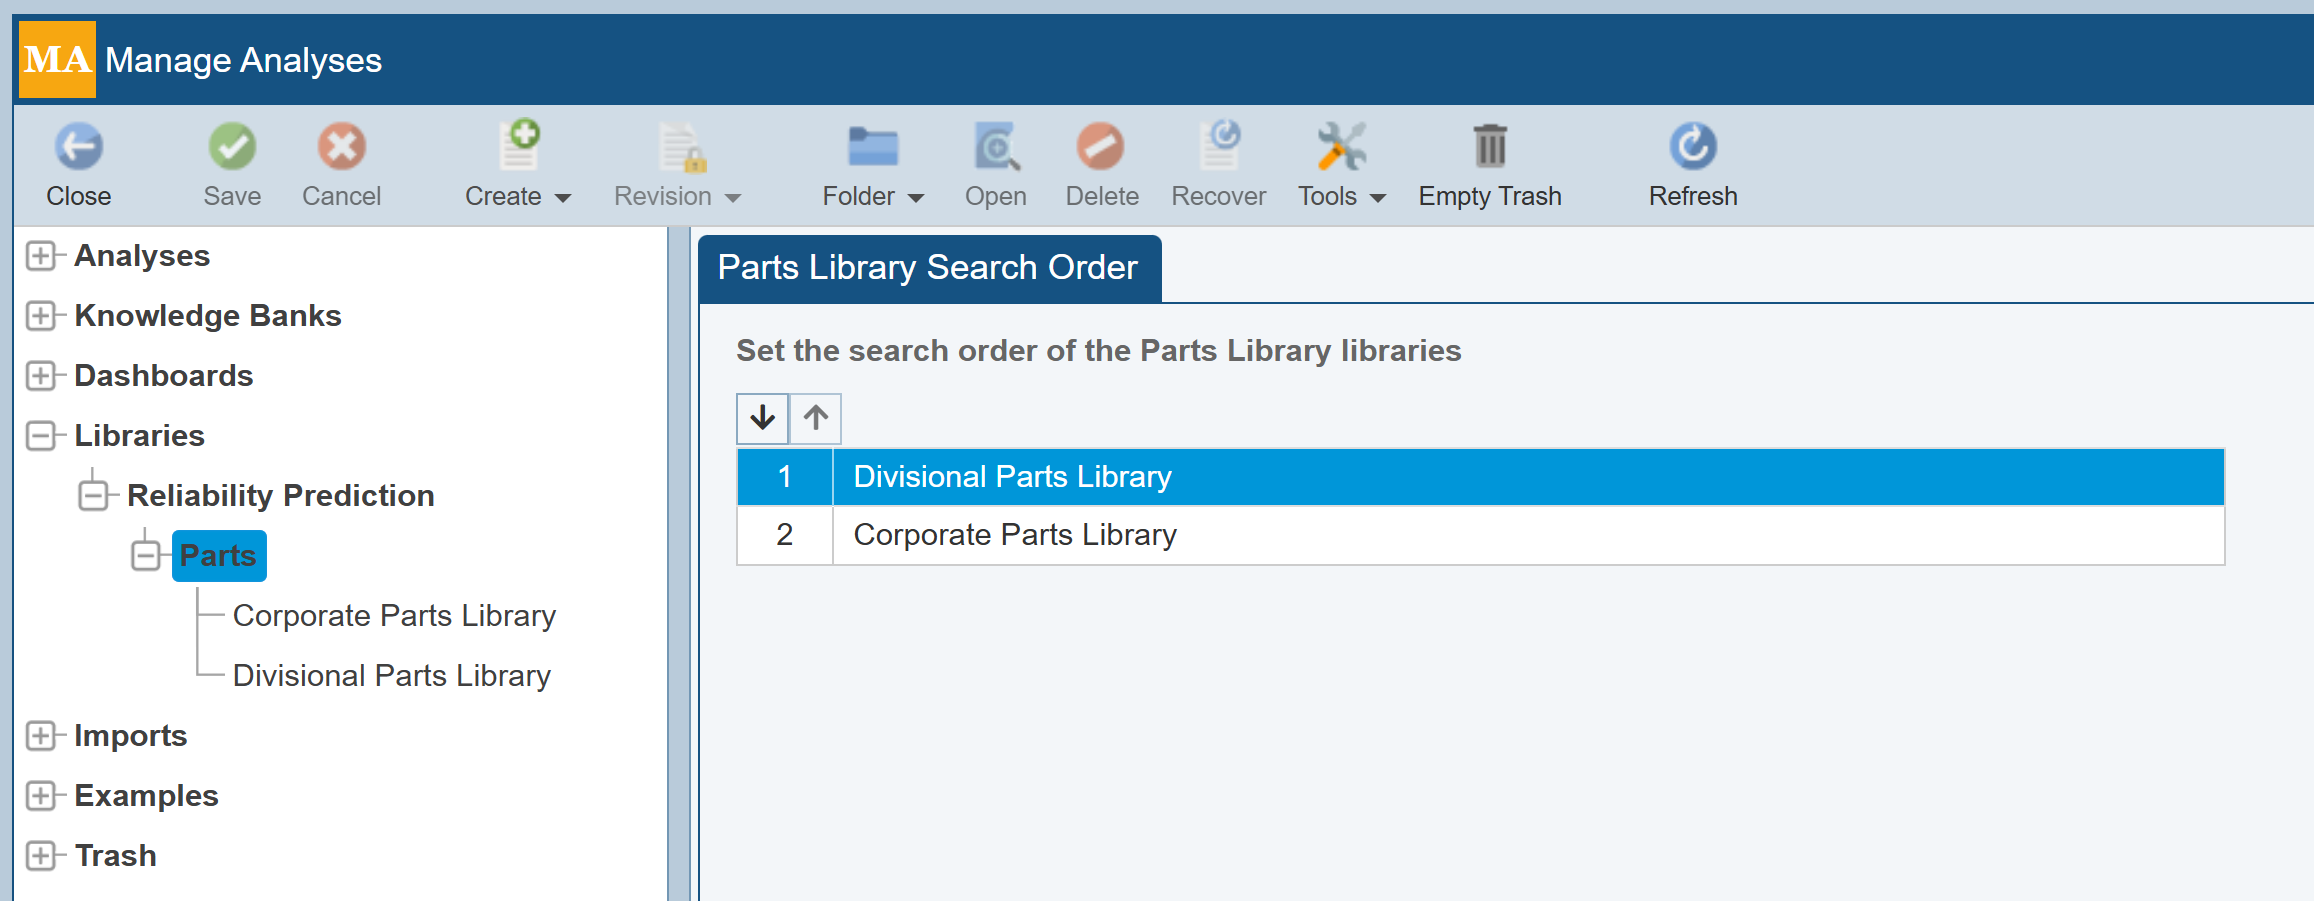
When the Maintainability Prediction or Prediction / Parts headings are selected, the Settings pane shows the Maintainability Library Search Order or Parts Library Search Order tab, which allows you to set the search order for the relevant Library files. Select the Library and use the Move Down and Move Up buttons to adjust the order, as needed.
The Settings pane simply shows Name and Type when an Import is selected.
The Settings pane shows the same properties and tabs as any Analysis when an Example Analysis is selected.
The Setting panes shows disabled relevant fields when an item in the Trash is selected.
Manage Analyses Toolbar Functions
The toolbar enables you to perform various actions on your various Relyence data items, including Analyses, Dashboards, Knowledge Banks, Libraries and more.
Depending upon your Relyence license and what you have created, all these items may not appear.
Close
Closes the Manage Analyses page and return to where you were. If there are unsaved changes, you will be asked if you want to save your changes prior to closing.
Save
Saves any modifications you have made in the Settings pane.
Cancel
Cancels any modifications you have made in the Settings pane.
Create
The Create dropdown enables you to create a new item or duplicate an item.
Creating New Analyses, Dashboards, Libraries and Knowledge Banks
To create a new item, click New from the Create dropdown menu. The Create New dialog appears.
Creating a New Analysis

Enter a Name and Description for the new Analysis. Analysis names must be unique. The description is optional and can be used for your own informational purposes.
Select Analysis from the I want to create a new dropdown choice list.
You can choose if you want to base the new Analysis on an existing Analysis by selecting or clearing the Create based on existing Analysis checkbox.
If you are not creating an Analysis based on an existing Analysis and you are licensed for FMEA, RCM, and/or FRACAS, select the FMEA, RCM, and FRACAS templates to use for your Analysis from the choice lists.
If you are creating an Analysis based on an existing Analysis, select the Analysis to use as basis from the dropdown list. Select Copy data if you want to also copy the data from the existing Analysis to your new Analysis.
If any Analysis Folders exist, the Create in option appears to allow you to choose the Folder in which the new Analysis should be created. For more details on Folders, see Using Folders.
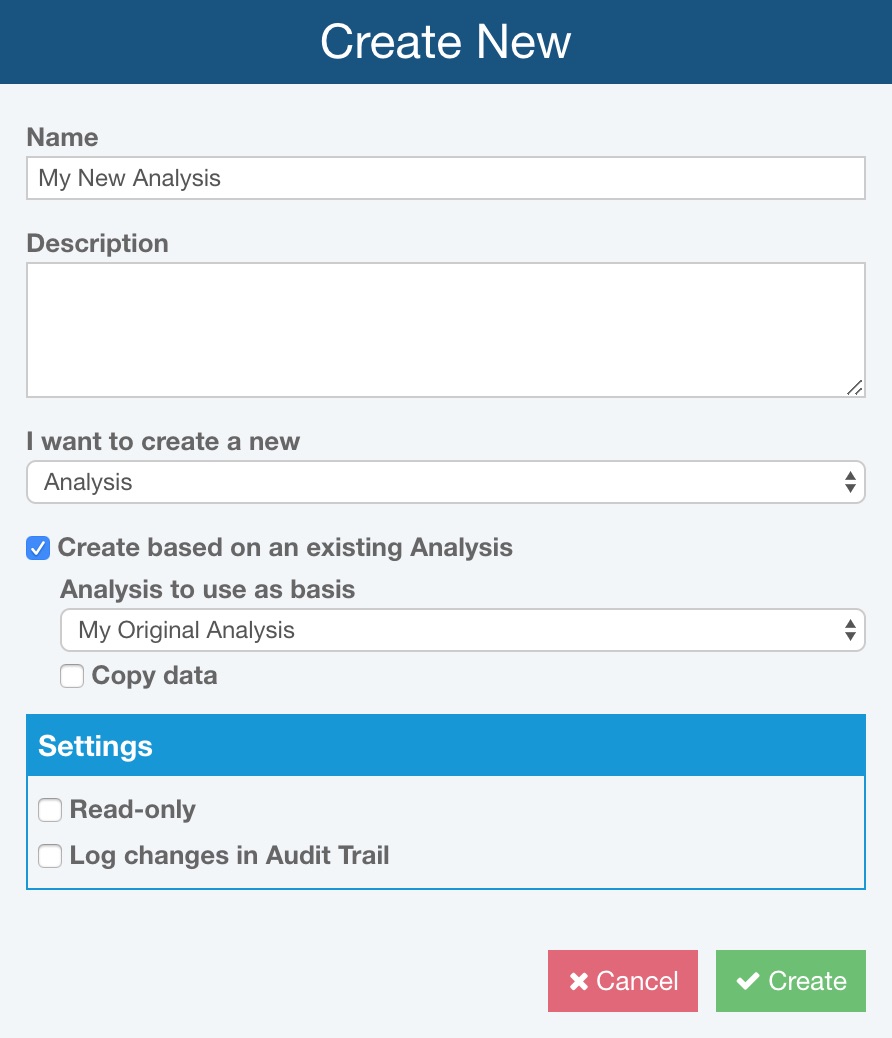
If you want your new Analysis to be non-editable, select the Read-only checkbox.
If you are licensed for the Audit Trail capability, you can select Log changes in Audit Trail to create a log of modifications made to your new Analysis.
If you need to perform fault tree analysis per SAE ARP 4754A / ARP4761, you should select Perform SAE ARP4754A / ARP4761 FTA,
Click Create to create the new Analysis.
Creating a New Knowledge Bank
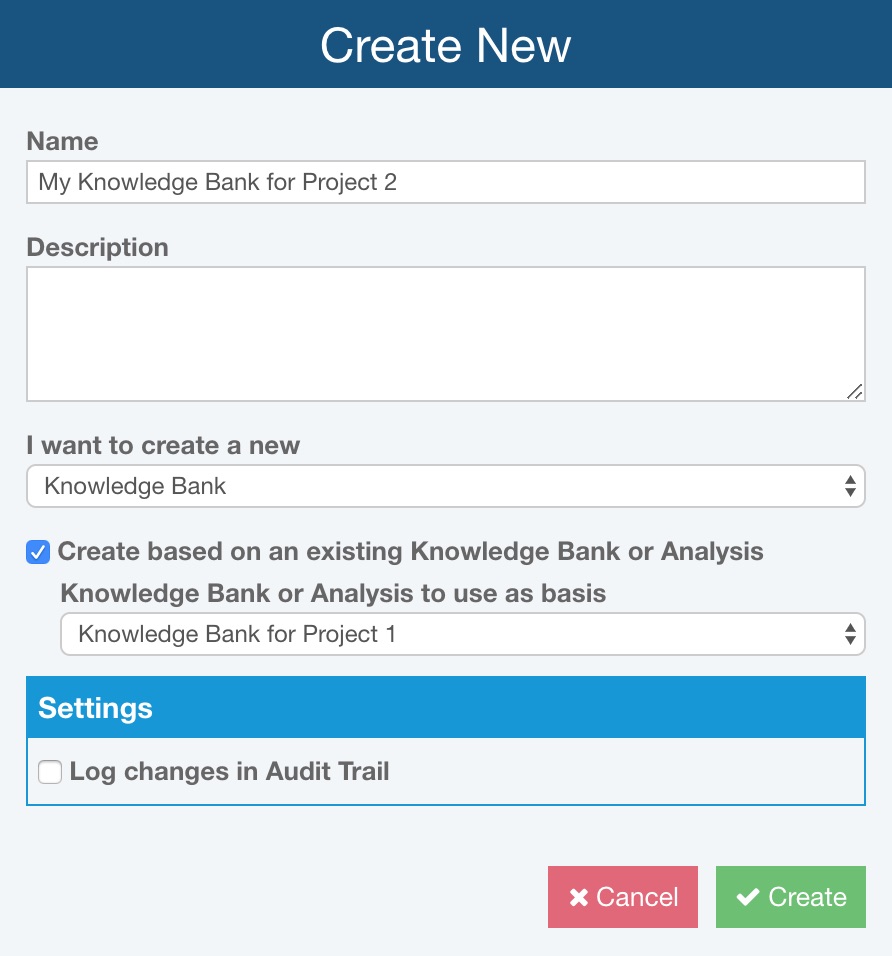
Enter a Name and Description for the new Knowledge Bank. Knowledge Bank names must be unique. The description is optional and can be used for your own informational purposes.
Select Knowledge Bank from the I want to create a new dropdown choice list.
If any Knowledge Bank Folders exist, the Create in option appears to allow you to choose the Folder in which the new Knowledge Bank should be created. For more details on Folders, see Using Folders.
You can choose if your want to base the new Knowledge Bank on an existing Knowledge Bank or Analysis by selecting or clearing the Create based on existing Knowledge Bank or Analysis checkbox. If you are creating a Knowledge Bank based on an existing Knowledge Bank or Analysis, select the Knowledge Bank or Analysis to use as basis from the dropdown list.
If you are not creating an Knowledge Bank based on an existing Knowledge Bank, select the FMEA template to use for your Knowledge Bank.
If you have licensed for the Audit Trail capability, you can select Log changes in Audit Trail to create a log of modifications made to your new Knowledge Bank.
Click Create to create the new Knowledge Bank.
Creating a New Dashboard
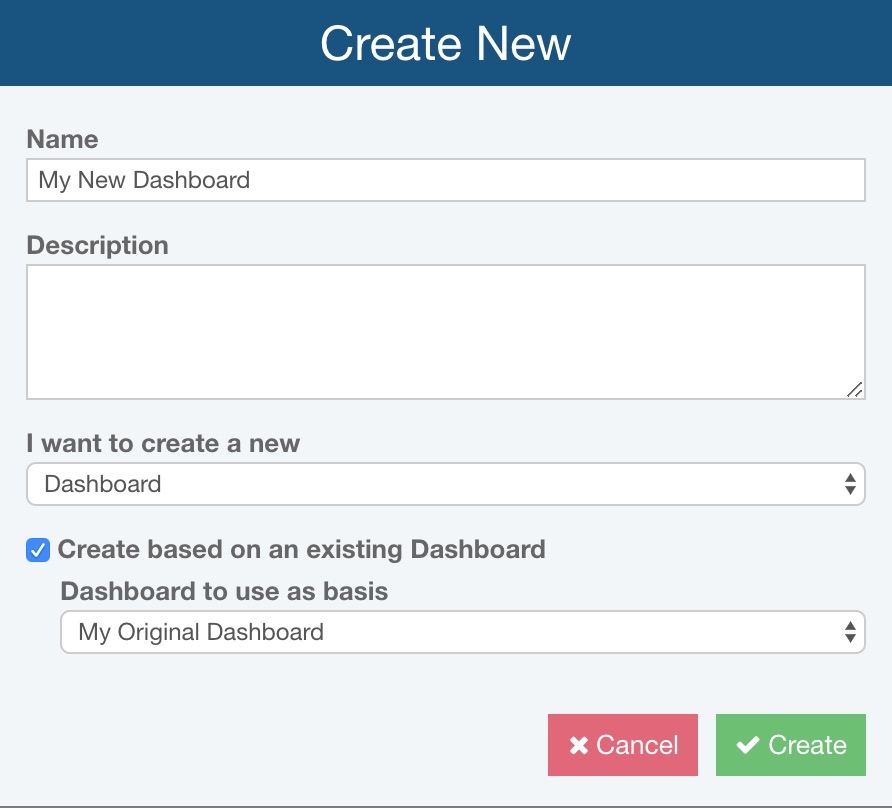
Enter a Name and Description for the new Dashboard. Dashboard names must be unique. The description is optional and can be used for your own informational purposes.
Select Dashboard from the I want to create a new dropdown choice list.
If any Dashboard Folders exist, the Create in option appears to allow you to choose the Folder in which the new Dashboard should be created. For more details on Folders, see Using Folders.
You can choose if your want to base the new Dashboard on an existing Dashboard by selecting or clearing the Create based on existing Dashboard checkbox. If you are creating a Dashboard based on an existing Dashboard, select the Dashboard to use as basis from the dropdown list.
Click Create to create the new Dashboard.
Creating a New Derating Library
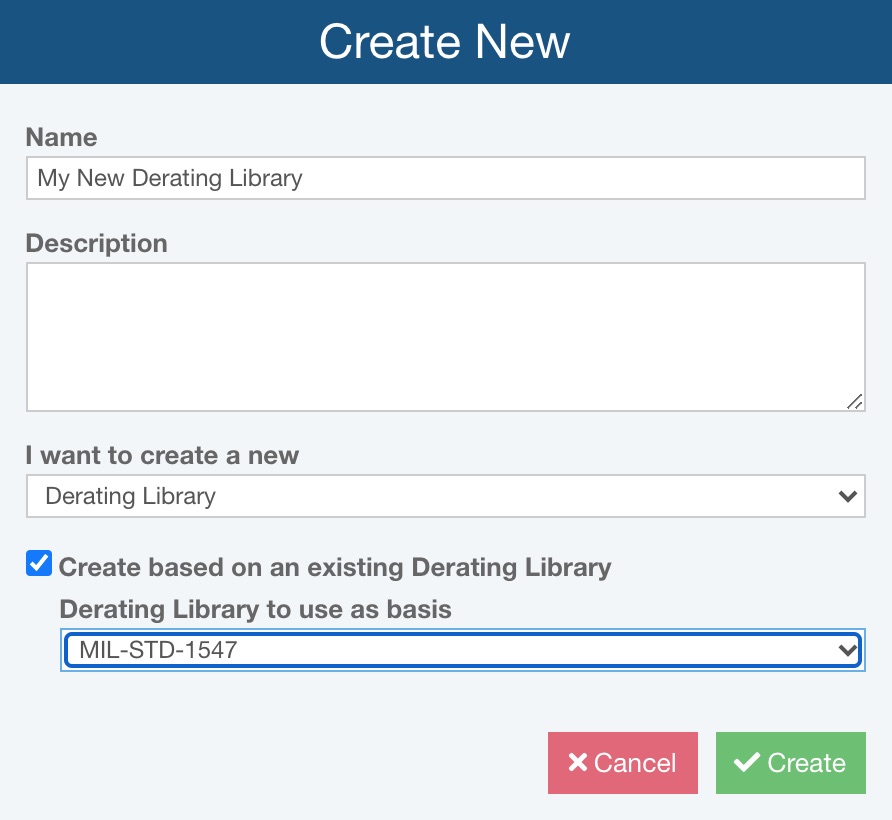
Enter a Name and Description for the new Derating Library. Dashboard names must be unique. The description is optional and can be used for your own informational purposes.
Select Derating Library from the I want to create a new dropdown choice list.
You can choose if your want to base the new Derating Library on an existing Dashboard by selecting or clearing the Create based on existing Derating Library checkbox. If you are creating a Derating Library based on an existing Derating Library, select the Derating Library to use as basis from the dropdown list.
Click Create to create the new Derating Library.
Creating a New Block Library, Event Library, Event Library (SAE ARP4754A / ARP4761), Fault Tree Library, Fault Tree Library (SAE ARP4754A / ARP4761), Maintainability Library, Parts Library, RBD Library
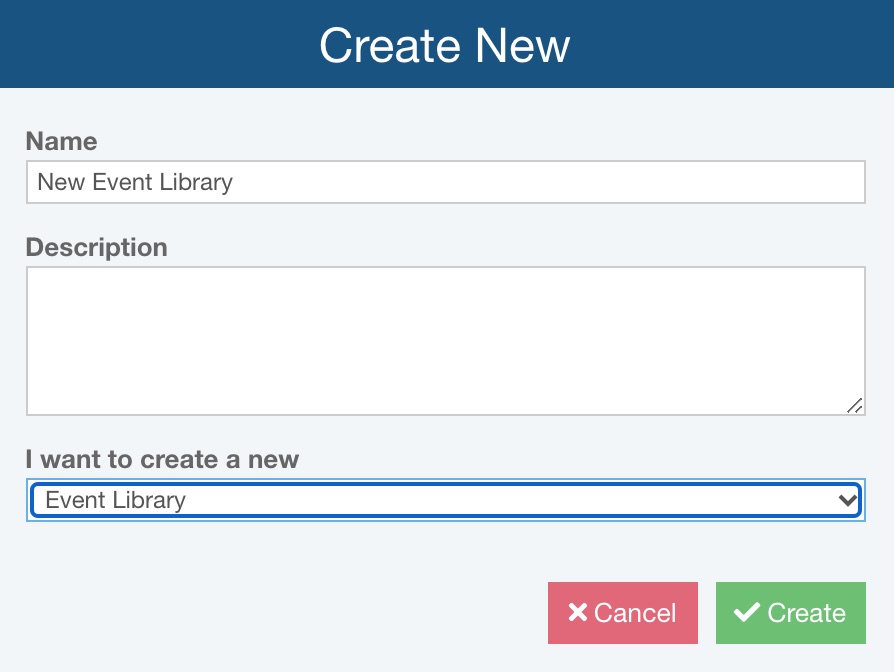
Enter a Name and Description for the new Block Library, Event Library, Event Library (SAE ARP4754A / ARP4761), Fault Tree Library, Fault Tree Library (SAE ARP 4754A / ARP4761), Maintainability Library. Parts Library, or RBD Library. Names must be unique. The description is optional and can be used for your own informational purposes.
Select Block Library, Event Library, Event Library (SAE ARP4754A / ARP4761), Fault Tree Library, Fault Tree Library (SAE ARP 4754A / ARP4761), Maintainability Library. Parts Library, or RBD Library from the I want to create a new dropdown choice list.
Click Create to create the new Block Library, Event Library, Event Library (SAE ARP4754A / ARP4761), Fault Tree Library, Fault Tree Library (SAE ARP 4754A / ARP4761), Maintainability Library. Parts Library, or RBD Library.
Duplicating an Analysis, Dashboard, Knowledge Bank, or Library
To duplicate an item, click Duplicate from the Create dropdown menu. On the Duplicate dialog, enter the name and click Create.
Revision
When an Analysis is selected in the Navigator pane, there may be Analysis Revisions and/or Analysis Tree Revisions.
Details about working with Analysis Revisions are included in the following sections.
Details about working with Analysis Tree Revisions are included in the following topics:
- FMEA Analysis Tree Revisions
- Reliability Prediction Analysis Tree Revisions
- Maintainability Prediction Analysis Tree Revisions
When an Analysis is selected in the Navigator pane, the Revision dropdown enables you to create a Revision of an Analysis using the New option.
When a Revision of an Analysis is selected in the Navigator pane, the Revision dropdown enables you to create an Analysis from a revision using the Create Analysis from Revision option or generate a summary report using the Summary Report option.
Making a Revision of an Analysis
To make a Revision of an Analysis, select the Analysis in the Navigator pane, and click New from the Revision dropdown menu. The Create Revision dialog appears. Enter the Revision Name for the Revision. You can also optionally enter a Revision Description. Select if you want to Apply Push updates to this Revision (not recommended), though note that this is not recommended as generally you would not want the contents of the Revision to be updated with changes from a Knowledge Bank. To keep the Revision in it's original state, keep Apply Push updates to this Revision (not recommended) cleared. Click Create. The Revision is shown below the original Analysis in the Navigator pane in italicized font.
Creating an Analysis From a Revision
For any Analysis with Revisions, select the Revision on which the new Analysis should be based and click Create Analysis from Revision from the Revision dropdown menu. The Recreate Analysis dialog appears. Enter the Analysis Name for the new Analysis. Click Create. The new Analysis, based on the originally selected Revision, will be created and opened for you.
Generating a Revision Summary Report for an Analysis
For any Analysis with Revisions, click Summary Report from the Revision dropdown menu. The Report Options dialog appears. Enter the Report title for the Revision Summary Report. Click Report. The Revision Summary Report appears in a new browser tab and includes details of all Revisions of the Analysis, including the Names, Created By details and Created On details. Close the browser tab when finished reviewing the Revisions Summary Report.
Folder
Allows you to create new Folders for Analyses, Dashboards, and Knowledge Banks, as well as move items to relevant Folders using the Move to Folder function or Organize Folders dialog. For more details on Folders, see Using Folders.
Open
Closes the Manage Analyses page and opens the item selected in the Navigator pane.
Trash
Move the selected Analysis to the trash bin. You will be asked if you are sure prior to moving an Analysis to Trash. Only appears if an Analysis is selected.
Note that the Trash button will be disabled if the selected Analysis is set as Read-only or Hidden for Users in your Group via Access Control settings.
Delete
Deletes the item selected in the Navigator pane. You will be asked if you are sure prior to moving to deleting the item. Delete is permanent and cannot be undone, so use Delete with caution.
Note that the Delete button will be disabled if the selected item is set as Read-only or Hidden for Users in your Group via Access Control settings.
Recover
Recovers an Analysis that was moved to Trash. Only enabled when an Analysis in Trash is selected.
To recover an Analysis from Trash, select the Analysis name in the Navigator pane and click Recover. The Analysis will no longer appear in Trash and will appear under the Analyses section in the Navigator pane.
Tools
Exports items to or imports items from an XML format and allows access to the Template Transfer feature.
To export an item to an XML file, select the item and click Tools>Export XML from the toolbar. Once the export is complete, a pop-up message will appear, and the file will be downloaded to your default downloads folder.
To import an XML file, click Tools>Import XML, select the file from the File Selector dialog. The import will automatically start. When complete, a pop-up message will appear and the newly imported item will be appear in the Navigator pane.
The Template Transfer feature allows you to select an Analysis or Knowledge Bank, particularly one with specific user customization such as custom fields, custom lists, etc., and apply that user customization to one or more additional Analyses or Knowledge Banks. To access the Template Transfer wizard, click Tools>Template Transfer. For additional details, see Manage Analyses Template Transfer.
In the unlikely event your Analysis Tree would become corrupted, the Repair Analysis Tree feature can be run to check for any problems with the Analysis Tree structure's Subsystems and Parts. Select the Analysis to check and choose Tools>Repair Analysis Tree. If any issues are found, the Subsystem or Part items are moved to be child items of the top level Subsystem. If needed, reach out to the Relyence support team for further assistance via support@relyence.com.
Empty Trash
Permanently deletes items in the Trash. Only enabled when items are in the Trash.
To delete all items in Trash, click Empty Trash from the toolbar. A confirmation dialog appears, click Yes if you are sure you want to delete the items in Trash.
You can also delete individual items in Trash by selecting the item in the Navigation pane and clicking Delete from the toolbar.
Once items are deleted from Trash, they cannot be recovered.
Refresh
Refreshes the Manage Analyses page.
Manage Analyses Access Control
The Access Control section of the Manage Analyses function enables you to control access on a Group basis to your Analyses or Revisions, Dashboards, Knowledge Banks, and certain Libraries.
For Analyses, the access control capability enables you to control access to your Analysis Trees down to the Subsystem level. For example, you can allow some team members to only view certain Subsystems, others can have full edit capability, and others may not be able to see certain Subsystems of the Analysis Tree at all.
By default, access to your Analyses or Revisions, Dashboards, Knowledge Banks, and Libraries are open to all team members. Select the item you want to set access control for in the Navigation pane and then use the settings in the Access Control section to specify your set up.
The Limit access to selected groups option is available for Analyses, Revisions, Dashboards, Knowledge Banks, and some Libraries. The Limit access to subsystem level data option is available only for Analyses, and therefore is not shown in the Access Control section when Dashboards, Knowledge Banks, or any Library is selected.
Note: If Limit access to selected groups is selected, if the Analysis, Revision, Dashboard, Knowledge Bank, or Library is copied or duplicated, any User with permission to Edit Access Control will have the option to review and set appropriate Group Access Control. The Properties for the Analysis, Revision, Dashboard, Knowledge Bank, or Maintainability Library will also include an Access Control tab to review and set Group Access Control settings.
.png)
If the Limit access to selected groups is selected, the Full, Read-only, and Hidden columns will be enabled, and all Groups will be set to Hidden. All Groups will be marked as Hidden initially because it is the most constrained setting. This enables you to specifically grant access to the selected item as you desire.
You can select Full, Read-only, or Hidden access for each Group by selecting the appropriate checkbox. This setting applies to the selected item as a whole. Each Group may be allowed Full access to the selected item (can open and edit it), Read-only access to the item (can view it, but not edit it), or Hidden access (will not be able to see the item at all).
Setting Access Control at the Tree Level for Analyses
If Limit access to subsystem level data is selected, the Subsystem Access Control column will be enabled. For any Group you want to be able to control access down to the Subsystem level of the Analysis Tree, select the checkbox in the Subsystem Access Control column. This setting controls the enabling and disabling of the green Access Control button. In other words, it controls who is able to click the green Access Control button to edit details within that dialog.
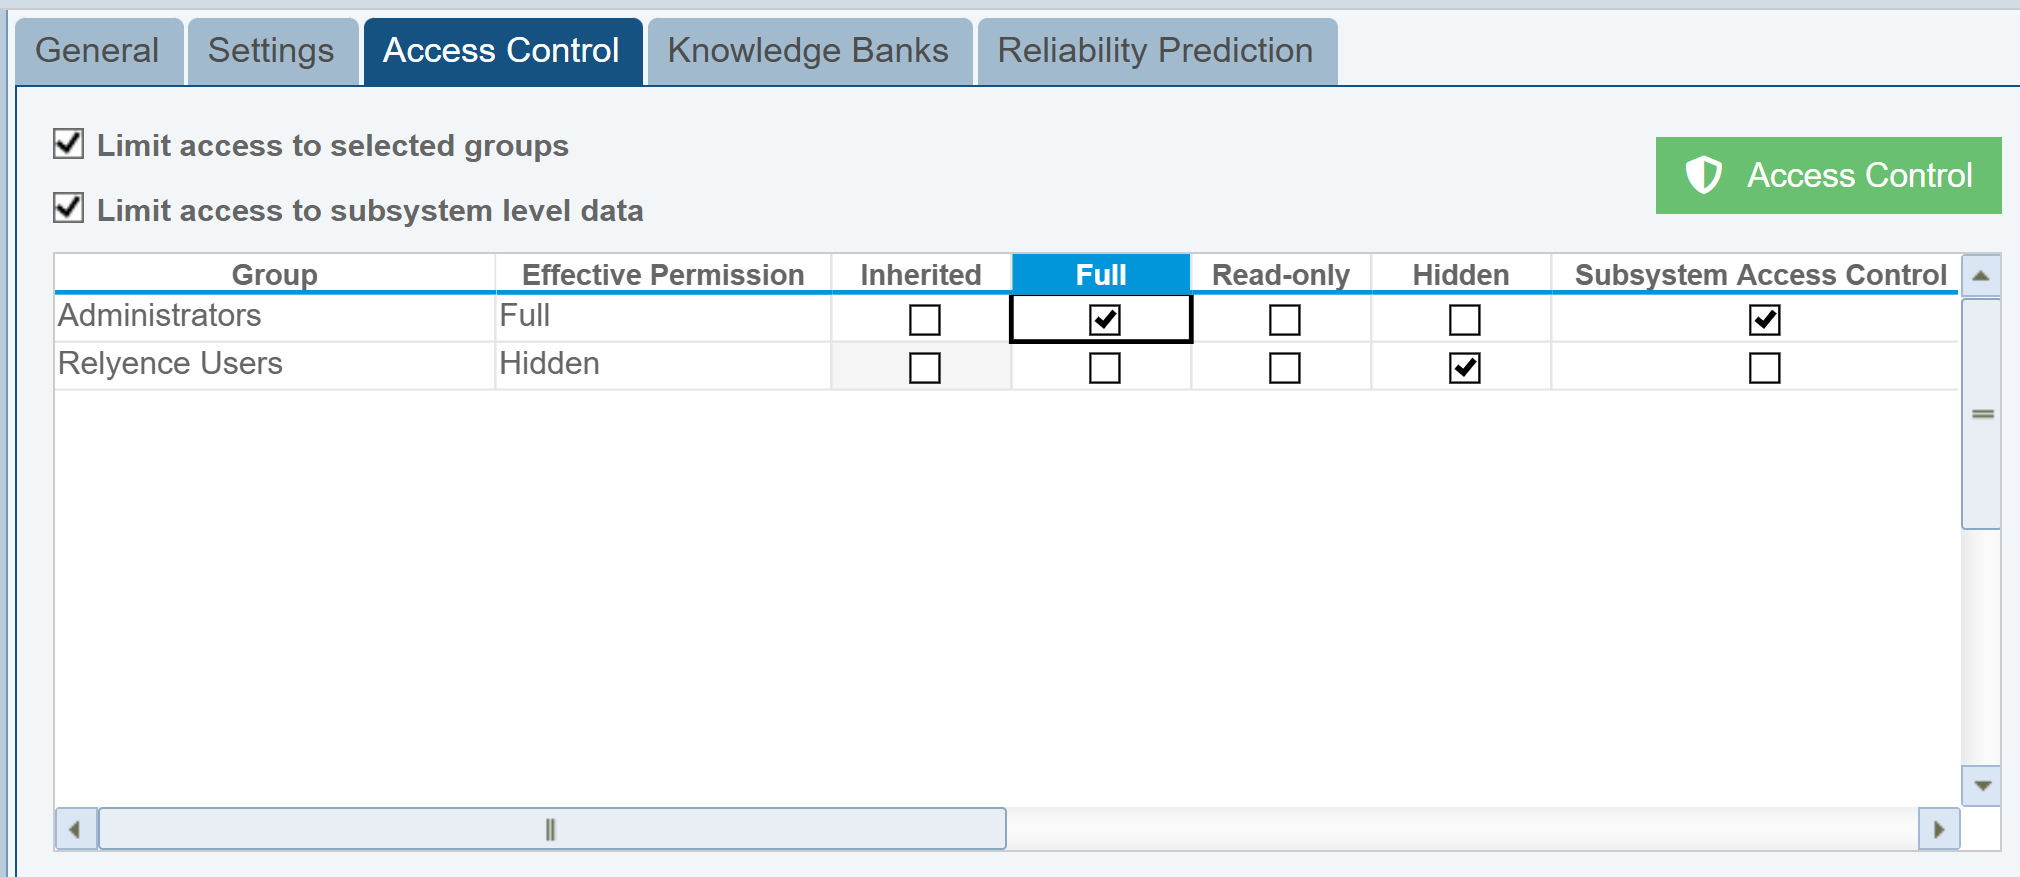
The Access Control button will automatically enable for any Group that has Subsystem Access Control enabled.
To set subsystem access control, click the Access Control button. The Analysis Tree Access Control dialog appears.
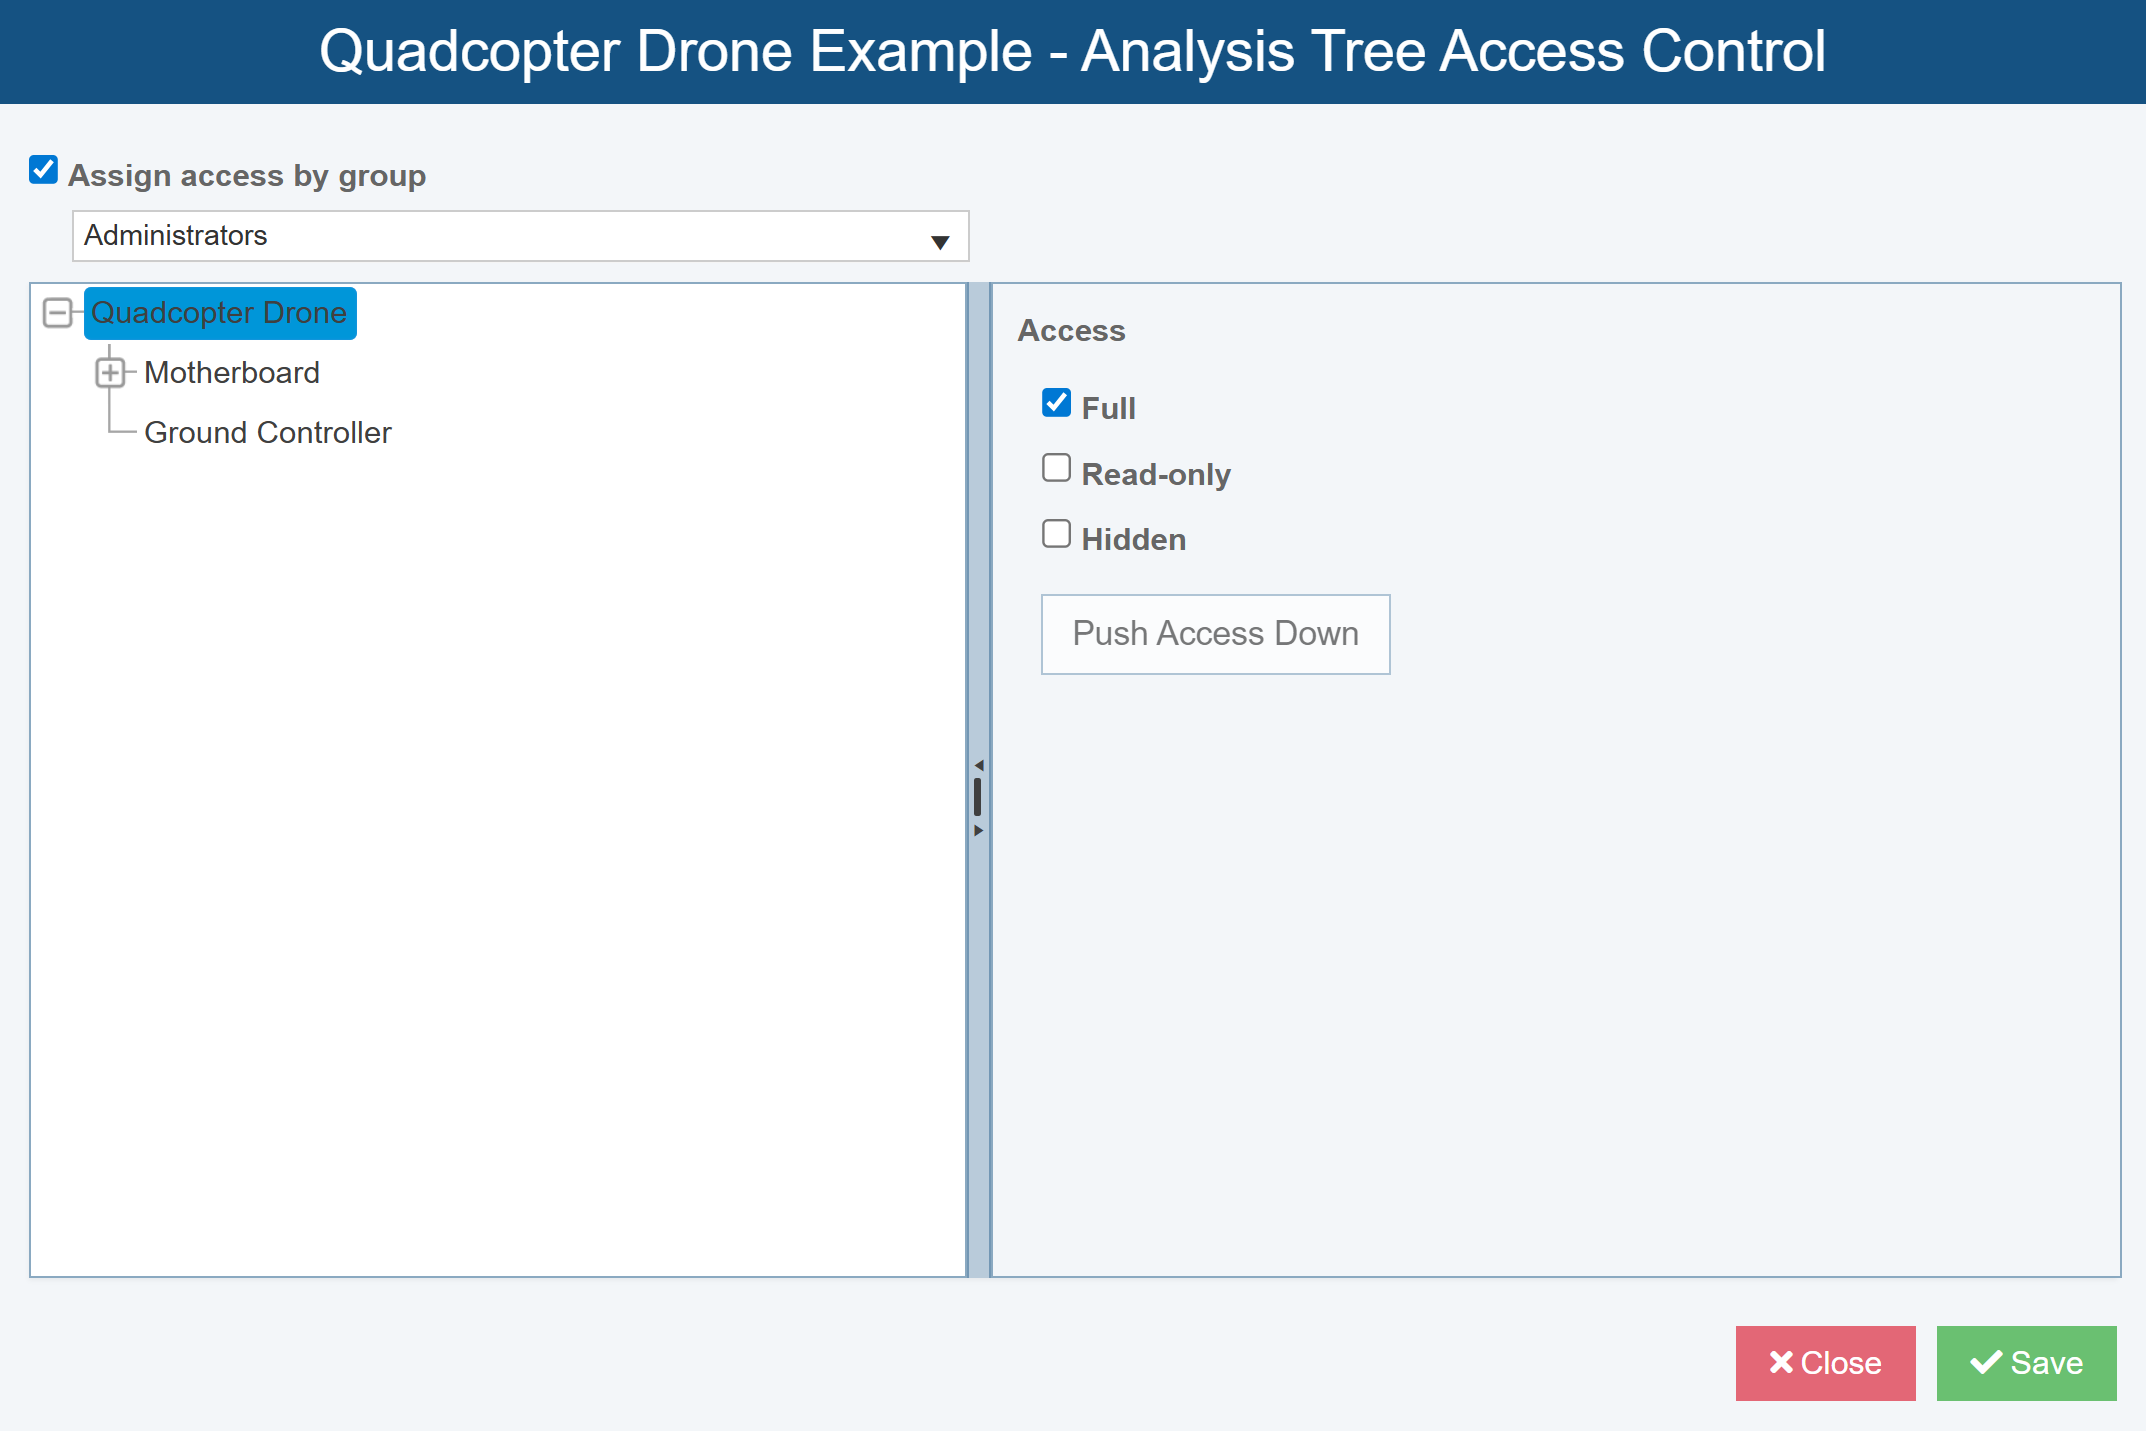
The Assign by group button allows you to choose between one of two ways to define the access settings for the Subsystems in your Analysis Tree. If you prefer to select one Group at a time and go through the Analysis Tree and specify the access settings, select Assign access by group. If you would rather go through the Analysis Tree Subsystem by Subsystem and define the access settings for all your Groups, clear Assign access by group. When Assign access by group is cleared, you will see a table with all your Groups in order to define your access settings:
When first starting, all Subsystems will be marked as Hidden, the most constrained setting. This enables you to specifically grant access control as you desire.
You have three access options for the Subsystems of your Analysis Tree:
- Full: The Subsystem can be viewed and modified. In this Analysis Tree Access Control dialog, Subsystems with Full access will appear in a normal font.
- Read-only: The Subsystem and all its associated data can only be viewed; no edits can be made. Read-only Subsystems will appear in the Analysis Tree in an italic font when the Analysis is opened. In this Analysis Tree Access Control dialog, Subsystems with Read-only access will appear in an italic font.
- Hidden: The Subsystem is unable to be viewed or edited. Hidden Subsystems it will not appear in the Analysis Tree when the Analysis is opened. In this Analysis Tree Access Control dialog, Hidden items will be marked with a strikethrough.
If you set a Subsystem to a specific access level and want that same access for all child Subsystems, you can click the Push Access Down button. For example, if you want Subsystem A and all its children to be Read-only, select Subsystem A, select the Read-only checkbox, and then click the Push Access Down button.
Note that Full access always flows down the Tree to all Subsystems. For example, you cannot mark the top-level tree item Full and a Subsystem of that level Read-only or Hidden. Full access means that the selected Subsystem and all children have Full access.
Also note that depending on how you have set up your access control settings, the Analysis Tree hierarchical format may not be kept intact when users open an Analysis. For example, if you have particular Subsystems designated as Hidden, they will not appear in the Analysis Tree view. This means that the Analysis Tree may appear differently for different users.
Click Save to save your changes at any point during set up. Once you have completed setting up all your control settings, click Close.
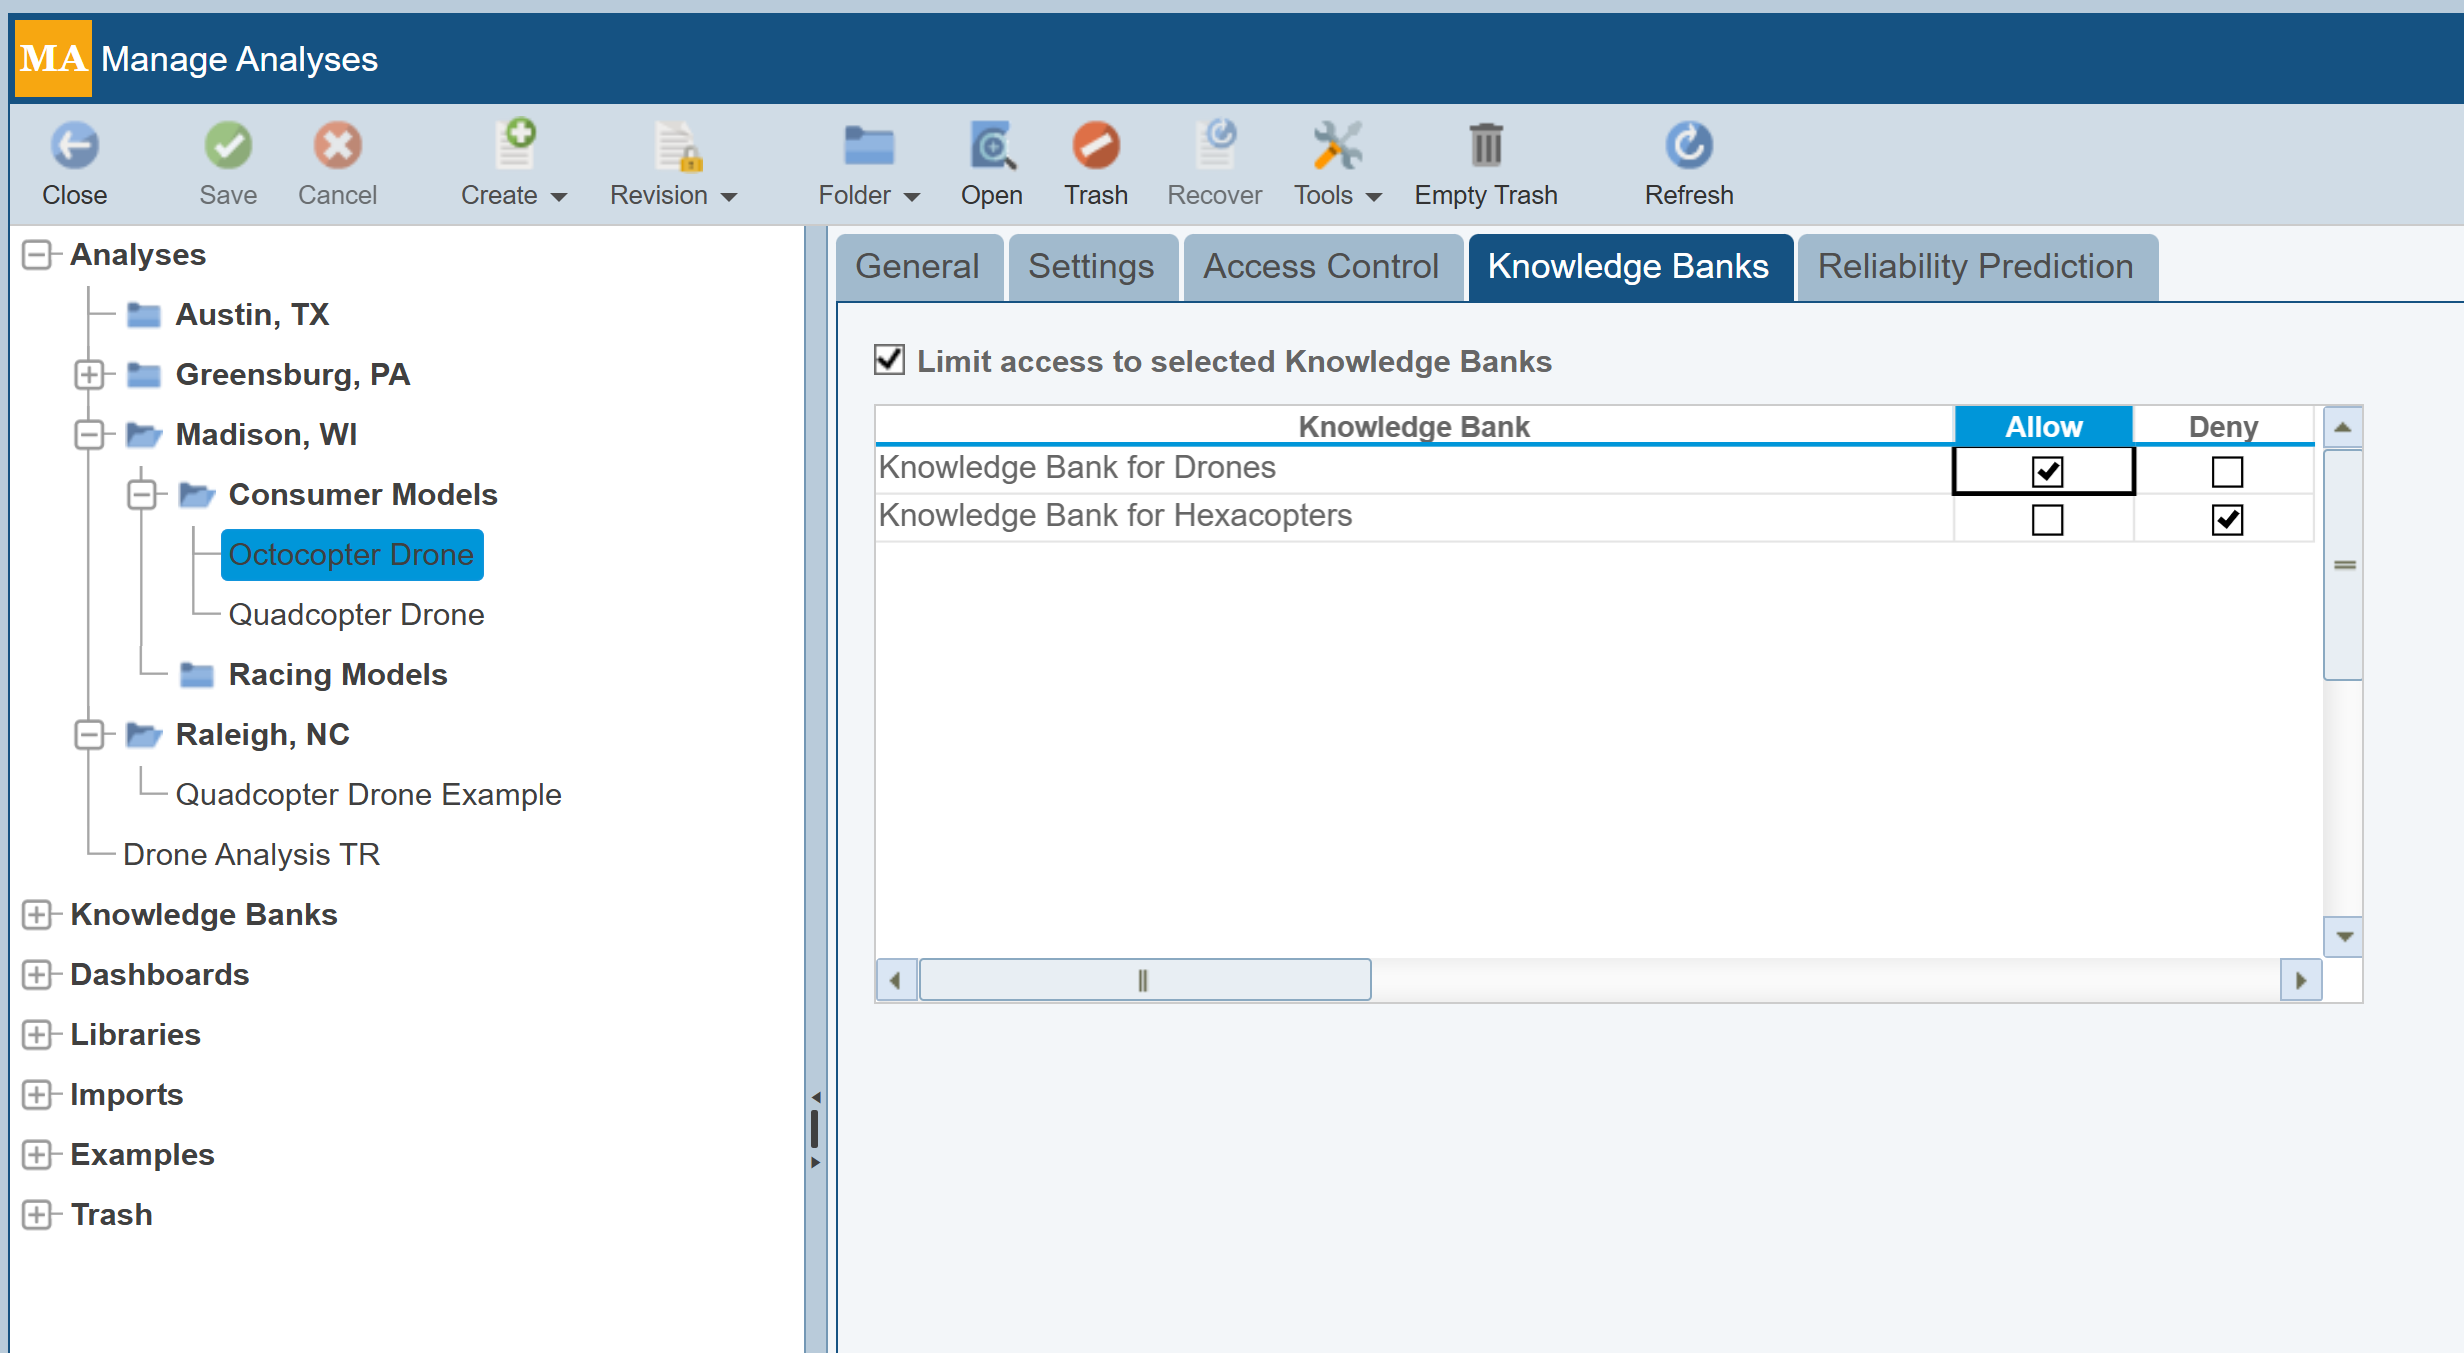
Managing Access to Knowledge Banks
You can control which Knowledge Banks an Analysis can access using the Knowledge Banks tab of the Manage Analyses function.
To limit which Knowledge Banks an Analysis can access, select the Analysis name in the Navigator pane.
On the Knowledge Banks tab, select Limit access to selected Knowledge Banks. In the list of Knowledge Banks, select Allow for those Knowledge Banks associated with the selected Analysis, and select Deny to all Knowledge Banks for all Knowledge Banks this Analysis should not have access to. By default, access to all Knowledge Banks will be set to Deny.
The example below enables access to the Knowledge Bank Knowledge Bank for Drones for the Octocopter Drone Analysis, and denies access to the Knowledge Bank for Hexacopters Knowledge Bank.
Access Control Example
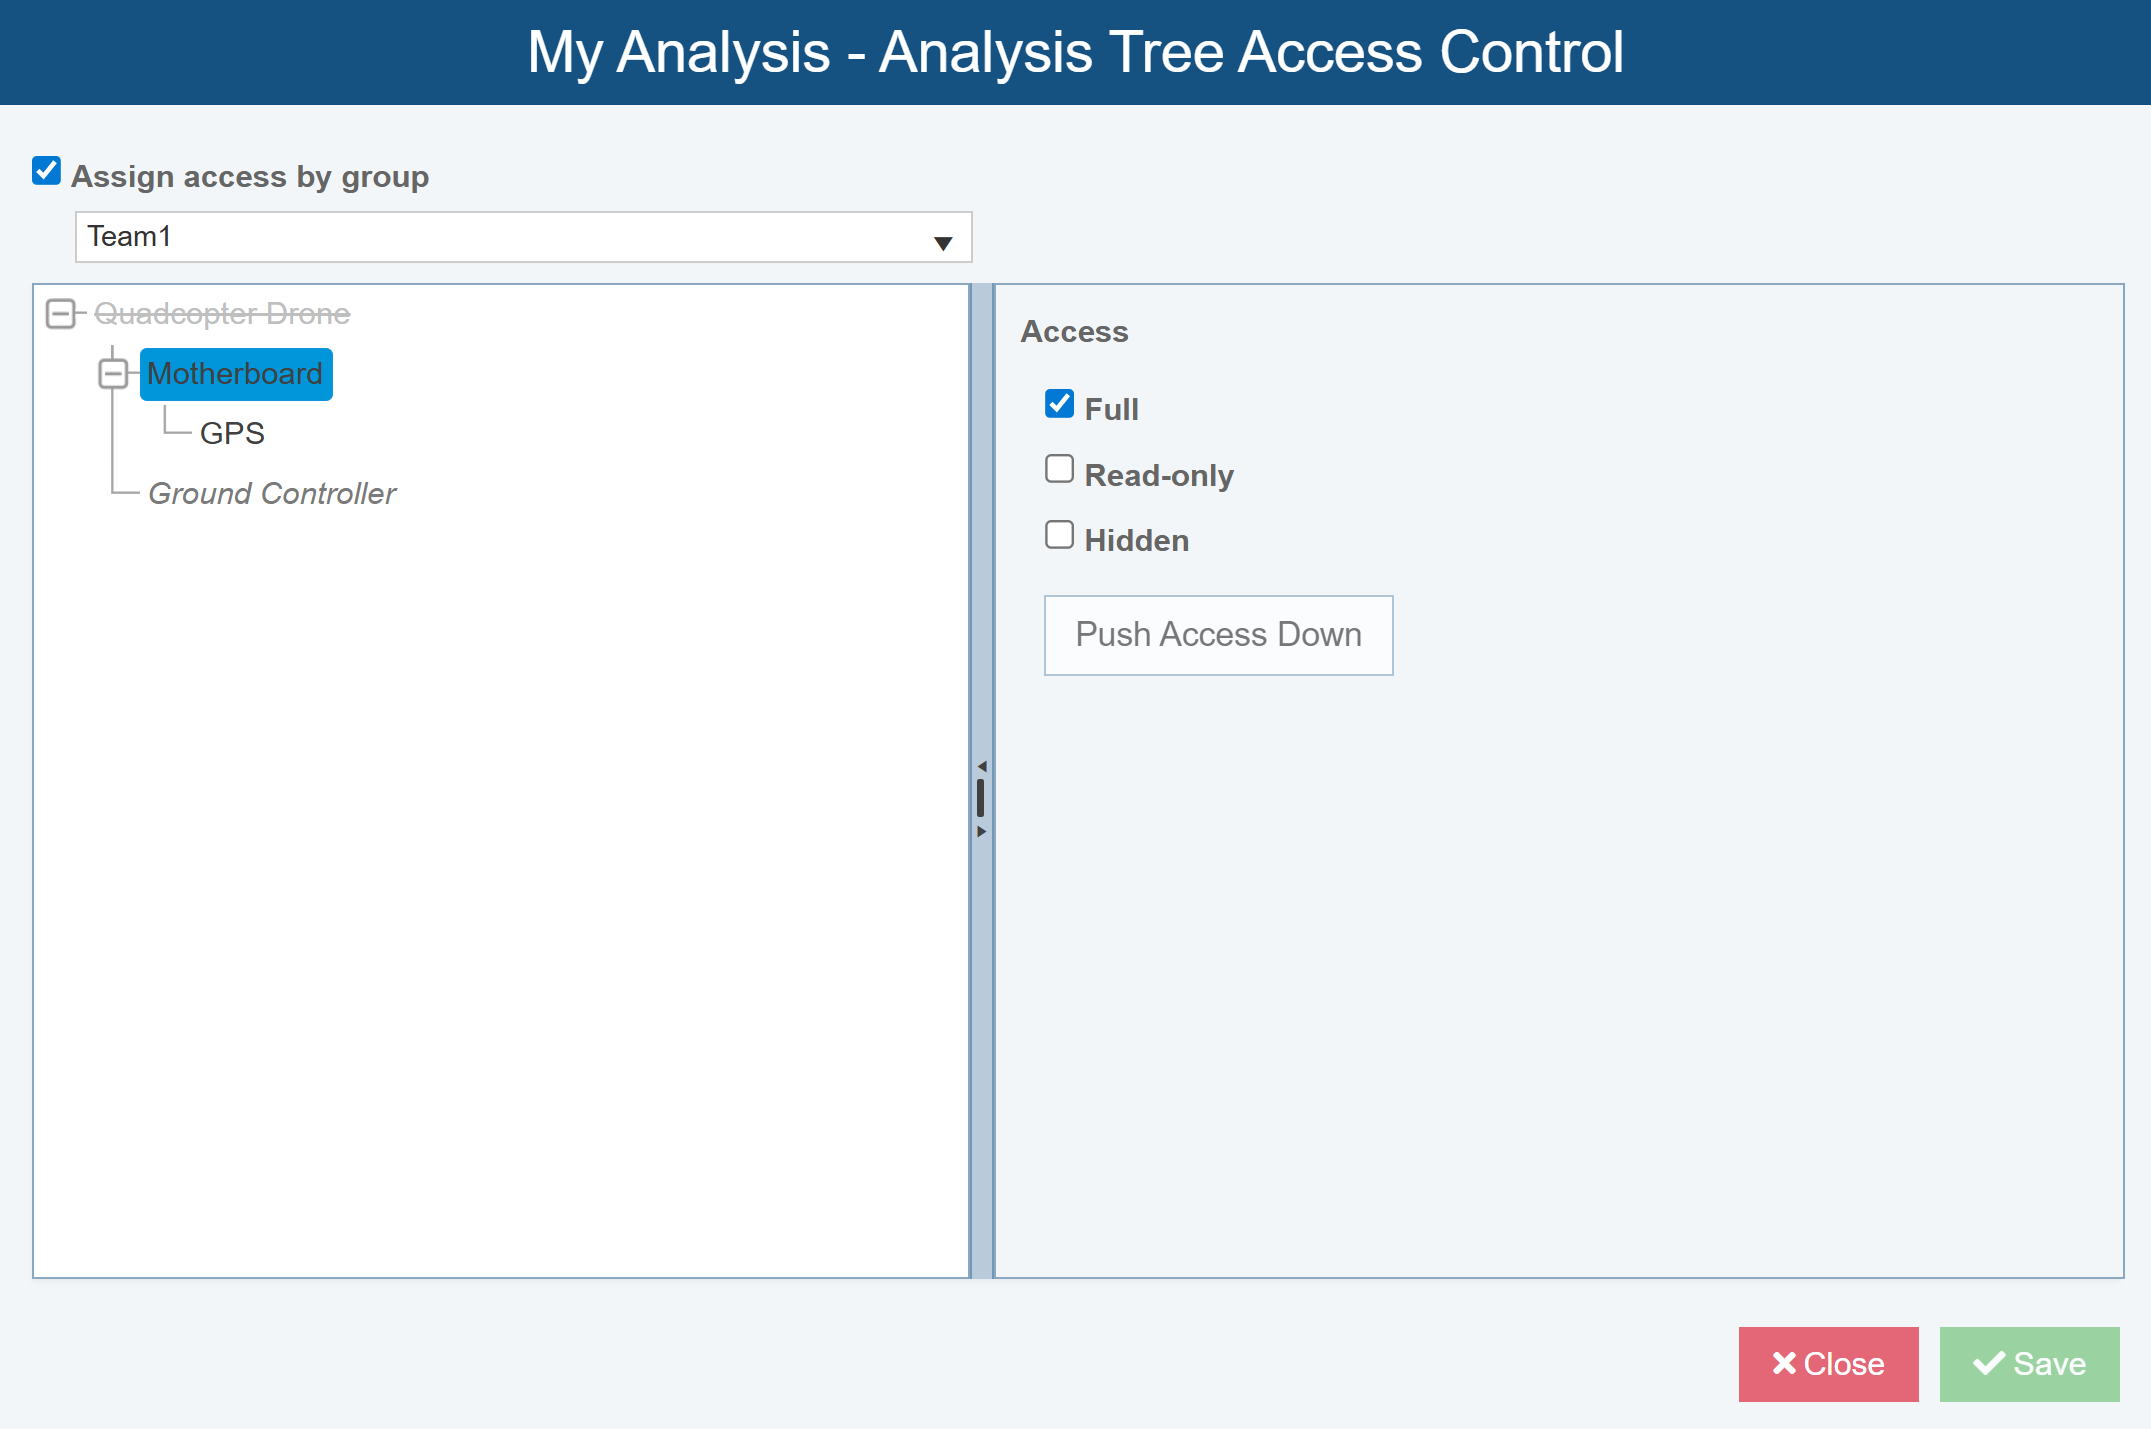
In this example, the Analysis Tree in My Analysis is set up with differing levels of access controls based on the Group.
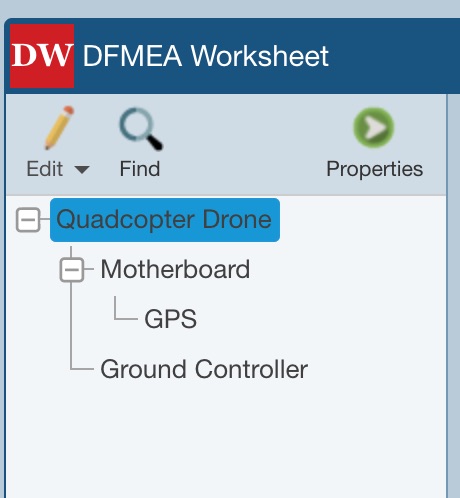
The Administrators Group has Full access to the entire Analysis Tree:
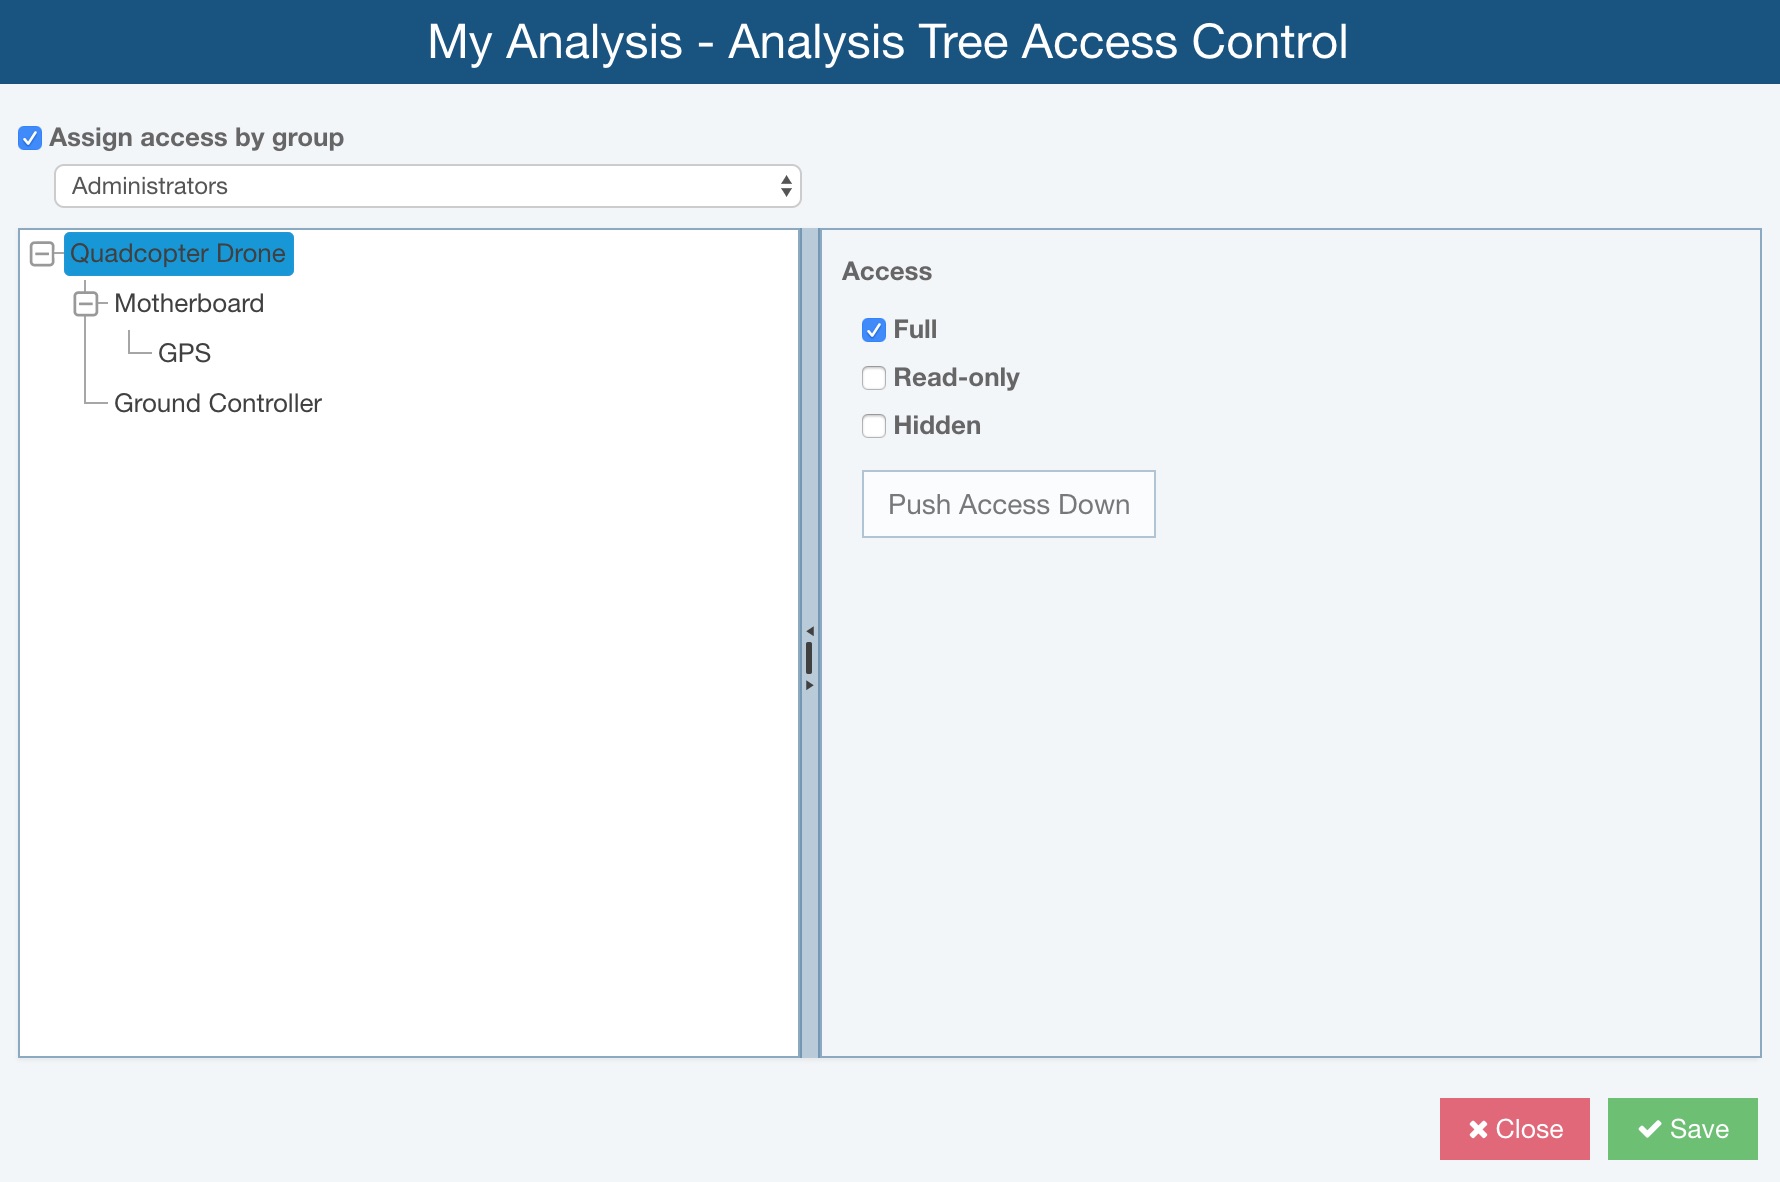
This is the way the Analysis Tree looks when a member of the Administrator Group opens My Analysis:
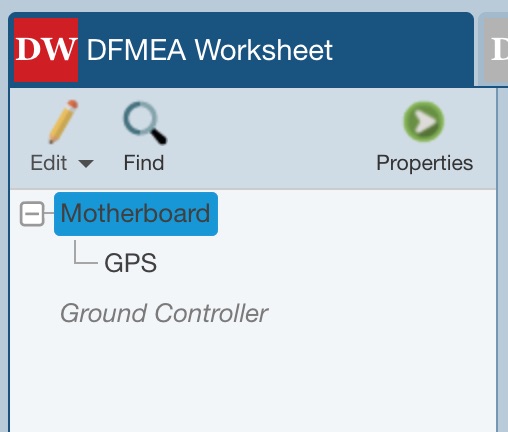
The Team1 Group has Full access to the Motherboard (and, therefore to the child GPS Subsystem as well), and Read-only access to the Ground Controller:
This is the way the Analysis Tree looks when a member of the Team1 Group opens My Analysis:
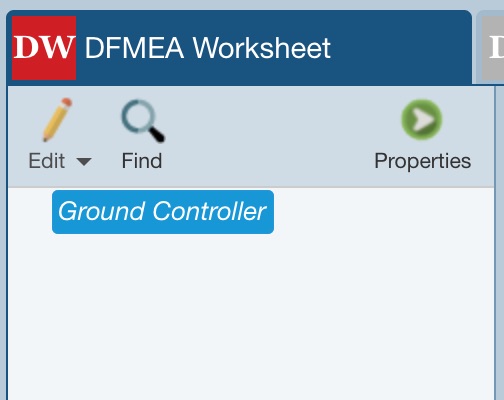
Members of the Team2 Group have Read-only access to the Ground Controller only and all other Subsystems are Hidden:
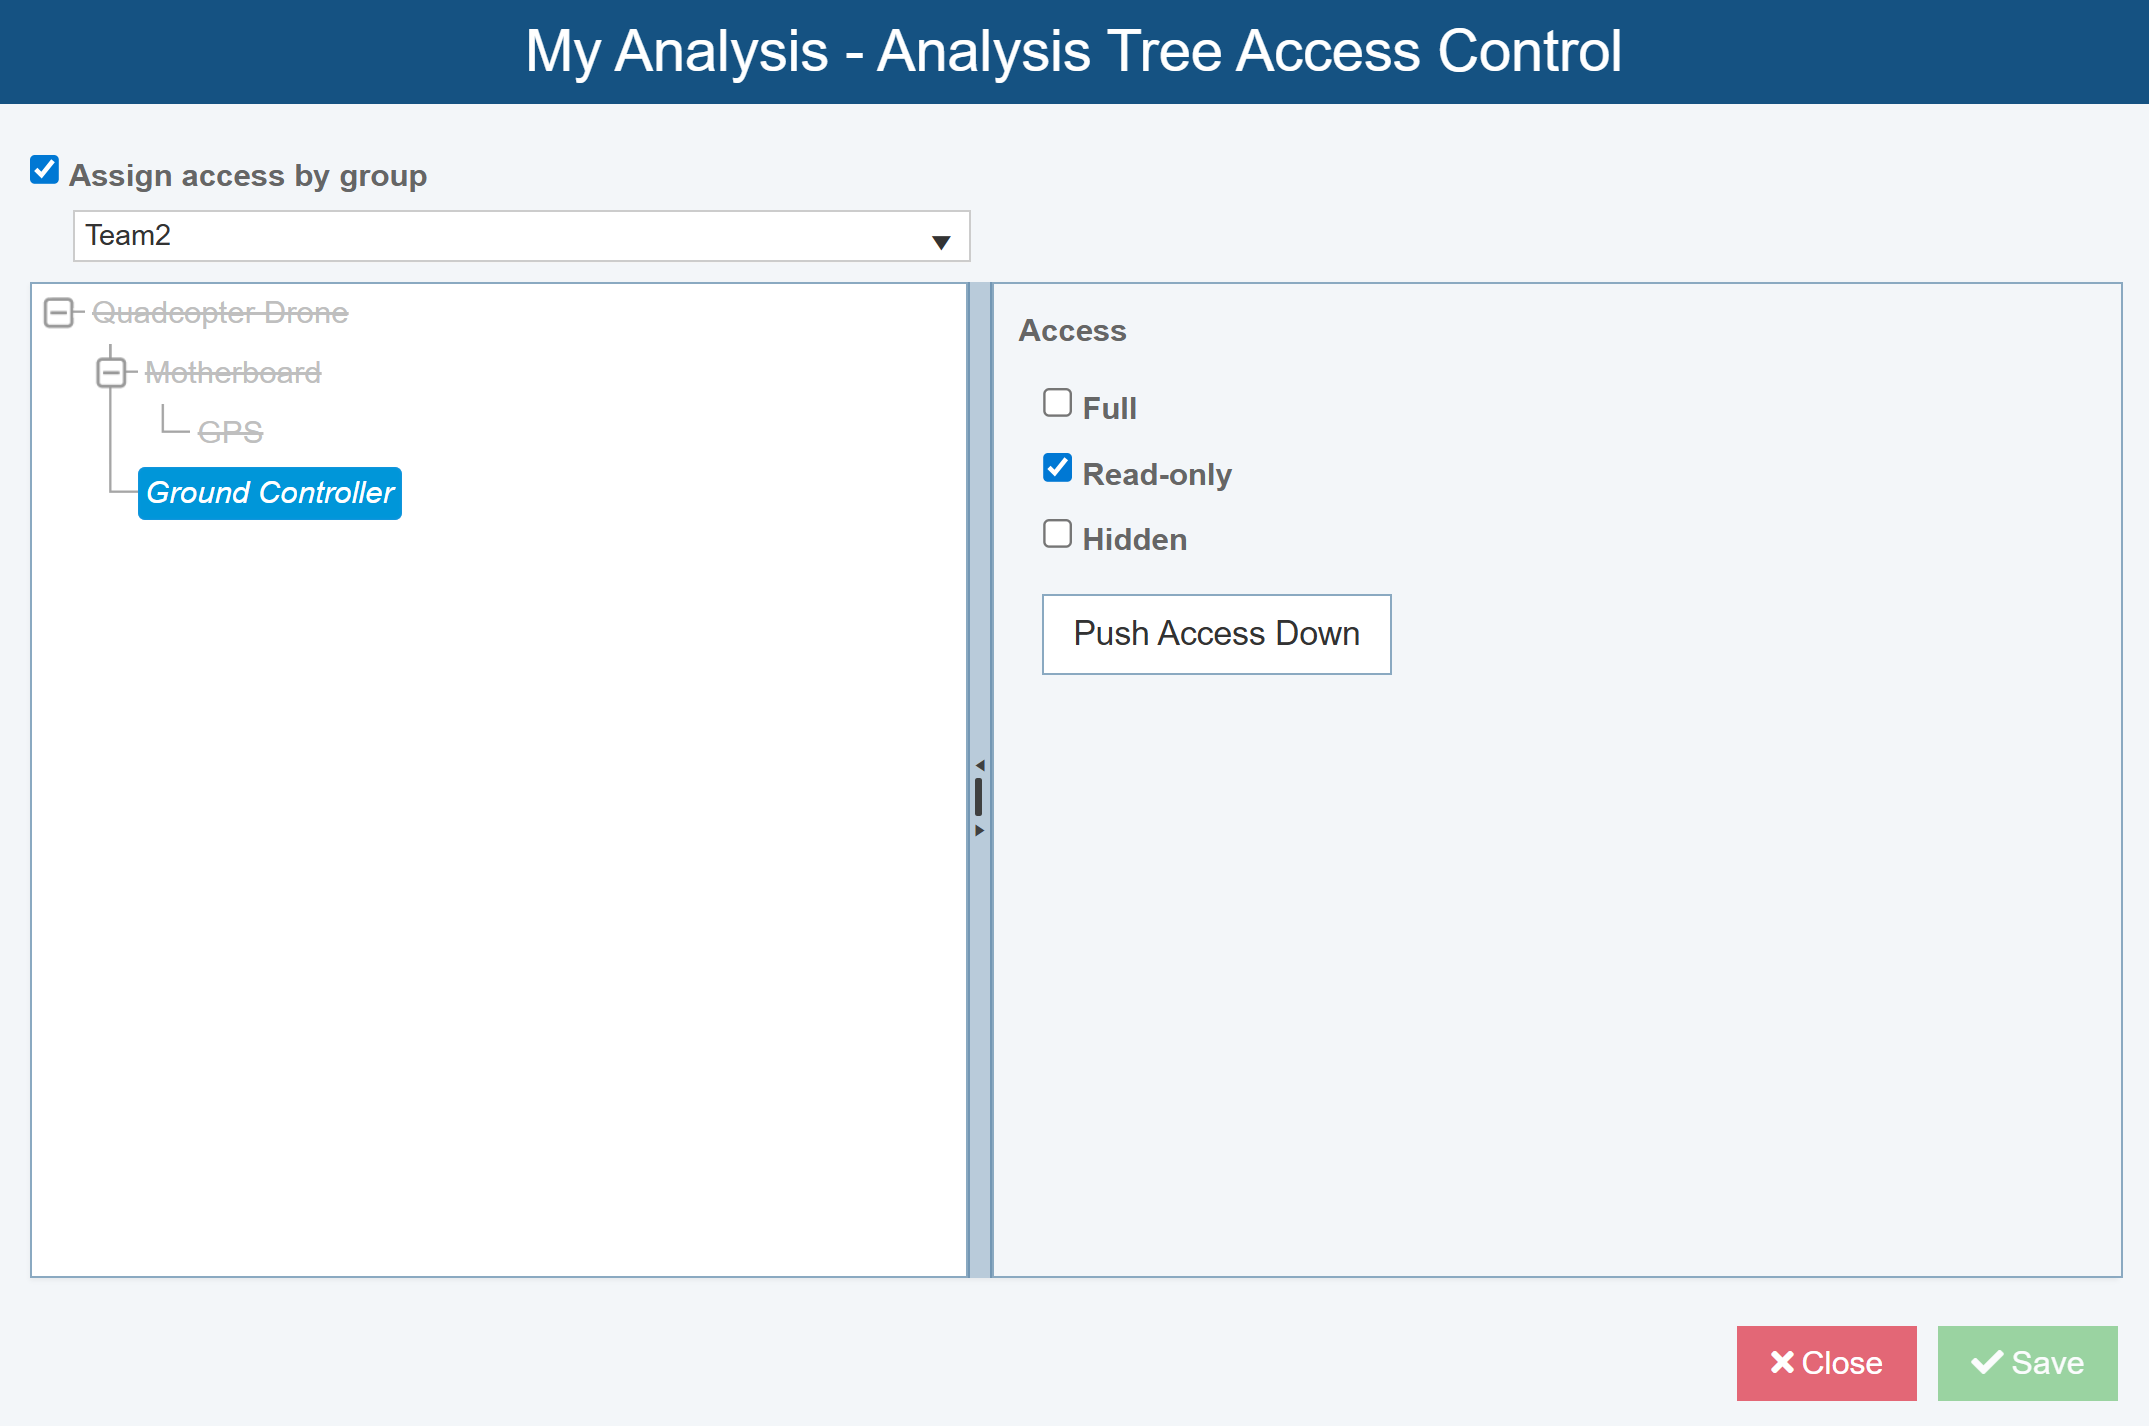
This is the way the Analysis Tree looks when a member of the Team2 Group opens My Analysis:
Manage Analyses Configure Functions
Several options are available from the Configure menu in the Sidebar.
Analysis Status
By default, the Analysis Status is a text field that allows the entry of any word or words you prefer. If you wish, you can use it to keep track of the status of Analyses as they are In Progress, Completed, etc.
For more details, see Customizing Analysis Status.
Analysis Categories
Customizable Analysis Categories can be set for Analyses as a way to categorize Analyses based on details such as Manufacturing Plant, Customer Location, Product Line, etc. Analysis Categories can assist with Analysis filtering.
By default, Relyence does not have predefined Analysis Categories.
For more details, see Customizing Analysis Categories.
Delay Load Threshold
In some instances, a small, simple Analysis Tree is ideal in your Analysis. In other cases, a large, complex Analysis Tree may be required. Depending on the size of the Analysis Tree, you may wish to apply the Relyence Analysis Tree Delay Load function. Using the Analysis Tree Delay Load function can improve loading time when opening an Analysis. Instead of loading all Subsystems in the Analysis Tree, Relyence will only load the topmost Subsystem.
For more details, see Customizing Delay Load Threshold.
Generate Suggestions API Key
Click Generate Suggestions API Key to display the OpenAI API Key dialog to set API Key and Model. Note that this does require you to have a license for Generate Suggestions - Custom API Key.
For more details about using Generate Suggestions, see SmartSuggest Generate Suggestions.
Microsoft Copilot
Microsoft Copilot is an AI chatbot and from the Relyence Help menu, you can access a chat client. Note that this does require you to have a license for Microsoft Copilot.
For more details, see Setting Up Microsoft Copilot in Relyence and Using Microsoft Copilot in Relyence.