The Relyence User Interface
Once you have opened a Relyence Analysis, the main Relyence user interface window appears. There elements of the interface will be used through this guide, so it is good to know the terminology that will be used to refer to the various elements.
The main elements of the Relyence user interface include:
- Header Bar
- Sidebar
- Tabs
- Toolbars
The Relyence Header Bar
The Relyence header bar is the topmost area of your display.

From right to left, the elements of the Relyence header bar are:
- Relyence logo. Clicking the Relyence logo will open up another browser tab and take you to the Relyence corporate website.
- Sidebar expand/collapse icon (arrow button). Clicking this icon that appears to the right of the Relyence logo will expand and collapse the sidebar menu.
- Product icon. This icon designates which Relyence Product is currently active.
- Analysis name. The name of the currently active Analysis appears next to the Product icon.
- Help menu. This dropdown menu allows quick access to Help related activities.
- Account menu. This dropdown menu includes all the functions you need to manage your account, specify global Relyence settings, manage your Relyence users, groups, and Analyses, and manage your Relyence licenses. For details refer to the Managing your Relyence Toolset section of this guide.
The Relyence Sidebar
The Relyence Sidebar is your central area for actions related to your Analyses. The functions in the Sidebar menu vary depending upon which Relyence Products you have purchased, which Product is active, and which Analysis you have open. The screenshot below is representative of the Sidebar when all Relyence Products are licensed and in use and Relyence Design FMEA is active.

The circles to the left of the Product names are used for informational purposes. If the circles are solid, as shown above, this indicates that you have a license for all Relyence Products, and your active Analysis includes data for all Products.
If the circles are not solid, this indicates that you are using the trial version of Relyence.

The sidebar is organized into sections. Clicking on the various items will perform the following actions:
- Analyses: Allows you to select and manage Relyence Dashboards, Relyence Analyses and Relyence Knowledge Banks.
- Dashboard Name: If a Dashboard is active, the name is displayed. Click the arrow to see a list of your 5 most recently used Dashboards. To create a new Dashboard, click New Dashboard. To see the full list of all your Dashboards, rename a Dashboard, or delete a Dashboard, click Manage. To view or edit the Dashboard Properties, click Properties.
- Select Dashboard: Appears if no Dashboards exist or one is not active. Click to select a Dashboard or click New Dashboard to create a Dashboard.
- Back to Dashboard: Returns to the last active Dashboard. An easy way to go back to your Dashboard after activating a Relyence Product or using the drilldown feature of a Dashboard.
- Analysis Name: Displays the name of your active Analysis and allows you to select the Analysis you want to work on. Click the arrow to see a list of your 5 most recently used Analyses. To create a new Analysis, click New Analysis. To see the full list of all your Analyses, rename an Analysis, or delete an Analysis, click Manage. To view or edit the Analysis Properties, click Properties.
- Knowledge Bank: Allows you to open the single Knowledge Bank or click the arrow to see a list of the 5 most recently used Knowledge Banks. Click More... to see additional Knowledge Banks.
- Libraries:
- For Fault Tree, allows you to open Event and Fault Tree Libraries, as well as use the Build Library function.
- For Reliability Prediction, allows you to open Defaults, Derating, and Parts Library Libraries as well as update Parts Libraries.
- For Maintainability, allows you to open Maintenance Tasks, FD&I Outputs, or Maintenance Groups Libraries.
- View All: Opens the View All dialog where you can manage your Relyence Analyses, Dashboards, Knowledge Banks, and Libraries.
- Products: Allows you to move between the various Relyence Products.
- FMEA: Makes Relyence FMEA active.
- FRACAS: Makes Relyence FRACAS active.
- Fault Tree: Makes Relyence Fault Tree active.
- Reliability Prediction: Makes Relyence Reliability Prediction active.
- RBD: Makes Relyence RBD active.
- RCM: Makes Relyence RCM active.
- Maintainability: Makes Relyence Maintainability Prediction active.
- Weibull: Makes Relyence Weibull active.
- ALT: Makes Relyence ALT active.
- Functions: Access to various analysis-related functions. Not all functions appear all the time, it depends on what Relyence Product is active and your user permissions.
- Revert Example: Only displayed when an Example Analysis or Example Dashboard is active. If a Relyence supplied Example Analysis or Relyence supplied Example Dashboard is active, this allows you to reopen the example in its original state, losing any modifications you may have made.
- Not applicable for non-demo Analyses.
- Calculate: Performs calculations for FRACAS, Fault Tree, Reliability Prediction, RBD, Maintainability Prediction, Weibull, or ALT, whichever is active.
- Not applicable to FMEA.
- View Results: Displays the last calculation results of FRACAS, Fault Tree, Reliability Prediction, RBD, Maintainability Prediction, Weibull, or ALT, whichever is active.
- Not applicable to FMEA, Weibull or ALT.
- Perform: Applicable for FMEA only, Provides option to perform Autoflow Down and Fault Tree Creation.
- Report: Generates a report on the active Analysis.
- Import: Imports the data in the currently active view or the Analysis Tree.
- For FRACAS allows importing of custom lists.
- Export: Exports the data in the currently active view.
- For FMEA and FRACAS allows exporting of Notification Logs and Audit Reports.
- Configure: Allows for configuration of different features and functions, dependent upon Relyence Product.
- For FMEA, allows for configuring Action Library, Autoflow, (Detection & Prevention) Controls, Product Characteristics, Risk Criteria, Formulas, as well as Workflow, Approvals, and Notifications.
- For FRACAS, allows for configuring Formulas, Subtables, as well as Workflow, Approvals, and Notifications.
- For Fault Tree, allows for configuring of CCF Groups and Disjoint Event Groups.
- For Reliability Prediction, allows for configuring Formulas and Mission Profiles.
- For Maintainability, allows for configuring Maintenance Levels.
- Tools: Allows access to different tools, which vary by Relyence Product.
- For Reliability Prediction, allows defining Allocations and What If? scenarios.
- For Weibull and ALT, allows for use of Generate Data Points function.
- For ALT, allows for access to Test Plan function.
- Properties:
- For FMEA allows setting of FMEA features to include and various other FMEA Properties. See FMEA Properties for more details.
- For FRACAS allows setting the Identifier autonumbering rules, FRACAS elements to include, and enable notification logging.
- For Fault Tree allows setting the diagram font sizes and color-coding gates and events based on value.
- For Reliability Prediction allows setting Parts Library settings and calculation properties.
- For RBD allows customizing how blocks are displayed.
- For RCM allows setting of RCM features to include.
- For Maintainability Prediction allows setting False Alarm frequency, Maintenance Time Adjustment, and enabling Procedure 5A.
- For Weibull allows enabling the Legend and the Plot Headings.
- Revert Example: Only displayed when an Example Analysis or Example Dashboard is active. If a Relyence supplied Example Analysis or Relyence supplied Example Dashboard is active, this allows you to reopen the example in its original state, losing any modifications you may have made.
The Relyence Tabs
The term "Tab" refers to the items that appear in the upper area of the main window which allow you to switch between data elements. The screenshot below shows the tabs that appear when you are working on a Design FMEA (DFMEA).
.jpg)
The Relyence Toolbars
The toolbar appears in the upper part of the main window. The functions available in the toolbar vary depending on the active Relyence Product and what you are viewing.
Save, Cancel, Close, Save and Close
During data entry in your Relyence Tables and Forms, your changes are not committed until you click Save. If you are editing data and decide you do not want to save your changes, you can click Cancel to discard your edits.
When using the customize features to customize your Relyence interface, the toolbar includes the Save and Close, Save, and Close functions. When making your edits in the customize view, click Save and Close to save your changes, close the customize view and return to your table or form. Click Save to save any changes but remain in the customize view. Click Close to close the customize view and return to your table or form. If you click Close when changes have been made but not saved, you will be asked if you want to save or discard the changes before closing.
Undo, Redo
Use the Undo and Redo functions to undo or redo unsaved changes in Relyence FMEA Tables and Forms.
Insert, Delete
Use the Insert and Delete functions to insert or delete data in Relyence Tables and Forms.
The Insert function may be a dropdown list if multiple Insert functions are available. For example, on the Worksheet in Relyence FMEA, the Insert dropdown menu includes functions to insert at the end, above, or below for each FMEA level (function, mode, effect, cause, and action).
In Tables, inserts and deletes are always performed at the location of the currently active cell.
Also note that in many tables, such as the FMEA Worksheets, FRACAS Incident, Problem and Time Log tables, Reliability Prediction Parts Table and Weibull and ALT Data Points tables, keyboard support for Insert is supported using the <Insert> key and <Ctrl>+<Shift>+<NumPad +>.
Before a delete is performed, you will always be asked if you are sure you want to delete.
Insert Gate, Insert Event
In Fault Tree, the Insert Gate button enables you to select the type of gate you wish to insert, the Insert Event button enables you to select the type of event to insert. Once selected, the gate or event type remains selected, so you click the Insert buttons to insert multiple gates or events of the same type.
Edit
In Fault Tree, the Edit toolbar button provides options to Cut, Copy and Paste functions.
Move Right, Move Left
In the diagrams for Fault Tree and RBD, the Move Right and Move Left buttons shift the selected gate, event, or block right or left. This is a quick and easy way to rearrange the elements of your diagrams.
Branch - Move Up, Move Down
In the diagrams for RBD, the Move Up and Move Down functions shift the blocks in a branch where a block is selected up or down. This is a quick and easy way to rearrange the branches of your diagrams. Note that the priority order of branches in an RBD is based on their vertical placement; the top-most branch has the highest priority and the bottom-most branch has the lowest priority.
Wrap, Unwrap
The Wrap function is available to RBD to allow you to wrap a connector in your RBD to the next line. The Wrap function enables you to layout your diagram in a more compact fashion for easier on-screen viewing.
Search
In FMEA, Search brings up a Knowledge Bank Search dialog, which enables you to search the Knowledge Bank for data stored in your Knowledge Bank for retrieval into your current FMEA.
In Reliability Prediction, Search brings up the Parts Library Search dialog, which allows you to search the library of components for retrieval into your current Reliability Prediction.
Bank
In FMEA, the Bank function enables you to add or retrieve FMEA data to or from your Knowledge Bank.
Modes
In FMECA, the Modes toolbar function enables you to Restore Modes for Current Part or Restore Modes for All Parts. When selected, the failure modes found in FMD-97 for the Parts in your Analysis Tree will be retrieved and added to your FMECA Worksheet.
Cut, Copy, Paste
During data entry, cut, copy, and paste functions can be used by clicking on the Cut, Copy, and Paste toolbar icons. For cases where more than one option is available, for example, Paste as child and Paste as sibling, the toolbar icons will include a dropdown arrow for selection. By default, the first selection in the list will be performed.
Note that in Relyence Fault Tree and Relyence RBD, the Cut, Copy, and Paste options are grouped under the Edit button.
Also note that in many tables, such as the FMEA Worksheets, FRACAS Incident, Problem and Time Log tables, Reliability Prediction Parts Table and Weibull and ALT Data Points tables, keyboard support for Cut, Copy, and Paste is supported using <Ctrl>+<X>, <Ctrl>+<C>, and <Ctrl>+<V>.
SmartSuggest
DFMEA SmartSuggest allows you to automate failure Causes at higher levels becoming failure Modes at the next lower level and automate failure Modes at higher levels becoming Effects at the next lower level. For more details, see help topic Using DFMEA SmartSuggest.
Format
Format Cells
Note: The Format Cells options are available in Relyence FMEA only.
Select any cell(s) on a FMEA worksheet and from the Format button, select Format Cells. The Format Cells dialog appears.
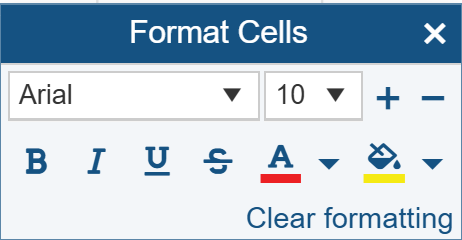
From the Format Cells dialog, for the selected cell(s), you can:
- change the font style and size
- apply Bold, Italic, Underline, or Strikethrough format to the cell font
- change the Apply Text Color and Apply Cell Fill color
- Clear formatting to return to default Relyence formatting
Freeze Columns, Unfreeze Columns
When data appears in a spreadsheet-like table view, you can optionally freeze columns on the left side of the table. The columns which are frozen will remain in place and will not scroll out of view as you scroll horizontally through the table data.
If Allow Cell Formatting is checked on in the FMEA Properties, the Freeze Columns and Unfreeze Columns options will be accessed via the Format button. Select any cell in the rightmost column of the columns you wish to freeze by clicking on the column header, and then click Format and Freeze Columns. To unfreeze columns, click Format and Unfreeze Columns.
If Allow Cell Formatting is not checked on in the FMEA Properties, the Freeze Columns and Unfreeze Columns options will be accessed directly from the toolbar.
Library
The Library button provides access to functions related to Event Libraries, Fault Tree Libraries, Block Libraries and RBD Libraries in Relyence Fault Tree and Relyence RBD.
Filter
The Filter button provides access to Show functions and Filter functions.
The Show functions controls what data appears in Tables and Worksheets.
The Show function is accessed from the Filter toolbar button.

When a Show setting other than the default (by Subsystem) is selected, the Filter toolbar button appears with a darker blue background as a helpful indicator.
In FMEA, the Show options are:
- By Subsystem: Displays the FMEA Worksheet associated with the selected Subsystem in the Analysis Tree.
- By Branch: Displays the FMEA data from Worksheets associated with the selected Subsystem and its children (i.e. the branch) in the Analysis Tree. For example, if you are on the top level item in your Analysis Tree and select Filter>(Show) By Branch all FMEA data in your Analysis will be shown.
- All: Shows the data from all your FMEA Worksheets in your Analysis Tree.
In FRACAS, the Show options are:
- By Subsystem: Displays the Incidents or Problems associated with the selected Subsystem in the Analysis Tree.
- By Branch: Displays Incidents or Problems associated with the selected Subsystem and its children (i.e. the branch) in the Analysis Tree. For example, if you are on the top level item in your Analysis Tree, and select Filter>(Show) By Branch all Incidents or Problems in your Analysis will be shown.
- Unassociated Incidents or Problems: Shows the Incidents or Problems that are not associated with any Analysis Tree item.
- All: Displays all Problems or Incidents in the entire Analysis Tree.
- By Incident: Displays the Problems associated with the Incident selected in the Incident Table when on the Problem Table.
- By Problem: Displays the Incidents associated with the Problem selected in the Problem Table when on the Incident Table.
In Fault Tree, the Show options are:
- Subtrees as Transfer Gates: Subtrees are displayed in your Fault Tree diagram as Transfer Gates. This is a more compact view of your diagram.
- Subtrees Expanded: Removes Transfer Gates and expands all the subtrees into your current Fault Tree diagram.
In Reliability Prediction, the Show options are:
- By Subsystem: Displays the Parts associated with the selected Subsystem in the Analysis Tree.
- By Branch: Displays the Parts associated with the selected Subsystem and its children (i.e. the branch) in the Analysis Tree. For example, if you are on the top level item in your Analysis Tree, and select Filter>(Show) By Branch all Parts in your Analysis will be shown.
- All: Shows all the Parts in your Analysis Tree.
The Filter options include:
- Filter: Provides option to select available Filters.
- Clear: Provides option to clear the currently active filter.
- Save: Provides option to save the currently active filter for future use.
- Manage Filters: Provides access to the Manage Filters function.
Weibull
On the FRACAS Incident Table, the Weibull function enables you to create a Weibull dataset from your FRACAS Incident data.
Cut Sets
In Relyence Fault Tree, the Cut Sets toolbar button turns on the cut set highlighting for the fault tree.
Calculate
In Weibull and ALT, the Calculate function performs a Weibull or ALT analysis on the current Data Set with the current calculation parameters. The results appear in the Results area of the Weibull Properties or ALT Properties.
Analytics
In Relyence RBD, the Analytics toolbar button provides access to the Highlight Path Sets, Highlight Cut Sets, and (Analytics) Calculator options. In Relyence Weibull and ALT, the Analytics toolbar button provides access to the Weibull or ALT Analytics Calculator.
Edit PFD
When on the Process Flow Diagram (PFD) in PFMEA, the Edit PFD function activates the diagram editor to enable you to edit your PFD.
Refresh
If you want to refresh the data on your Table, click the top part of the Refresh button or Refresh>Refresh. Refresh may be useful if more than one person is working on an Analysis at the same time. You may want to periodically refresh your view to make sure you have the most recent data. Refresh also updates the URL in the browser bar to the location of the current view.
To copy the URL, from Refresh, click Copy Link. This copies the URL to the clipboard so it can be pasted to share or reuse in the browser bar.
View
The View dropdown on the right side of the Relyence Toolbar appears when you can optionally switch your Table Views. You can create any number of customized Views and switch between them. The View dropdown will show a list of all available data Views, as well as options to customize Views, delete Views (if applicable), create new Views, and access the View Manager. For more details on the View Manager, see View Manager.
To Form, To Diagram, To Table
The To function appear on the right side of the Relyence Toolbar when the View can be changed from one type of view to another.
In Reliability Prediction and the FMEA Worksheets, you can switch between the Table and Form Views of your data using the To Form and To Table buttons.
In PFMEA, you can switch between the Process Flow Table and Process Flow Diagram (PFD) using the To Table and To Diagram buttons.