Introduction
FMEA, or Failure Mode and Effects Analysis, is a proven and well-accepted approach for failure analysis and risk assessment. Originating in the U.S. military as a means to eliminate failures that were occurring in equipment, its successful methodology led to widespread adoption. FMEA is now one of the most commonly used techniques in engineering for failure analysis of products and processes. FMEA is an organized, step-by-step process for comprehensively evaluating a system or process to identify potential failure modes and eliminate or mitigate those deemed most critical.
The FMEA process begins by identifying all possible failure modes of a product or process. Then, possible causes and resulting effects of those potential failures are determined. The next step is to assess the risk level associated with each of the failure modes based on a set of established criteria. Finally, an action plan to detect, mitigate, or prevent failures in order to bring the product or process into alignment with overall quality and risk goals is implemented.
For those new to FMEA, see our New to FMEA introductory overview. You can watch a video to see a step-by-step description of the FMEA process or read our blog post.
The FMEA Process
Oftentimes the first thing an analyst sees when starting a FMEA is a large, complex-looking worksheet. The initial view of an empty FMEA Worksheet can be daunting! You start to ask yourself, “Where do I even begin?” This overwhelmed feeling leads to many of the classic FMEA issues analysts encounter, such as:
- It’s too large a hurdle, so analysts give up trying.
- The worksheet is completed in a disorganized, ineffective way.
- The FMEA process is completed but does not result in any useful purpose.
For FMEA to be successful, it is vital to prevent these situations. When properly and effectively performed, FMEAs are one of the most useful tools available for reliability and quality improvement.
So, how do you overcome these challenges? One of the most important ways we at Relyence have discovered over the years is to view the FMEA as a process. This is counter to the most common approach we typically see: an exercise in completing the large and oftentimes confusing FMEA Worksheet in a single step. When performed as a process driven, step-by-step approach, the task is not only more easily managed, it also naturally becomes more effective.
FMEA as a Process: What are the steps of a FMEA?
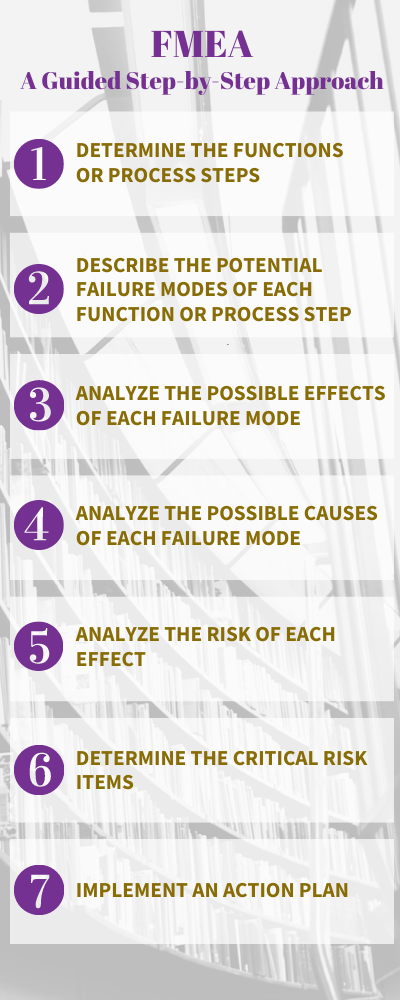
The FMEA process can be broken down into a series of phases and steps:
Planning Phase
- Establish the ground rules for your FMEA.
- Create a hierarchy for the system or process you are going to analyze so you have focused and separate Worksheets.
Analyzing Phase
- Determine the Functions (DFMEAs) or Process Steps (PFMEAs) of the item.
- Describe the potential Failure Modes of each Function or Process Step.
- Analyze the possible Effects of each Failure Mode.
- Analyze the possible Causes of each Failure Mode.
- Analyze the Risk of each Effect.
- Determine the critical Risk items.
- Implement an Action Plan.
Concluding Phase
- Once the Actions have been completed, re-evaluate risk levels to make sure goals have been met.
- Complete and close out the FMEA.
Glancing at this outline you can see why an overwhelming feeling can set in! However, this article will discuss each of these steps in order to demystify the process. The result will be an easy-to-follow approach for your failure analyses.

FMEA Planning Phase
Establish the ground rules for your FMEA
This first step should not be lengthy or difficult. It simply involves answering a set of basic questions. The answers to many of these questions may be established by your organization based on contractual requirements. Or you may be free to make your own decisions.
- What type of FMEA will you be performing? Some of the possible choices include:
-
- Design FMEA (DFMEA), the most commonly used type
- Process FMEA (PFMEA), used when analyzing a process versus a product
- FMECA (Failure Mode, Effects, and Criticality Analysis), most commonly used in the aerospace and defense related sector
- Custom
For more information on FMEA types and how to choose, see our definitive guide.
Note that FMEAs may encompass additional analyses. For example, P-Diagrams, DVP&R (Design Verification Plan and Report), PFDs (Process Flow Diagrams), and CP (Control Plans) are sometimes done in conjunction with FMEA. This article will not cover these topics. The FMEA Worksheet is the core of all FMEAs, so that will be the central focus for this article.
- Will you use a FMEA standard? There are several standards to choose from. The most commonly used standards are the AIAG & VDA FMEA Handbook, SAE J1739, and MIL-STD-1629. Most commonly, analysts select a standard to start with and then tailor it for their needs. See our overview of FMEA standards for more information.
- Determine how you will assess risk. Again, there are commonly used approaches for risk assessment, including RPN (Risk Priority Number) and AP (Action Priority). For more information about risk assessment with FMEA, download our white paper. Along with deciding on your risk assessment methodology, you must decide your acceptable risk levels. For example, you may decide that your FMEA is only completed once all RPN levels are below 300. Whatever your strategy is, make sure it is understood and agreed upon.
Create a hierarchy for the system or process you are going to analyze
If you are analyzing a complex system, you will want to break it down into component elements for ease of analysis and better organization. Basically, you want each FMEA Worksheet to have a clearly focused element. For example, if you are analyzing a computer, you could break it down into the monitor, the keyboard, the motherboard, and power system.
If you don’t break down your system or process in this manner, you will end up with one FMEA Worksheet. Typically, this would not be the most efficient approach. It is also very helpful to break down your process or system in a hierarchical manner to improve your team’s clarity and understanding.
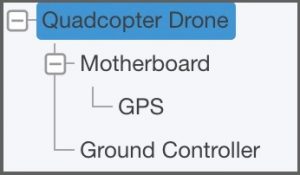
In an example from Relyence FMEA, a drone is broken down into the following hierarchical structure:

Note that this structure does not have to be a complete list of components. It should include all the items you want to analyze using the FMEA methodology. Your breakdown can be as detailed or as high-level as you prefer. The more detailed you are with each level, the more focused each FMEA Worksheet will be.
An additional benefit to breaking down your analysis into multiple FMEA Worksheets is that it enables you to assign different teams or team members to particular items based on their area of expertise.
Analyzing Phase: Performing the FMEA using a Guided Process
(Note: For our example FMEA, we will use a DFMEA format for ease of discussion. The same process applies to all FMEA types.)
You are now ready to begin the core task of FMEA: analyzing failures. You work on each FMEA Worksheet individually. Oftentimes, analysts will start at the lowest levels and work up the tree. However, that is not required, and you can do the analysis in any order you prefer.
The use of FMEA Views is a valuable and beneficial way to effectively guide your FMEA process. In Relyence FMEA software, you can create any number of FMEA Worksheet Views. You can design each View to be tailored to the specific task at hand. Relyence FMEA Views are available with one-click, so you can select and change Views with ease.
You can also name the Views to aid in this step-by-step approach.

Example Worksheet Views List in Relyence FMEA
Using these customized Views, you can complete your FMEA in a guided, manageable way.
Determine the Functions or Process Steps
The first step is to delineate the list of Functions or Process Steps associated with all the items in the system or process. To do this, change the FMEA Worksheet View to only show the Function or Process Step column on the Worksheet. This focuses your attention on the first step of the analysis and simplifies the task. You can insert as many Functions or Process Steps as necessary for each item.
The main idea behind this approach is to fully concentrate on each step before moving onto the next. In this case, that means you spend enough time to completely define all the Functions or Process Steps of this particular item. In the end, this approach will make the resulting analysis much more comprehensive and thorough.

Describe the potential Failure Modes of each Function or Process Step
Once the Functions or Process Steps are defined, change the FMEA Worksheet View to include only the Function or Process Step and Failure Mode columns. Again, this allows you to easily step through each Function or Process Step and fully consider all possible Failure Modes in a systematic way.

Analyze the Effects of each Failure Mode
In the next step, change the FMEA Worksheet View to include the Effects column. Again, because the new column is the only empty column, it easily focuses your attention on the Effects.

Analyze the Causes of each Failure Mode
Now it is time to investigate the Causes. Change the FMEA Worksheet View to show the Causes in place of the Effects. You can see how clear demarcation between Effects and Causes in two separate steps creates less confusion.

Analyze the Risk of each Effect
For the next step of risk assessment, use a specialized View that includes the fields you’ve selected to utilize for risk analysis. For this example, Severity, Occurrence, and Detection values are used to compute RPN values.
You now enter the risk levels for each item in the FMEA Worksheet. In Relyence FMEA, the resulting risk metrics, such as RPN or AP, are automatically computed.

Determine the critical Risks
Using the criteria you established in your FMEA planning stage, go through the Worksheet and determine which items you need to focus on in order to lower overall risk.
In Relyence FMEA, you can define a color-coding system to easily highlight your high-risk items. For example, you may decide that RPN values over 300 should be considered for improvement, and RPN values over 500 must be considered. In this case, you can set all RPN values less than 300 to display in green, values from 300 to 500 to display in yellow, and those above 500 to display in red. This makes it easy to identify your critical risks.

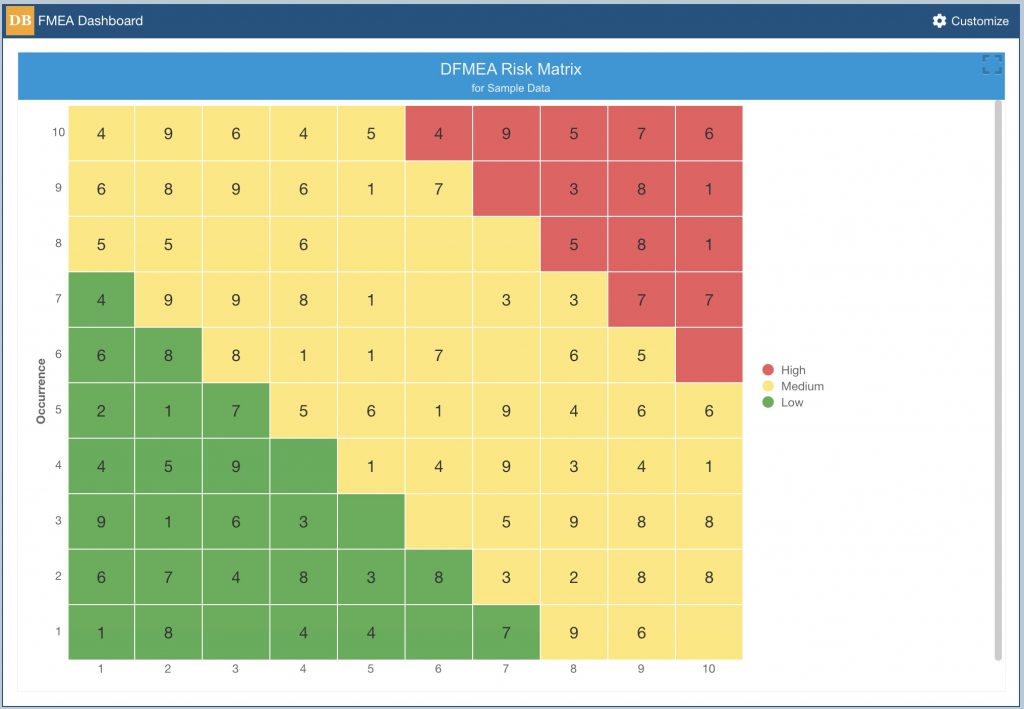
Another method to use as an overview of risk is a Risk Matrix. The Risk Matrix provides a graphical view of the all the items in your FMEA broken down by risk level. A color-coded system is utilized here as well. In Relyence FMEA, you view Risk Matrices in the FMEA Dashboard and drill down to see the associated FMEA items. Additionally, the Risk Matrix can be customized based on your established rules.

Implement an Action Plan
It is now time to consider the ways to eliminate, mitigate, or detect any failures that pose an unacceptable risk.
Change to a more comprehensive View which includes all data needed to describe the Recommended Action Plan, assign team members to each task, establish due dates, and include any other necessary information. In this Worksheet View, it is important to keep all the information from the earlier steps in view for easier action planning.
For this example, the guideline is that RPN values cannot exceed 300. An action plan needs to be developed for all RPNs above this limit.

FMEA Concluding Phase
Re-evaluate Risk Levels
Once the Action Plan has been completed, it is time to reassess the risk level. You can build upon the View used in the prior step by adding additional columns for Revised risk assessment values. In this View, it is helpful to see RPN alongside Revised RPN – that way you can clearly see the results of the action plan!

If your system overall risks are at an acceptable level, the FMEA can be closed out. Otherwise, it is time to go back to the Action Plan step and continue to iterate until risk levels fall into your accepted ranges.
Complete and close out the FMEA
At this time, your FMEA Worksheet is complete. You can see at this stage how the complexity of the FMEA Worksheet has grown from the initial Function-only View! Fortunately, by using the guided approach to FMEA, you have made tackling the FMEA task much more manageable and understandable.
Conclusion
Relyence FMEA was designed and built to ensure the FMEA process is as smooth and efficient as possible. The ability to create and customize Views to support a guided approach to FMEA is just one example of the power of Relyence FMEA.
A well-controlled and easy to follow FMEA process means your FMEAs will be manageable and effective, allowing you to realize all the benefits of this proven analysis technique. Check us out today to see why Relyence FMEA has become the go-to platform for Failure Mode and Effects Analyses!
If you are interested in learning more about Relyence FMEA sign up today for your own no-hassle free trial. Or, feel free to contact us to discuss your needs or schedule a personal demo.


