Relyence FRACAS offers two unique and fully customizable capabilities to enable you to control and monitor your corrective action activities: Approvals and Notifications. You can optionally use either or both of these features and set them up to meet your specific requirements. Used in conjunction with one another, they offer a powerful way to enhance your FRACAS process for your team.
Approvals
Relyence FRACAS supports Approvals as a mechanism for you to control your FRACAS Workflow process. When Approvals are enabled, Incidents or Problems cannot be advanced to the next step in your process until approval is received. You define who is allowed to Approve, as well as Approval Due Dates.
You may optionally enable Approvals for each step in your FRACAS process. For example, you may want an approval process enforced only for the corrective action part of your FRACAS Problem Workflow. Or you may want an approval process enforced for each Workflow step. You can choose how to utilize approvals based on your needs.
The first step is to enable Approvals in Relyence FRACAS. To do this, select Configure>Approvals from the Sidebar menu when Relyence FRACAS is active.
You can enable Approvals for any step of your Incident or Problem Workflow. For example, to enable Approvals for the Corrective Action Workflow Step using the built-in Relyence 8D Problem template, select the Approval Required checkbox for this step of the Workflow in the Problem Approvals tab.
Configuring Your Approvals
You can enter other information as desired on the Approvals tab:
Days to Complete Step: The maximum number of days you expect a team member to complete this step in your process. For example, perhaps you want Step D4: Root Cause to be done within 60 days. In that case, enter “60” for the Days to Complete Step. The default number of days is set to 30. If desired, you can set up Notifications to be sent to the responsible team member based on the Days to Complete Step. For example, if you set up a Notification to occur once the Days to Complete Step has passed, the team member responsible will get notification emails when their task is overdue.
Default Step Responsibility: The name(s) of team members who are responsible for completing the tasks in this Workflow Step. This is optional. You can enter the responsible team members directly on the FRACAS forms if you prefer.
Only Step Responsibility Can Edit: When selected, only the team members with responsibility for this Workflow Step can make changes to the FRACAS data.
Enable Only When Active: When selected, the FRACAS form for the currently active Workflow Step is the only one which can be edited or modified, all other forms for all the other Workflow Steps are disabled. This prevents team members from going to previous or next Workflow Steps and making changes. This setting essentially disables all FRACAS Forms except for the form for the currently active Workflow Step.
Approval Required: Select Approval Required to enable approvals for this Workflow Step.
Days to Approve or Reject: The maximum number of days for the Approver to approve or reject a request for approval. The default number of days is set to 30. If desired, you can set up Notifications to be sent to the Approver based on the Days to Approve or Reject. For example, if you set up a Notification to occur once the Days to Approve or Reject has passed, all permitted Approvers will get notification emails when approval is overdue.
Default Permitted Approvers: The name(s) of team members who are allowed to approve the work for this Workflow Step. This is optional. You can enter the responsible team members directly on the FRACAS forms if you prefer.
Using Approvals
When a Workflow Step has Approvals enabled, the Workflow Step section of the FRACAS form includes the Approval controls. If an approval is necessary for the Workflow Step, you cannot move to the next Step in your process until the approval has been received.
Once the task for the process Workflow Step is complete, click the Request Approval button on the form.
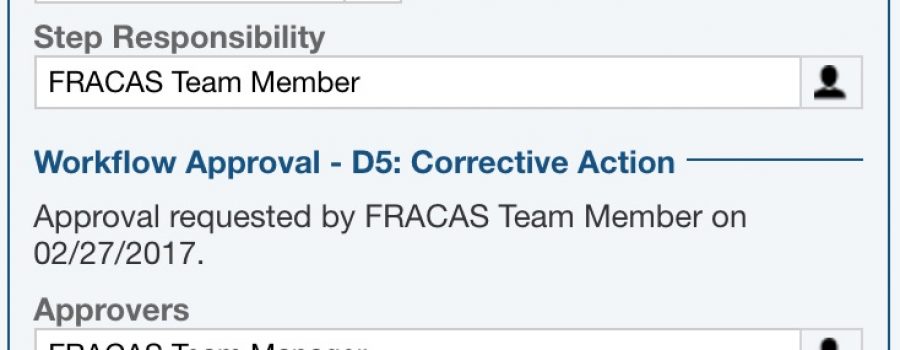
The approval request is noted in the Workflow Step box along with the Team Member requesting approval and the date approval was requested. The names of the Default Approvers you specified in Approval setup are filled in automatically in the Approvers field. To modify or add to this list, click the Team button to the right of the Approvers field to bring up the Team Members dialog and select from the list. The Approval Due Date is filled in based on the default setting specified in Approval setup. You can modify the Approval Due Date if you desire.
Once an Approval has been requested, a permitted Approver is required to either approve or reject the Incident or Problem. When a permitted Approver is signed in, the Incident or Problem requiring approval appears with Approve and Reject buttons.
Upon review, if the request needs to be rejected, click the Reject button. Enter the reason for the rejection in the Reject dialog.
If the request can be approved, click the Approve button. The Workflow Step is automatically advanced to the next step in your FRACAS Workflow.
Notifications
You can set up a variety of Notifications to be sent to team members to update them about events in your FRACAS process. Notifications are an important element in keeping team members informed about events that occurred, upcoming due dates, overdue actions, etc. You can customize Notifications completely to your requirements.
To set up Notifications, select Configure>Notifications from the Sidebar menu when Relyence FRACAS is active.
You can add Notifications based on Incidents and/or Problems. For example, to add a Notification related to the close out of a Problem going through an 8D Problem Workflow process, click the Problem Notifications tab to activate it, select the D8: Closure tab, and click the Insert button on the toolbar.
Configuring Your Notifications
Add the information as required to define the Notification in the Edit Notification dialog:
Inactive: If selected, the Notification is disabled, and no emails will be sent. If cleared, the Notification will be processed and emails will be sent.
Type: Select the type of Notification from the list of choices:
- Workflow Step – On Change: Send a Notification when the Workflow Step either advances or regresses to another Workflow Step.
- Workflow Step – Recurring: Send Notifications on a recurring basis depending upon scheduling selections.
- Approval – On Approval: Send a Notification when an Incident or Problem is approved.
- Approval – On Rejection: Send a Notification when an Incident or Problem is rejected.
- Approval – On Request: Send a Notification when approval is requested.
- Approval – Recurring: Send Notifications on a recurring basis depending upon scheduling selections.
Description: Enter a description of this Notification. This is optional and is for informational purposes only.
The following fields appear for recurring Notifications only:
- Start: Enter the number of days and choose either before or after the due date you want the Notifications to occur.
- Frequency: Select the frequency you want the Notifications to occur: once, daily, every 2 days, weekly, every 2 weeks, or monthly.
- Stop on Due Date: Select this checkbox if you want Notifications to end once the due date is reached.
To: Click in the To field and select from the list of choices to designate Notification recipients.
Subject: Enter the text you want to appear in the subject line of the Notification email. Use the Data Field dropdown to add a FRACAS data field to the subject line.
Body: Enter the text to appear in the body of the email Notification. The toolbar formatting buttons allow you to format the email body text however you would like. You can use the Link button to add a web link to the body of the email. The team member receiving the email can click this link to be taken directly to the Incident or Problem in Relyence FRACAS. Use the Data Field dropdown to add a FRACAS data field to your Notification.
You can click the Send Test Email button to test out your Notification if you desire.
Notification Logging
Relyence FRACAS can also log all Notifications processed. To enable Notification logging, select your Analysis Name from the Sidebar menu and click Properties. On the Analysis Properties dialog select the Log notifications checkbox under the Settings heading and then click Save.
You can then review the logs of Notifications by clicking the Notifications Log button in the toolbar.
Relyence FRACAS
Relyence FRACAS fully supports both CAPA and FRACAS processes. It offers a completely customizable robust platform for tracking and managing your corrective and preventive action process. It includes out-of-the-box support for the most widely accepted process methodologies, including 8D, DMAIC, and PDCA. You can tailor these, or create your own completely unique process. Your own particular FRACAS process may have unique needs and requirements for approvals and notifications. We are happy to offer assistance and guidance in setting up your protocols. You can also engage our implementation team to design and set up your approvals and notifications for you. Feel free to contact our team to discuss your project.
For more information feel free to schedule your own personal webinar or you can sign up today for a free trial.


